
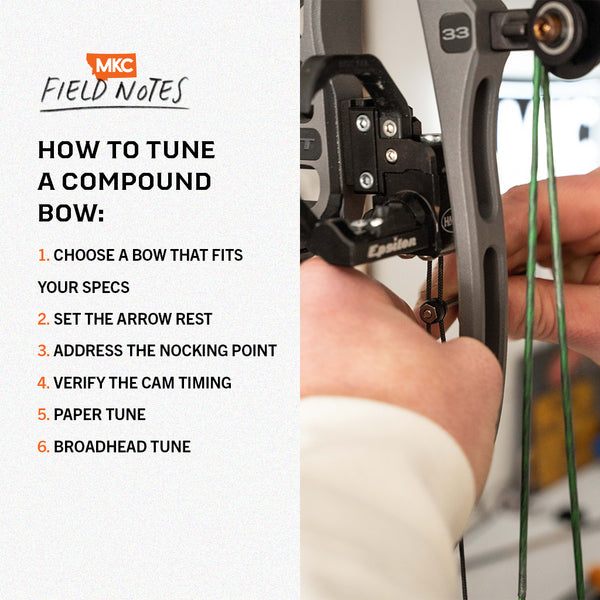
How to Tune a Bow: Step-by-Step Guide
Nothing ruins confidence in the field like an arrow that veers off course. If your broadheads do not group with field points or your shots feel inconsistent, the problem is not always your form. It is likely your bow needs tuning. How to tune a bow is a critical skill for every archer, especially hunters who demand precision at extreme angles and distances. A properly tuned bow ensures arrows fly straight, penetrate deeply, and hit exactly where you aim.
Tuning aligns your bow, arrow, rest, and cams so the arrow launches cleanly along the centerline. This minimizes fishtailing, porpoising, and fletching contact. It is not a one-time job. String stretch, temperature changes, and gear adjustments all affect tune. This guide walks you through every step, from foundational setup to advanced verification, using proven methods like paper tuning, bare shaft testing, and walk-back tuning.
Set Up Your Bow Correctly Before Tuning
Before any tuning begins, your bow must be assembled and configured exactly as it will be used in the field. Too many archers tune with stabilizers off or quivers missing, only to lose accuracy when they add gear later.
Mount your sight, stabilizers, quiver, and dampengers. These accessories shift the bow is center of gravity and can cause limb torque or rest misalignment if added post-tune. Use a bow vise like the OMP Versa-Cradle to secure the riser during adjustments. Then verify three core elements: arrow spine, nocking point, and cam timing.
Arrow spine must match your draw weight, draw length, point weight, and total arrow length. Use manufacturer charts or software like Archer is Advantage to select the right shaft. When in doubt, choose a stiffer spine. Being over-spined is forgiving. Under-spined arrows wobble and destabilize quickly.
Check that your rest is centered at approximately 13/16 inches from the riser edge and the nocking point is set so the arrow shaft sits 90 degrees to the string. Use a business card as a quick angle guide. If you are using a drop-away rest, ensure it drops just after release. Too early or too late causes fletching drag.
Verify Cam Timing and Synchronization
Out-of-sync cams cause uneven energy transfer and erratic arrow flight. On most compound bows, timing marks like dots, lines, or holes on the cams should align at full draw.
Draw the bow slowly and watch. Both draw stops should contact limbs or cables simultaneously. If the top cam hits first, twist the bottom cam cable or untwist the top. If the bottom leads, do the opposite. You can also adjust the string. Removing twists slows the leading cam. Adding twists speeds it up.
Use a bow press like the Last Chance EZ Green to safely access cables. After each adjustment, recheck axle-to-axle length and brace height. On bows with limb-shift tech, use built-in alignment features instead of moving the rest.
Adjust Brace Height and ATA Length
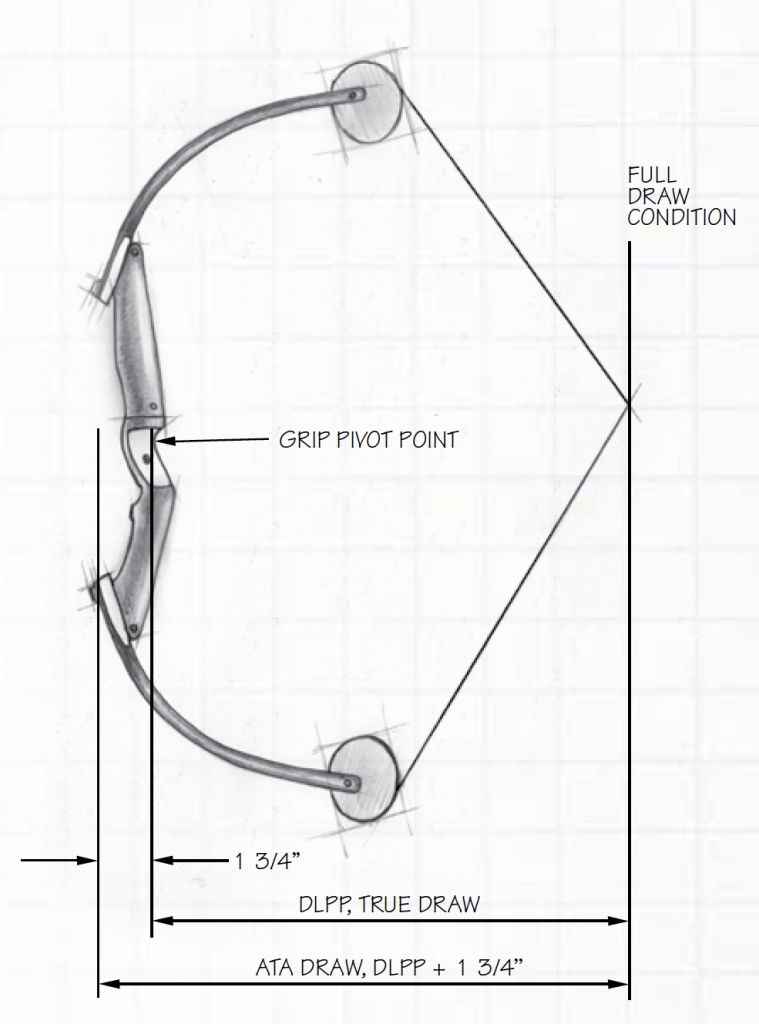
Brace height and axle-to-axle length are foundational settings that affect speed, forgiveness, and noise. ATA is measured from the center of the top cam axle to the bottom cam axle on the shelf side. It must match the manufacturer is spec. Deviations indicate incorrect string or cable twist.
Brace height, the distance from the deepest part of the grip to the string, affects performance this way. Shorter brace height means faster but less forgiving. Longer brace height means slower but more forgiving.
To adjust brace height, twist up cables to decrease ATA and increase brace height. Untwist cables to increase ATA and decrease brace height. Twist the string for a minor effect on both. For balance, add 3 twists to cables for every 1 twist to the string. After each change, verify draw weight with a scale like the OMP Accu-Arrow Digital Scale. Even small adjustments can alter poundage by several pounds.
Find the Sweet Spot on Traditional Bows
For recurves and longbows, brace height is tuned by twisting or untwisting the string. Start at the manufacturer is recommendation, often called fist mele, which means a clenched fist with thumb extended.
String the bow and shoot a few arrows. Then adjust the string in 3-twist increments, shooting between changes. Listen for the quietest shot. This is the sweet spot where vibration and noise are minimized. This is your optimal brace height.
Use a blow dryer or leave the bow strung overnight to settle new strings. Traditional bows are sensitive to tiller, which is the difference in string-to-limb distance between top and bottom. Tiller is usually set 1/8 inch to 3/8 inch higher on the top limb. Only adjust tiller if you suspect damage or extreme imbalance.
Paper Tune for Clean Arrow Flight

Paper tuning is the gold standard for diagnosing arrow flight. It reveals vertical and horizontal inconsistencies that grouping alone cannot detect. Set up a frame with painter is tape or tracing paper 4 to 8 feet from the shooting line. Shoot through it into a safe backstop. The goal is a bullet hole, a clean round tear the size of the arrow shaft with vanes tearing outward evenly.
Vertical tears indicate up/down misalignment. If the nock is high with the tail low, the rest is too low or the nock point is too high. Raise the rest or lower the nocking point. If the nock is low with the tail high, the rest is too high or the nock point is too low. Lower the rest or raise the nocking point.
If vertical issues persist, check cam rotation. A top cam under-rotated can cause nock-high flight. Add twist to the top cam cable.
Horizontal tears point to spine or rest alignment issues. If the tail is left for a right-handed shooter, the rest is too far right or the arrow spine is too weak. Move the rest left or stiffen the spine. If the tail is right, the rest is too far left or the spine is too stiff. Move the rest right or weaken the spine.
Make micro-adjustments, 1/16 inch at a time. After each change, retest. For more sensitivity, shoot bare shafts, arrows without vanes. Since vanes self-correct flight, bare shafts expose true oscillation. Apply foot powder to fletchings to detect contact. If powder marks appear on the rest or cables, rotate the nock 90 degrees or adjust rest height.
Perform Bare Shaft and Broadhead Tuning
Once paper tuning yields a clean bullet hole, move to bare shaft tuning, the most accurate method for final verification. Shoot a fletched arrow and bare shaft at the same dot from 20 to 30 yards. They should impact together.
If the bare shaft hits right of the fletched arrow for a right-handed shooter, the arrow is acting weak. Either the spine is too stiff or the rest is too far left. If the bare shaft hits left, the spine is too weak or the rest is too far right.
Use the following adjustments to correct bare shaft impacts. If the bare shaft is left, move the rest left or move the cams right. If it is right, move the rest right or move the cams left. If it is high, move the rest down or twist the top cam cable. If it is low, move the rest up or twist the bottom cam cable.
Test Broadhead Flight
Shoot fixed-blade broadheads and field points at 20 yards. They should group together. If broadheads fly left, move the rest left. If high, lower the rest or twist the top cam cable. Mechanical broadheads are more forgiving and often group tighter with field points.
Ensure blades are aligned with fletchings to reduce drag. Check for bent ferrules or damaged blades. These cause flight issues even on a perfectly tuned bow.
Use French and Walk-Back Tuning
French Tune for Fast Alignment
French tuning quickly validates left/right consistency across distances. Set the target at 3 yards. Aim with your 50-yard pin and adjust sight until arrows hit center. Move to 50 yards and shoot again. If arrows drift left, move the rest right. If right, move the rest left. Recheck at 3 yards and repeat until centered at both distances.
This method bypasses long walks and is ideal for backyard tuning.
Walk-Back Tune for Vertical Consistency
Walk-back tuning confirms your bow shoots straight across distances. Sight in your top pin at 10 to 20 yards. Place vertical tape on the target. Shoot the same aiming point at 10, 20, 30, up to 60 yards. Arrows should form a straight vertical line.
If they drift left, move the rest right. If they arc, check cam timing or nock pinch. This test exposes subtle misalignments that paper tuning might miss.
Set 2nd and 3rd Axis on Your Sight
Even a perfectly tuned bow can miss due to sight cant. Second and third axis adjustments fix this.
Fix 2nd Axis Tilt
Second axis is side-to-side tilt of the sight housing. If your bow tips when leveled, your sight must compensate. Use a bow-mounted level. At full draw, the bubble should be centered. If not, rotate the sight housing until it is. This prevents left/right misses on sidehill shots.
Align 3rd Axis for Angled Shots
Third axis is the sight is rotation toward or away from you at full draw. Misalignment causes elevation errors on uphill/downhill shots.
To adjust, draw the bow fully. Use a level on the sight is windage bar. Rotate the 3rd axis knob until the bubble is level, perpendicular to your line of sight. This is crucial for mountain hunters who shoot steep angles.
Troubleshoot Common Flight Issues
Stop Nock Pinch and String Contact
If the arrow is nock lifts off the rest when drawn without the point touching, you have nock pinch. Add a nock set below the nock to hold it down.
If the nock binds on the string, try a different nock size or serving diameter. Tight nocks cause inconsistent release and poor flight.
Eliminate Fletching Contact
Symptoms include noisy shots, erratic grouping, or vane damage. Diagnose with foot powder on fletchings. Shoot through paper. Contact marks show where vanes hit the rest or cables.
Fix by rotating the nock, adjusting rest height or position, using lower-profile vanes like 0.010 inch thickness, or installing a drop-away rest. Drop-aways eliminate contact but require proper timing. Set to drop just after release.
Final Verification and Field Readiness
After tuning, confirm performance under real conditions. Shoot through paper from 12 feet and 10 yards to catch minor torquing. Group fletched arrows at 20, 30, and 40 yards. Test broadheads at 20 and 50 yards. Check peep alignment at full draw. Your eye, peep, and sight pin should line up cleanly at hunting distance.
Post-tuning maintenance matters. Recheck brace height before every hunt because strings stretch over time. Inspect strings and cables every 500 shots for fraying or serving separation. Clean and wax strings to extend life. Re-tune mid-season if you change arrows, rests, or shooting form.
Mark your best-performing arrow and broadhead combo with the number 1 for confidence in the field.
Frequently Asked Questions About How to Tune a Bow
What is the first step in tuning a bow?
The first step is setting up your bow exactly as you will use it in the field. This means mounting all accessories including the sight, stabilizers, quiver, and dampengers. Verify arrow spine matches your draw weight and length, then check that your rest is centered and the nocking point is set at 90 degrees to the string.
How do I know if my bow needs tuning?
Signs your bow needs tuning include arrows grouping inconsistently, broadheads not hitting where field points do, noisy shots, and arrows that veer left or right unexpectedly. Paper tuning reveals these issues by showing tear patterns that indicate specific alignment problems.
What is paper tuning and how do I do it?
Paper tuning involves shooting an arrow through paper stretched on a frame to analyze the tear pattern. A clean bullet hole means good tune. Tears indicate vertical or horizontal issues. Vertical tears mean rest height or nock point is off. Horizontal tears mean rest position or arrow spine is incorrect.
How often should I re-tune my bow?
Re-tune your bow after the first 500 to 1000 shots when strings stretch during break-in. Re-check before every hunting season. Also re-tune if you change arrows, rests, shooting form, or notice any changes in accuracy.
Can I tune a bow without expensive equipment?
Yes, you can tune a bow at home with basic tools. Essential items include a bow vise, arrow scale, and paper tuning stand. Advanced methods like bare shaft testing and walk-back tuning require only a target and measured distances. Many archers achieve excellent results with minimal investment.
What is the difference between tuning a compound bow and a recurve?
Compound bows use cams and adjustable rests, requiring cam timing checks and precise rest positioning. Recurves and longbows rely on brace height adjustment through string twisting and tiller settings. Both benefit from paper tuning and bare shaft testing to verify arrow flight.
Key Takeaways for Tuning Your Bow
A well-tuned bow delivers consistent accuracy, optimal penetration, and quiet operation. The process starts with proper bow setup, verifying arrow spine, and checking cam timing. Paper tuning reveals flight issues, while bare shaft testing confirms spine alignment. Walk-back and French tuning validate consistency across distances.
Remember these critical points. Match arrow spine to your bow is specifications. Use micro-adjustments, moving the rest just 1/16 inch at a time. Test broadheads against field points before hunting season. Re-check brace height before every hunt because strings stretch over time.
Take action now. Set up your bow, run paper tests, and make your first adjustments. A properly tuned bow means confident shots and ethical kills in the field.


