How to Use a Compound Bow: Quick Steps
You’ve got a compound bow in your hands, but hitting consistent bullseyes feels out of reach. Maybe your arrows scatter randomly, your form breaks down under pressure, or you’re not sure how to even start. The truth? Most beginners struggle not because they lack skill, but because they skip the fundamentals. Learning how to use a compound bow isn’t about raw strength. It is about precision, repeatability, and technique. This guide breaks down every step from stance to follow through using proven methods from elite archers. You will learn how to set up your bow correctly, anchor consistently, choose the right release style, and practice like a pro.
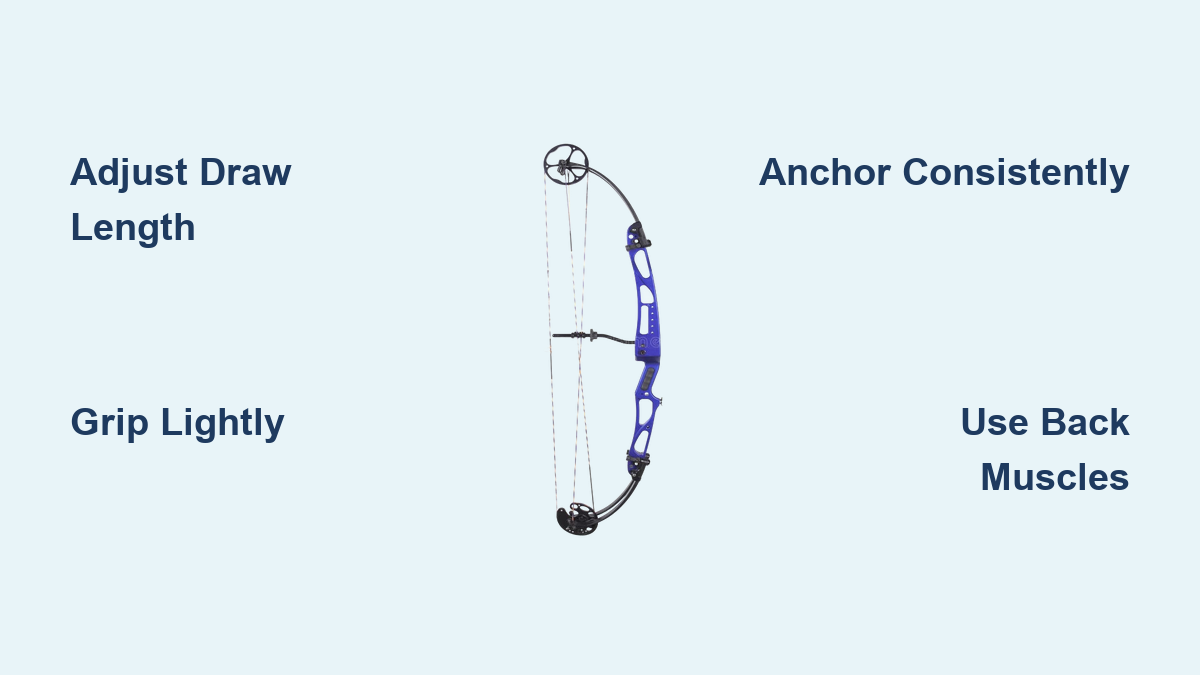
Set Up Your Bow for Your Body

Before you shoot, your bow must fit you. A poorly adjusted compound bow causes inconsistency, fatigue, and even injury.
Adjust Draw Length First
Your draw length determines how far you pull the string. If it is wrong, your anchor point floats and accuracy suffers. Most adult archers need 25 to 29 inches. To find yours, stand with arms outstretched like a T. Measure fingertip to fingertip in inches. Divide by 2.5 and subtract 2. For example, 70 inches divided by 2.5 equals 28 minus 2 equals 26 inches draw length. Modern bows let you adjust draw length via cam modules. Always verify at a pro shop, especially before buying.
Choose the Right Draw Weight
Peak draw weight should challenge you but not exhaust you. For hunting, pick a weight you can hold at full draw for 30 seconds without shaking. Most beginners start at 50 to 60 lbs. Use the 80% let-off to your advantage. A 60-lb bow with 80% let-off only requires 12 lbs to hold.
Pro Tip: If drawing feels too hard, lower the weight. Form matters more than power.
Install Essential Accessories
A bare bow will not shoot accurately. You need a peep sight on the string for alignment. You need a bow sight with adjustable pins. You need an arrow rest to support the shaft. You need a D-loop for a clean release. You need a release aid connected to the D-loop. Beginners should buy a ready-to-shoot package. These come pre-tuned and include all critical gear.
Adopt a Stable Shooting Stance
Your stance is the foundation of every shot. A weak base leads to inconsistent form and poor accuracy.
Position Feet Shoulder-Width Apart
Stand with feet hip to shoulder-width apart, perpendicular to the target. Turn toes slightly outward for balance. Distribute weight evenly, leaning slightly forward about 60% on your front foot to prevent rocking backward when drawing.
Pro Tip: Trace your ideal stance on cardboard. Use it as a template during practice for perfect consistency.
Maintain Athletic Posture
Bend your knees slightly. Lean forward from the hips, not the waist. Keep your back straight and head upright. Think of it like a golf or tennis stance. Balanced, ready to move, but grounded. Avoid locking your knees or craning your neck forward. Stay relaxed and alert.
Nock the Arrow Correctly
One of the most overlooked steps. Nocking properly prevents misfires and dry fires.
Click It Into Place
Place the arrow on the rest and push the nock onto the string until you hear and feel a distinct click. This ensures the arrow is securely engaged with the string loop. Check that the cock feather or index vane faces away from the riser. It is usually marked by a different color.
Warning: Never skip this check. A loose arrow can fall off or cause dangerous malfunctions.
Grip the Bow Lightly
How you hold the bow directly affects arrow flight. A tight grip introduces torque, making arrows veer left or right.
Use the Heel of Your Hand
Place the grip in the thenar eminence, the fleshy pad at the base of your thumb. Let the bow rest naturally. Do not squeeze. Your fingers should curl loosely under the shelf. Favor the thumb side of the grip to prevent soft-tissue pressure that shifts shot direction.
Watch for White Knuckles
If your knuckles turn white, you are gripping too hard. A proper grip feels like holding a bird. Firm enough not to drop it, but gentle enough not to crush it.
Draw Smoothly Using Back Muscles
Drawing is not an arm exercise. It is a back movement. Use your scapular muscles to pull the string straight back.
Engage Your Shoulder Blades
Attach your release aid to the D-loop. Begin pulling by squeezing your rear shoulder blade toward your spine. Imagine closing a barn door behind you. Keep both shoulders level. Avoid shrugging or leading with your elbow.
Use the Mirror Principle
As you draw, bow hand thumb should be up at a 45-degree angle. Release hand thumb should be down at a 45-degree angle. This symmetry keeps your draw path straight and balanced. If the bow feels too heavy, reduce draw weight. Smooth beats strong.
Anchor Consistently Every Time
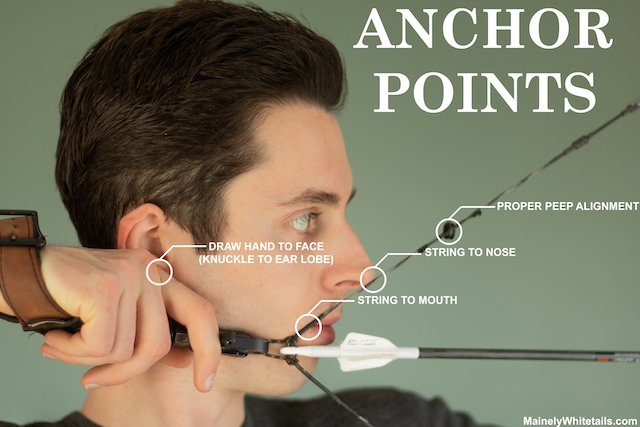
An inconsistent anchor ruins accuracy. You need three points of contact that never change.
Find Your Primary Anchor
Pull the string back until your release hand touches a fixed spot on your face. Most commonly, this is the corner of the mouth, under the jawbone, or against the cheekbone. Many archers use the jawbone between index and middle fingers as a tactile reference.
Add Secondary and Tertiary Points
The string should touch the tip of your nose to ensure consistent head tilt. The peep sight should be aligned with the front sight for aiming. The hand position on the release aid should be identical each time.
Align the Peep Sight Perfectly
Your peep sight is the rear sight of your aiming system. Misalignment causes major errors.
Rotate for Clear View
Twist the peep ring so it lines up naturally between your eye and the front sight. It should sit at the edge of your vision, not forced into the center. Once set, mark its position with dental floss or a drop of super glue to prevent rotation.
Visual Cue: When anchored, you should see a clean, round view through the peep with the front pin centered. If you cannot see through it, adjust peep height on the string or check draw length.
Aim with Focus on the Target
Aiming is simple, but only if you train your focus correctly.
Align Peep, Pin, and Target
With your peep sight aligned, center the front sight pin on the target. But here is the key. Focus on the target, not the pin. Your brain will naturally correct minor pin movement if your eye is locked on the bullseye.
Use magnified sights for long-range precision. Multi-pin setups help hunters quickly switch between distances.
Avoid Target Panic
Staring too hard at the pin causes target panic, a flinch or jerking release. Train your mind to stay relaxed and let the shot happen.
Choose the Right Release Method
Your release style defines your shooting personality. Pick one based on your goals.
Command-Style for Hunters
Used by most bowhunters. You consciously press the trigger when the pin crosses the target. Why it works. Fast decisions in real-time hunting scenarios. Less prone to flinching. Easier to learn.
Steps for command-style release. Slow the pin movement with steady back tension. Lightly rest finger on trigger. Fire the moment the pin drifts over the center. Do not wait for perfect stillness. Visualize success before each shot. Best with index-trigger releases.
Surprise Release for 3D Competitors
Preferred by 3D shooters. You gradually squeeze until the shot breaks unexpectedly. How to master it. Float the pin over the target. Shift mental focus entirely to the bullseye. Let the release fire on its own.
Use thumb or hinge releases for cleaner surprise breaks. Practice by closing your eyes during draw and release. This builds trust in muscle memory.
Back Tension for Elite Accuracy
Used in high-level competition. The release fires when back muscles apply enough pressure. No finger involvement.
Three-week training plan. Week one. Stand 2 to 3 feet from target. Draw, close eyes, squeeze shoulder blades. Fire with back only. Repeat 20 times daily. Week two. Shoot 30 to 40 arrows at 15 to 20 yards. End with close-range, eyes-closed drills. Week three. Extend to 25 to 30 yards. Focus on burning the pin into the target.
Requires discipline. Best for serious competitors.
Follow Through Like a Pro
Your shot is not over when the arrow leaves. Premature movement ruins accuracy.
Hold Your Position
After release, keep bow arm extended toward target. Keep release hand pulled back to anchor. Keep body still for 1 to 2 seconds.
Avoid dropping the bow arm. Avoid snatching the trigger. Avoid flinching or leaning. Let the bow fall naturally into your bow hand. Thanks to a correct grip and relaxed hold, this happens automatically.
Practice Smart: Drills That Build Consistency
Repetition without purpose leads to bad habits. Train with intention.
Shoot at Multiple Distances
Practice at 10, 20, 30, 40 yards to build range confidence. Mark known distances in your backyard or range. Use sight tapes or multiple pins for quick adjustments.
Simulate Real-World Conditions
Kneel, sit, or shoot off uneven ground. Practice drawing in cold weather. This mimics treestand hunts. Have a friend yell or clap during aiming to simulate adrenaline.
Heart-Rate Drill: Do 20 jumping jacks, then shoot immediately. Teaches control under stress.
Track Your Groups
Fire 5 or more arrows at the same point of aim. If groups exceed 2 inches, fix form, not the sight. Only adjust your sight after confirming consistency.
Maintain Safety and Equipment
A well-maintained bow performs better and lasts longer.
Never Dry-Fire
Firing without an arrow can destroy limbs, cams, and strings. Always double-check before releasing.
Inspect Before Every Session
Check strings and cables for fraying. Ensure D-loop, rest, and sight are secure. Confirm arrows are straight and undamaged. Wax strings every 3 to 6 months, more often in dry climates.
Store Properly
Keep your bow in a dry, temperature-stable place. Avoid extreme heat or cold, which can warp limbs and degrade materials.
Troubleshoot Common Problems
Even perfect form can fail if equipment is not tuned.
Arrows Grouping High or Low?
Likely a nock point issue. Adjust up or down in 1/16-inch increments.
Arrows Drifting Left or Right?
Could be rest misalignment. Could be cam timing off. Could be grip torque. Check rest centering first. Then inspect cam sync. If one limb lags, timing is off.
Inconsistent Groups?
Rule out form errors before blaming gear. Check for inconsistent anchor. Check for tight grip. Check for poor follow-through. Shoot with eyes closed to test repeatability.
Frequently Asked Questions About Using a Compound Bow
What is the ideal draw length for a beginner?
Most adult archers need a draw length between 25 and 29 inches. To find yours, measure your wingspan from fingertip to fingertip, divide by 2.5, and subtract 2. Have a professional at a pro shop verify this measurement before shooting.
How much draw weight should a beginner use?
Most beginners start with 50 to 60 lbs peak draw weight. The key is choosing a weight you can hold at full draw for 30 seconds without shaking. With 80% let-off, a 60-lb bow only requires 12 lbs to hold at full draw.
What release method is best for hunting?
Command-style release is best for hunting. You consciously press the trigger when the sight pin crosses the target. This method allows fast decisions in real-time scenarios and is less prone to target panic.
Can I use a compound bow for target competition?
Yes. Compound bows are used in Paralympic Games, World Archery Championships, World Cup events, World Games, 3D archery, field archery, and indoor target competitions. Target distance is typically 50 meters with an 80-cm target face.
How often should I wax my bowstring?
Wax strings every 3 to 6 months. In dry climates, wax more frequently. Regular waxing extends string life and maintains performance.
What happens if I dry-fire my compound bow?
Dry-firing can cause catastrophic damage to limbs, cams, and strings. The energy has nowhere to go, so it destroys the bow. Always ensure an arrow is nocked before releasing.
Key Takeaways for Mastering Your Compound Bow
Mastering how to use a compound bow takes time, but every expert started where you are now. Focus on consistency, not perfection. Set up your bow to fit your body with correct draw length and weight. Anchor the same way every time using three points of contact. Choose a release method that matches your goals, whether command-style for hunting or surprise release for competition. Practice under pressure with drills that simulate real-world conditions.
With the right fundamentals, you will see steady improvement. Tighter groups, cleaner releases, and more confidence in the field await. The compound bow is a precision tool. Treat it like one, and it will deliver.