
How to Use a Bow Drill: Step-by-Step Guide
Imagine being deep in the woods with no matches, no lighter, just you and the raw will to survive. You kneel on the forest floor, assemble a simple tool from natural materials, and within minutes, a glowing ember sparks to life. That fire was born from friction, focus, and skill. The bow drill is one of humanity’s oldest fire-making methods, and mastering it means mastering self-reliance.
Using a bow drill is not just about spinning wood. It is about understanding balance, pressure, rhythm, and material science. When done right, you can start a fire in under a minute. When done wrong, you will get smoke, frustration, and nothing else. This guide breaks down exactly how to use a bow drill, step by step, using proven methods and field-tested materials.
Gather and Prepare Your Components
Every successful bow drill fire starts with properly made parts. No amount of technique can overcome poor materials. Each component must be compatible, dry, and well-shaped.
Select the Correct Drill Wood
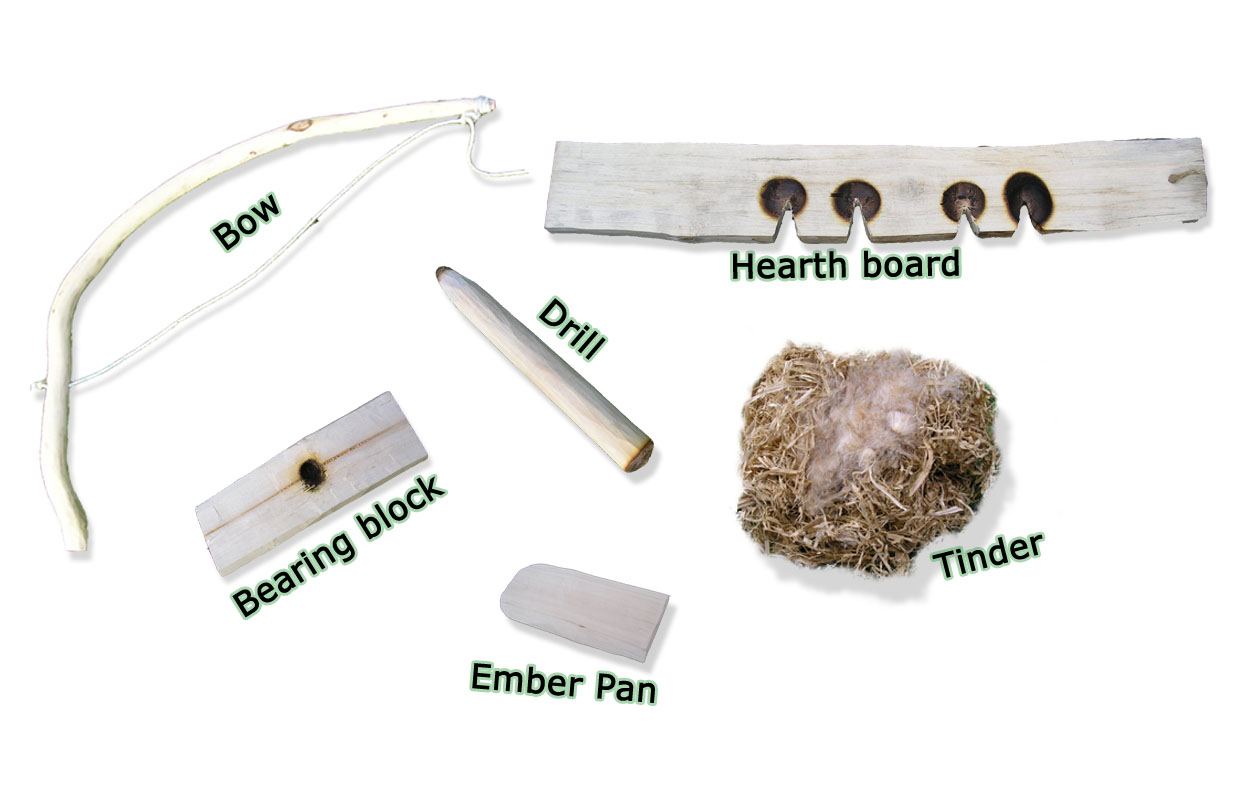
The spindle rotates against the hearth board to create heat. It must be straight, dry, and made from softwood.
Best species include lime (basswood), willow, sycamore, cottonwood, hazel, silver birch, ash, cedar, mulberry, and elder. Avoid green, damp, or pressure-treated wood. The ideal dimensions are 15 to 30 centimeters long and 10 to 20 millimeters thick (thumb-width ideal). Shape the bottom blunt for maximum contact and taper the top to fit the bearing block.
A thinner spindle (10 to 12 millimeters) focuses heat faster and can even dry slightly moist wood during use.
Always use indoor-stored, bone-dry wood, ideally aged six months or more.
Prepare a Functional Hearth Board
The hearth board holds the notch where the ember forms. It should be slightly softer than the drill.
The board should measure 25 to 30 centimeters long, 4 to 7 centimeters wide, and 15 to 20 millimeters thick. Effective material pairings include lime with lime, willow with willow, cottonwood with cottonwood, and hazel with ash or silver birch.
Cut the notch from the edge of the depression to the board’s side. The width should be approximately one-eighth of the drill diameter (about 3 millimeters), shaped as a V-cut or clean straight line.
Using an ember pan (a thin piece of bark, leaf, or cardboard) under the notch catches the fragile ember safely.
Craft a Stiff, Effective Bow
Your bow drives rotation. It is not a hunting weapon. It needs rigidity, not flexibility.
The bow should be 60 to 85 centimeters long (armpit to fingertip is ideal). Use a dead-standing hardwood branch, broom handle, or cedar. Avoid springy wood because it reduces efficiency and causes slippage. Longer bows allow longer strokes, increasing rotational momentum.
Smooth the edges for comfort, but prioritize function over aesthetics.
Use High-Grip Cordage
The string transfers motion from bow to drill. Slippage kills momentum.
Top choices include nylon pull-start cord (from weed eater or lawn mower), leather shoelace (better grip than paracord), sisal or jute (natural, high friction), and paracord (strong but slippery, double-wrap if used).
Wrap the cord once (single wrap) for speed, or twice for beginner control. Maintain slight slack so tension increases when drilling begins. Use an adjustable knot like an overhand or slip knot to fine-tune tightness.
Select a Durable Bearing Block
The bearing block holds the top of the spindle under pressure. It must resist heat and wear.
Materials include hardwood (yew, holly, oak, ash), stone or shell (limpet shell, concave rock), bone, antler, or metal (bottle cap, socket). The socket must be deep enough to cradle the spindle tip and prevent slippage. A beveled edge helps center the spindle.
Insert a green ivy leaf (not poison ivy) into the socket as a natural lubricant to reduce friction.
Prepare Ultra-Dry Tinder
Without good tinder, even a perfect ember dies.
Ideal tinder has fluffy, fine fibers, is bone-dry, and has high surface area. Natural options include basswood or clematis bark (shredded), thistledown, reedmace fluff, willowherb down, dry grass, pine needles (fully dry), bracken fern, and amadou (Fomes fomentarius fungus). Modern alternatives include dryer lint and cotton balls with petroleum jelly.
Prepare tinder by buffing fibers between palms to create fluff. Form a bird’s nest shape (fist-sized) with outer structure and a soft center. Include an ember extender like thistledown in the core. Make more than you think you need.
Store tinder in a dry pocket or sealed bag. Warm damp tinder against your body before use.
Assemble the System Correctly
Even perfect components fail if assembled wrong. Alignment and setup are critical to success.
Secure the Hearth Board
Place the board flat on the ground. Pin it under the ball of your foot to keep it stable without blocking the notch. Avoid stepping on the notch side. Position the ember pan beneath the notch to catch the ember.
Attach the Drill to the Bow
Loop the cord around the drill once (single wrap) for efficiency, or twice for beginners needing more control. Ensure the loop is on the outside of the bow to prevent slippage. Twist the drill into the string so it rotates freely but stays seated.
Create the Initial Impression
Press the drill into the hearth board’s center. Rotate slowly by hand to burn a circular depression. This guides the drill and prevents wandering. After burn-in, cut the notch from the edge of the depression to the board’s side.
A clean, sharp notch ensures efficient ember collection.
Apply Proper Drilling Technique
Success depends on pressure, rhythm, and stability, not brute force.
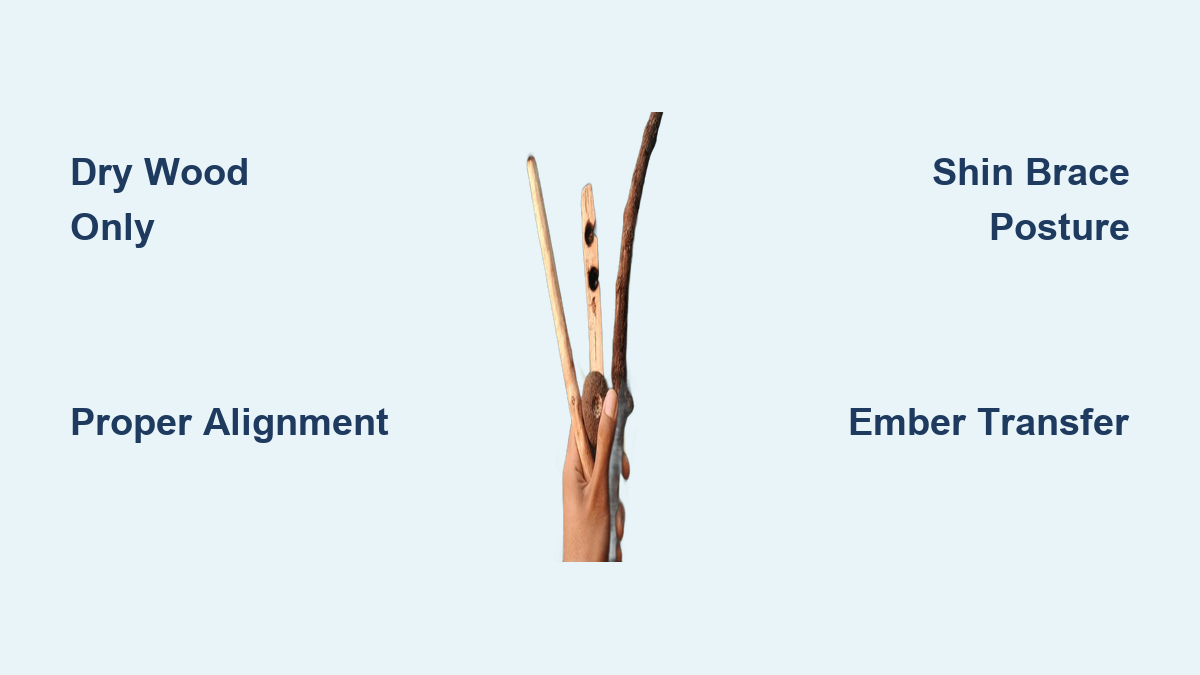
Adopt the Shin Brace Posture
Sit or kneel with your back straight. Place the hearth board under the ball of your foot. Press the bearing block against your shin (shin brace technique). This locks your top hand in place, maintains alignment, and reduces fatigue. Your elbow can press against your knee for extra stability.
Your non-dominant hand holds the bearing block while your dominant hand grips the bow.
Use Full-Length, Smooth Strokes
Start slowly to seat the drill. Gradually increase speed using the entire bow length. Apply firm, consistent downward pressure through the bearing block. Maintain steady rhythm without jerking or rushing.
Keep the spindle stable because heat must accumulate in one spot.
Pressure Guidelines
Too light pressure polishes the wood and produces no dust. Too heavy pressure causes binding or breakage. The right amount produces dark, powdery dust without stalling rotation.
Speed and Rhythm
Smooth motion matters more than fast motion. Consistent strokes allow heat to build in one location. Use long strokes to maximize rotations per pull.
Recognize Ember Formation
Knowing when to stop drilling is as important as how you drill.
Watch for Smoke and Dust
| Stage | Signs |
|---|---|
| 0 to 60 seconds | Thin smoke appears |
| 1 to 2 minutes | Thick, continuous smoke; dark charcoal dust |
| Late stage | Dust pile glows faint orange in low light |
| Ready | Ember smolders independently after pressure release |
Look for a small nugget of smoldering dust. That is your ember.
Test for Readiness
Stop drilling briefly. If the dust keeps smoking, it is likely ready. Gently lift the drill to inspect the notch. A slight tilt toward the notch once the dust is hot may help ignite the coal.
Transfer the Ember Safely
One wrong move can destroy a perfect ember.
Lift and Slide the Ember
Stop drilling when the ember is visible. Carefully lift the drill away. Lift the hearth board gently to expose the ember. Slide or tap the ember onto the ember pan (bark, leaf, or cardboard). Transfer it directly into the center of the tinder bundle’s fluffiest part.
Use a thin flat object under the notch to make pickup easier.
Blow the Tinder into Flame
Airflow ignites the ember, but too much moisture or force kills it.
Use Gentle, Controlled Blowing
Hold the bundle close to your mouth. Do not blow directly because moisture from your breath can extinguish the ember. Enclose the bundle with your hands to concentrate airflow. Blow gently and steadily through pursed lips. Start with long, light breaths and increase as the glow strengthens.
Track the Ignition Stages
Thin gray smoke progresses to thick dark smoke, then to visible glow, and finally to a sudden flare-up. Once flames appear, invert the bundle to encourage full combustion.
Alternative Airflow Methods
Using a drinking straw provides precise, low-effort airflow and requires only half a breath. Hat fanning (waving a hat or cloth near the bundle) offers a passive method that requires minimal energy.
Build a Sustainable Fire
An ember is useless without fuel.
Pre-Prepare Your Fire Lay
Construct a teepee, lean-to, or log cabin structure beforehand. Include fine shavings (thinner than pencil lead) as initial kindling. Have pre-prepared wood shavings ready before starting the drill.
Light and Feed the Flame
Place flaming tinder into the fire lay. Add fine, dry kindling immediately. Gradually introduce larger sticks. Shield from wind and rain until the fire is established.
Avoid Common Mistakes
Most failures come from preventable errors.
Fix No Smoke or Dust
Wet wood, poor alignment, or low pressure cause this problem. Use bone-dry materials, check alignment, and increase downward force.
Stop Notch Glazing
A polished surface from low friction creates this issue. Add dry sand to the notch, deepen the cut, or roughen contact points.
Prevent Spindle Slippage
Loose cord, shallow socket, or poor stability cause the spindle to slip. Tighten the string, deepen the bearing block socket, and use the shin brace.
Reduce Bearing Block Heat
Soft material overheating causes this problem. Switch to stone, shell, or hardwood handhold.
Use very dry wood. It is the key to success.
Practice for Mastery
Success does not come overnight, but it does come with practice.
Start with Ideal Materials
Use indoor-dried softwood (such as white framing 2×4). Combine with a long bow, leather lace, and hardwood bearing block. Practice with excess tinder.
Learning with perfect materials helps you recognize a real ember, which is critical for diagnosing field failures.
Progress to Wildcrafted Tools
Once confident, identify native suitable species. Try natural cordage (sisal or inner bark). Use stone or antler handholds. Practice in wind, cold, or damp conditions.
Practice regularly because skill develops through repetition.
Know When to Use the Bow Drill
This method shines in specific scenarios.
Best Use Cases
The bow drill works best in survival situations with no modern tools, primitive skills training, wet weather (if components are dry), and educational demonstrations.
Advantages
It is fully craftable from nature, reliable with practice, and works in rain if wood is dry.
Limitations
It is physically demanding, takes weeks of practice to master, and is sensitive to humidity and wood moisture.
Frequently Asked Questions About How to Use a Bow Drill
What is the best wood for a bow drill spindle?
The best spindle wood is dry, straight-grained softwood such as lime (basswood), willow, sycamore, cottonwood, or cedar. The wood must be completely dry (bone-dry) and free of knots or warps.
How long does it take to make a bow drill fire?
With ideal materials and proper technique, you can generate an ember in under one minute. However, most beginners require several minutes of drilling and may need multiple attempts before success.
Why is my bow drill not producing smoke?
No smoke usually means wet wood, insufficient downward pressure, or poor alignment between the spindle and hearth board. Ensure all materials are bone-dry, increase pressure through the bearing block, and verify that the drill sits squarely in the notch.
Can I use a bow drill in the rain?
Yes, if your components are dry. The bow drill works in wet conditions as long as the wood, cordage, and tinder remain dry. Protect your materials from moisture before and during use.
What is the shin brace technique?
The shin brace involves pressing the bearing block against your shin while drilling. This locks your top hand in place, maintains alignment between the spindle and hearth board, and reduces fatigue during extended drilling sessions.
How do I know when the ember is ready?
Signs include thick continuous smoke, dark charcoal dust accumulating in the notch, and a faint orange glow visible in low light. Stop drilling briefly. If the dust continues to smoke on its own, the ember is ready for transfer.
Key Takeaways for Mastering the Bow Drill
The bow drill is more than a fire-starting tool. It is a test of patience, preparation, and persistence. With dry materials, proper alignment, and consistent technique, fire is inevitable. But mastery comes not from one success, but from repeated practice.
Start indoors with ideal wood. Feel the smoke rise. Watch the ember glow. Blow it into flame. Then take it outside and do it again.
When you are cold, wet, and alone, that fire will not come from luck. It will come from skill. And now, you have it.


