
How to Install D-Loop on Bowstring
Installing a D-loop on your bow string transforms your shooting setup when using a mechanical release aid. The D-loop creates a fixed, reinforced attachment point that eliminates finger torque, protects the string’s center serving, and ensures your release engages the same spot every shot. Without one, repeated use can wear down the string, cause inconsistent arrow flight, or even lead to string failure. This guide walks you through every step from choosing materials to final tuning so you can install a durable, high-performance D-loop with confidence.
Essential Tools and Materials for D-Loop Installation
Gathering the right tools before starting makes the installation process smoother and more precise. You will need a bow square to locate the true center of your string relative to the riser, a string level to verify vertical alignment, sharp scissors for clean cuts, a lighter for melting cord ends, and needle-nose or D-loop pliers for tightening knots. A hex key or D-loop stretcher tool helps stretch the loop to its final size.
For materials, 400# nylon remains the most popular choice due to its softer feel and wide availability. Magi Braid offers superior strength at 80-pound test but has become difficult to source. BCY 450 serves as an excellent high-strength alternative. If your cord is not pre-waxed, apply a light coat of archery wax like Halo to make the material tacky and easier to handle during knotting.
Finding the Correct D-Loop Position on Your String
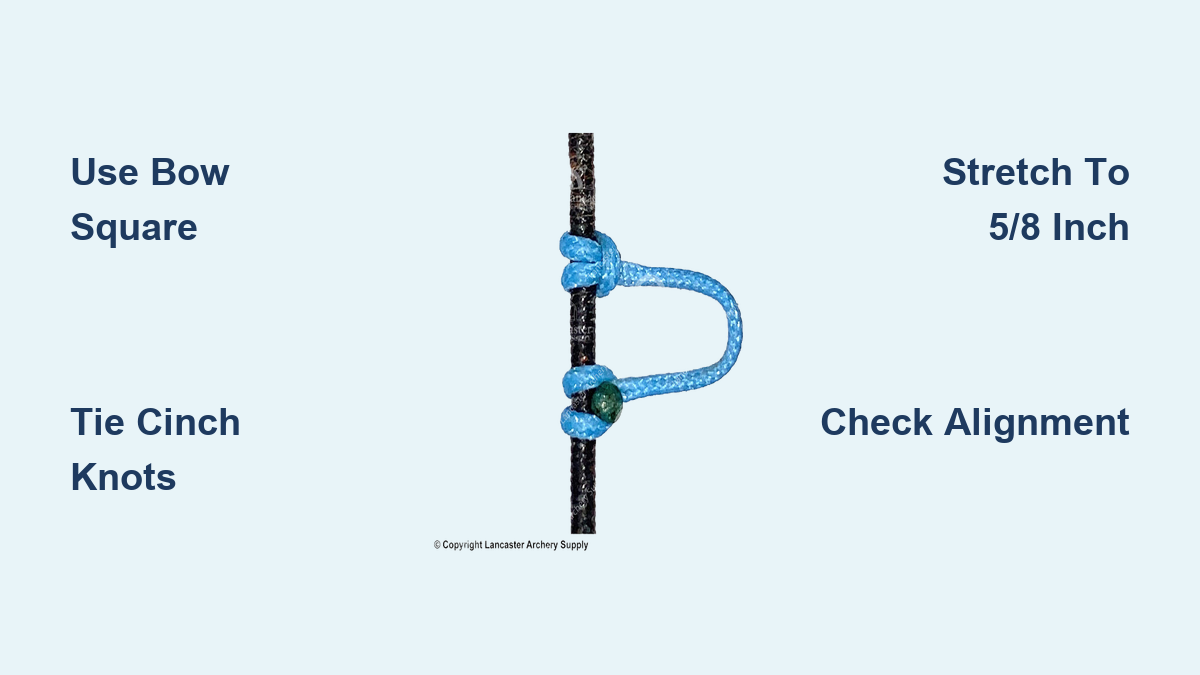
Using a T-square bow square, locate the true center of your bowstring by placing the horizontal arm on the Berger hole, which is the central arrow rest mounting hole in the riser. Slide the square up the string until it sits perfectly centered, then mark this spot with a felt-tip pen or small piece of tape.
Most archers position the bottom of the D-loop level with the bottom edge of the arrow rest bolt hole as a starting reference. Alternatively, placing the loop ½ inch above the Berger hole mark works well for most setups. The D-loop must sit vertically straight and face directly back toward the archer when the bow is at full draw. Ensure the curved side of the loop faces away from the riser during installation to keep your release aid in line with the string plane.
Preparing and Cutting Your D-Loop Cord
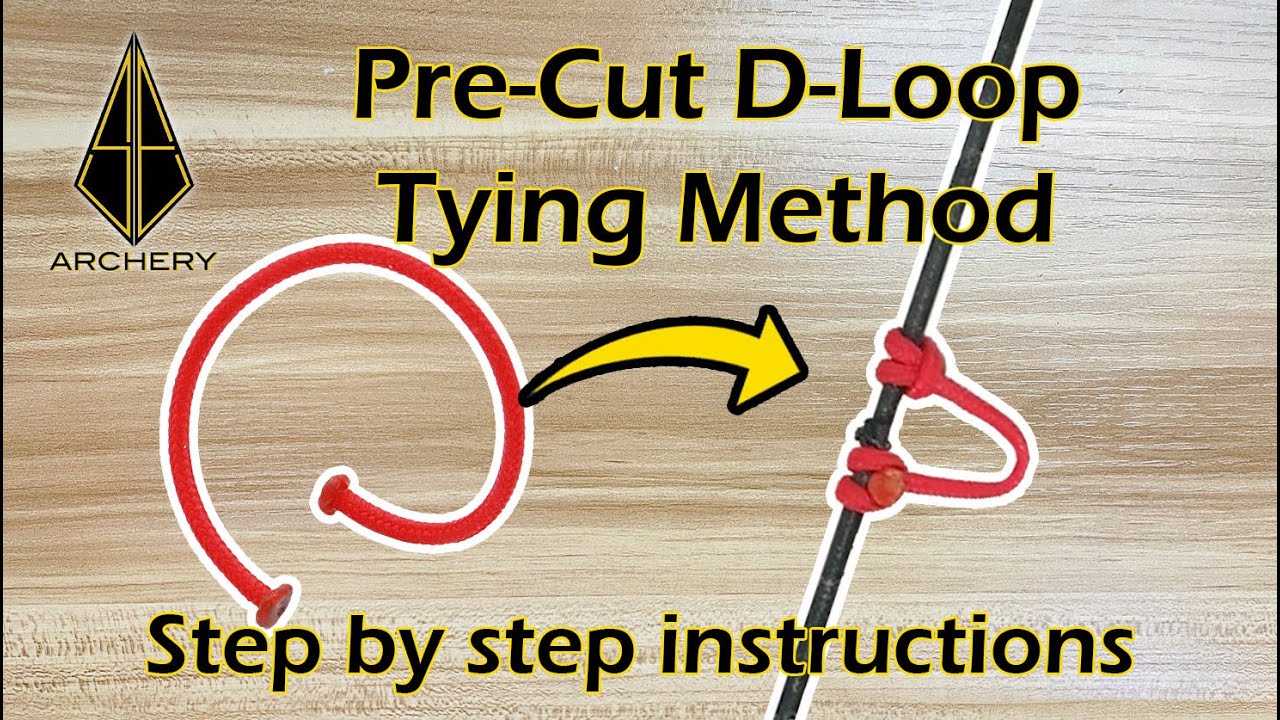
Cut a piece of D-loop cord between 4 and 6 inches long. A 6-inch length gives you more room to work and ensures secure knots, while 4 inches represents the minimum for basic installations. Always cut the cord away from the bowstring to avoid accidental nicks or burns from melting.
Hold each end of the cord in a lighter flame for 1 to 2 seconds until the tip melts and forms a small rounded mushroom ball. Immediately press the molten end against a flat, heat-resistant surface to flatten and shape it. This prevents the cord from pulling through the knots during tightening. Avoid overheating, which weakens the material, and let each end cool completely before handling.
Tying the Bottom Cinch Knot Securely
Lay the center of the cord across the string where you want the bottom of the loop to sit, aligned with your bow square mark. Form two overlapping X shapes with the cord over the string by crossing the left end over the right, then making a second X directly on top. Pull both ends back through the loops formed by the Xs, then thread one end under the starting loop to balance tension before tightening.
Position the knot so the bottom edge of the future loop aligns with your mark. Pull snug by hand first, leaving slight adjustability. As an alternative method, bring both cord ends down and around the back of the string, then pull them up through the loop from underneath. Hold the loop steady and tug the end closest to the bottom of the bow through the loop. The opposite end will be drawn tight and locked in place by the melted mushroom.
Attaching the Top Knot for Balanced Support
Guide the remaining cord upward across the front of the string, placing the top knot about ½ inch below the nocking point. Loop the cord over the string, then down behind, and bring it back up on the nock side. Wrap it around again, then pass the working end under the bottom of the string and back toward the first wrap. Push the end through the loop to complete the knot.
Pull slowly so the melted mushroom catches and locks the knot in place. Both knots should be mirror images of each other with mushroom ends facing opposite directions. This symmetry keeps the loop centered and prevents rotation, which could cause the loop to twist under draw tension and slap the arrow after release.
Setting the Proper Loop Size and Tightening

The ideal center-to-center distance between the bowstring and the D-loop is 5/8 inch or 16mm. This provides enough space for your release hook to engage smoothly without wobbling or binding. A loop that is too small makes attachment difficult, while one that is too large increases play and reduces consistency.
Insert a hex key, D-loop stretcher tool, or needle-nose pliers into the loop and pull upward sharply to stretch the cord and open the loop fully. This accounts for material memory since untreated cord shrinks slightly after tying. Repeat stretching 2 to 3 times during the tightening process. Then use D-loop pliers or needle-nose pliers to compress the knots by inserting them into the loop and opening the jaws fully to apply outward pressure. Repeat the stretch-and-compress cycle until the loop feels solid and does not shift.
Trimming and Finishing the D-Loop
Once fully secured, trim the excess cord ends flush with the outside of each knot using sharp scissors. Leave just enough material so the mushroom remains embedded without cutting into the knot itself. Pass each trimmed end through the flame again for 1 second, just enough to re-melt and seal. Flatten against a hard surface to avoid sharp edges that could snag your release or clothing.
Allow all melted ends to cool completely for at least 1 minute before drawing the bow. Premature tension on warm, soft material can cause failure and require you to re-tie the entire loop.
Verifying Alignment and Level
Clip a string level onto the bowstring above the D-loop and adjust your stance or bow angle until the bubble reads perfectly vertical. A level string ensures square arrow departure and consistent tuning. Place an arrow shaft level on a nocked arrow to confirm it is perfectly horizontal relative to the riser. If it tilts up or down, adjust the arrow rest height slightly.
Many archers prefer a slight upward tilt of 1 to 2 degrees to optimize paper tuning results and fletching clearance. The arrow nock should sit just above the top of the D-loop with a gap of 1/16 to 1/8 inch between the bottom of the nock and the top of the loop. This gap prevents nock pinch at full draw, allows the arrow to settle naturally onto the rest, and avoids knock-flow where the nock compresses and distorts spine dynamics.
Tuning Your D-Loop with Paper Testing
Install the D-loop temporarily and shoot an arrow through a paper tuner to find the sweet spot for arrow flight. Examine the tear pattern to determine adjustments needed. High or low tears indicate you should move the loop vertically. Left or right tears suggest checking rest alignment or cam timing. A bullet hole or round tear represents the ideal setup indicating perfect alignment.
Move the loop in 1/16-inch increments until you achieve a clean bullet hole. This sweet spot position allows you to shoot a wide range of arrow weights successfully once the D-loop is tuned properly. Archers report being able to shoot arrow spines from 150 to 400 with consistent accuracy when the D-loop sits at this optimal position.
Troubleshooting Common D-Loop Issues
If the D-loop rotates to the side at full draw, it can spin back violently after release and strike the arrow, ruining accuracy. This rotation stems from uneven knot tension, string twist, or improper peep sight alignment. To fix rotation, place the bow in a bow press, loosen the string slightly, and rotate it back into alignment. Ensure the peep sight turns freely since binding peep can induce string torsion. Alternatively, re-tie the D-loop with improved symmetry and even wraps.
Check your D-loop every few weeks or after heavy use for signs of wear including fraying or fuzzing of the cord, loose or deformed knots, shifting position on the string, or mushroom ends pulling through. If you tie soft knots above and below the D-loop, you can remove and replace the loop without cutting into the string’s center serving. Always leave a little extra space above the upper knot during initial installation to allow for future re-tying.
Frequently Asked Questions About Installing a D-Loop
What is the purpose of a D-loop on a bow string?
A D-loop creates a fixed, reinforced attachment point for mechanical release aids. It eliminates finger torque, protects the string’s center serving from abrasion, and ensures consistent arrow flight by providing the same anchor point every shot.
How high should a D-loop be positioned above the string?
The ideal center-to-center distance between the bowstring and the D-loop is 5/8 inch or 16mm. This measurement provides enough clearance for your release hook to engage smoothly without wobbling while maintaining consistent arrow release.
Can I install a D-loop without special tools?
While specialized tools like a bow square and D-loop pliers make installation easier, you can install a D-loop with basic tools including scissors, a lighter, and pliers. However, using proper tools ensures better accuracy and a more secure installation.
How often should I replace my D-loop?
Inspect your D-loop every few weeks for wear, fraying, or loosening. Replace it immediately if you notice any damage. With proper materials and installation, a well-maintained D-loop can last several seasons, but periodic replacement ensures reliable performance.
Do I need a D-loop if I shoot with fingers instead of a release?
D-loops are specifically designed for mechanical release users. Traditional finger shooters do not need one and may find it interferes with their draw technique. Stick with finger shooting methods if you do not use a release aid.
Key Takeaways for Installing Your D-Loop
Installing a D-loop is a fundamental skill that enhances accuracy, protects your equipment, and prepares you for field repairs. The process requires finding the correct position using a bow square, tying two symmetrical cinch knots with melted mushroom ends facing opposite directions, and stretching the loop to its proper 5/8-inch height before final tightening. Always verify alignment with a string level and test for nock pinch before shooting. Regular inspection and timely replacement ensure your D-loop performs flawlessly season after season. With the right tools, materials, and technique, you can create a secure, long-lasting loop that gives you complete control over your bow’s performance.


