

How to Shoot a Bow: Beginner’s Guide
You’ve picked up a bow for the first time, and now you want to learn how to use it properly. Archery is about consistency, not raw power. The best archers aren’t the strongest—they’re the most repeatable. This guide walks you through every essential step, from selecting your first bow to executing a smooth, accurate shot. You’ll learn proper stance, grip, draw, anchor, and release techniques that build muscle memory from day one.
Choose the Right Bow Type for Beginners
Picking the correct bow sets the foundation for your entire archery journey. Not all bows are created equal, and some are far better suited for beginners than others.
Start with a Compound Bow
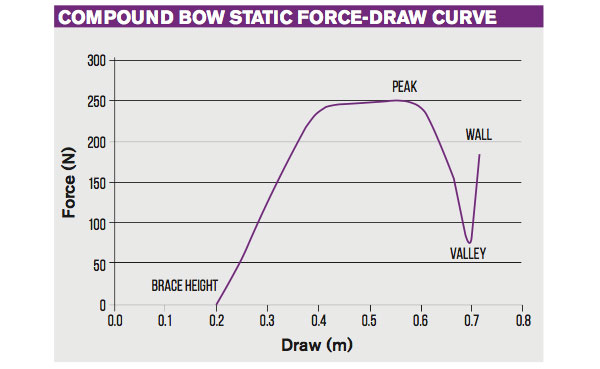
Most beginners should begin with a compound bow. Its pulley system reduces holding weight at full draw by up to 80%, making it easier to aim steadily without fighting fatigue. This mechanical advantage lets you focus on form instead of muscular endurance. Compounds are also highly adjustable: you can fine-tune draw length, draw weight, and timing to match your body as you progress.
Recurve vs. Longbow: Know the Difference
Traditional bows like recurves and longbows offer a pure archery experience, but they demand more strength and precision. A recurve stores energy in curved limbs but lacks let-off, meaning you hold full draw weight throughout aiming. A longbow is even simpler with a D-shaped profile and no mechanical aids. Both require flawless technique, making them less forgiving for beginners. Unless you’re specifically pursuing traditional archery, start with a compound.
Avoid Overpowering Yourself
Beginners often choose bows that are too heavy. If you’re an adult, start with 30-45 lb for a compound or 25-35 lb for a traditional bow. Smaller or younger shooters may begin at 15-20 lb. Use half your maximum draw strength so you can shoot 100+ arrows without exhaustion. Remember: a 70 lb compound at 80% let-off feels like 14 lb at full draw, while a 35 lb traditional bow feels like 35 lb throughout the entire draw.
Set the Correct Draw Weight
Your draw weight determines how quickly you progress and whether you risk injury from poor form.
Test Before You Buy
Before purchasing, simulate draw weight using an 8-inch resistance band. Attach one end to a wall and pull it like a bowstring. Try 30 lb, 40 lb, and 50 lb levels to feel the difference. If your form collapses after 20 shots, the weight is too high. Always test in person at a pro shop or rental range. Many retailers offer return policies, so use them if needed.
Prioritize Endurance Over Power
Aim to shoot 50-100 arrows per session without muscle burn. If your arms shake before shot 30, reduce the draw weight. Strength builds over time, but technique does not. Shooting too heavy leads to flinching, target panic, and bad habits. Start light, shoot often, and increase poundage only when your form is locked in.
Gear Up with Essential Equipment
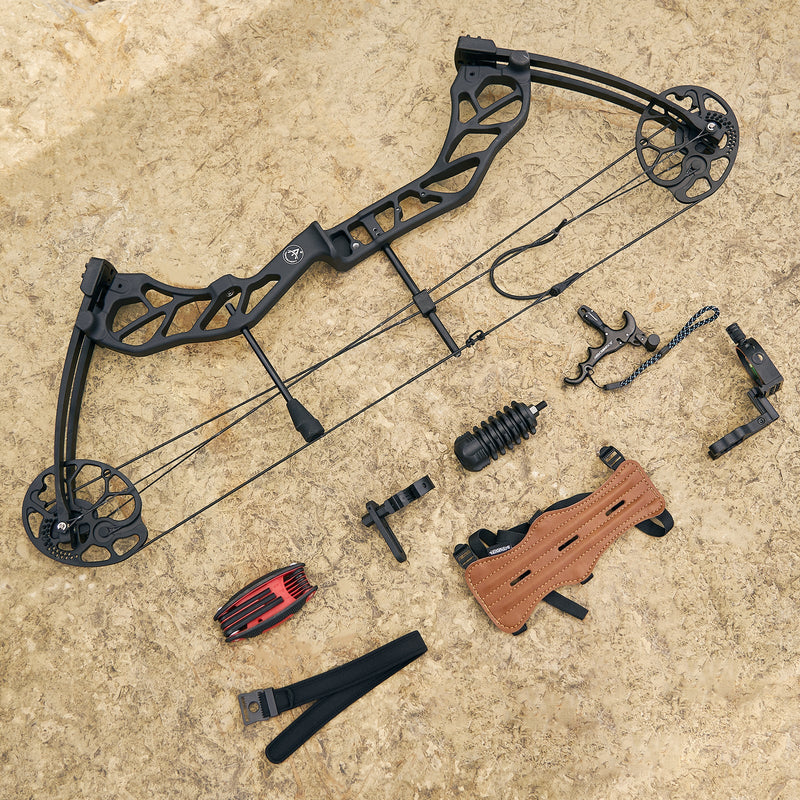
The right tools make learning faster, safer, and more effective.
Use a D-Loop and Release Aid
Attach a D-loop to your bowstring between the serving sections. This small cord loop gives your release aid a consistent hooking point, preventing string wear and improving shot repeatability. Finger shooters can use gloves or tabs, but a release aid delivers cleaner, more consistent breaks, especially for beginners.
Install a Peep Sight for Precision
A ¼-inch peep sight installed in your string acts as a rear sight. When aligned with your front sight and target, it creates a precise aiming tunnel. Larger peeps let in more light but reduce accuracy, while smaller ones restrict vision. The ¼-inch size offers the best balance for most beginners. Ensure it lines up perfectly with your front sight pin guard, ideally round so it centers cleanly in the peep.
Protect Your Body
Wear an arm guard on your bow arm to prevent painful string slap. Most are leather with padding and slip on easily. For your draw hand, gloves are beginner-friendly as they prevent blisters and string burn. As you advance, switch to a tab for better control and a thinner release profile.
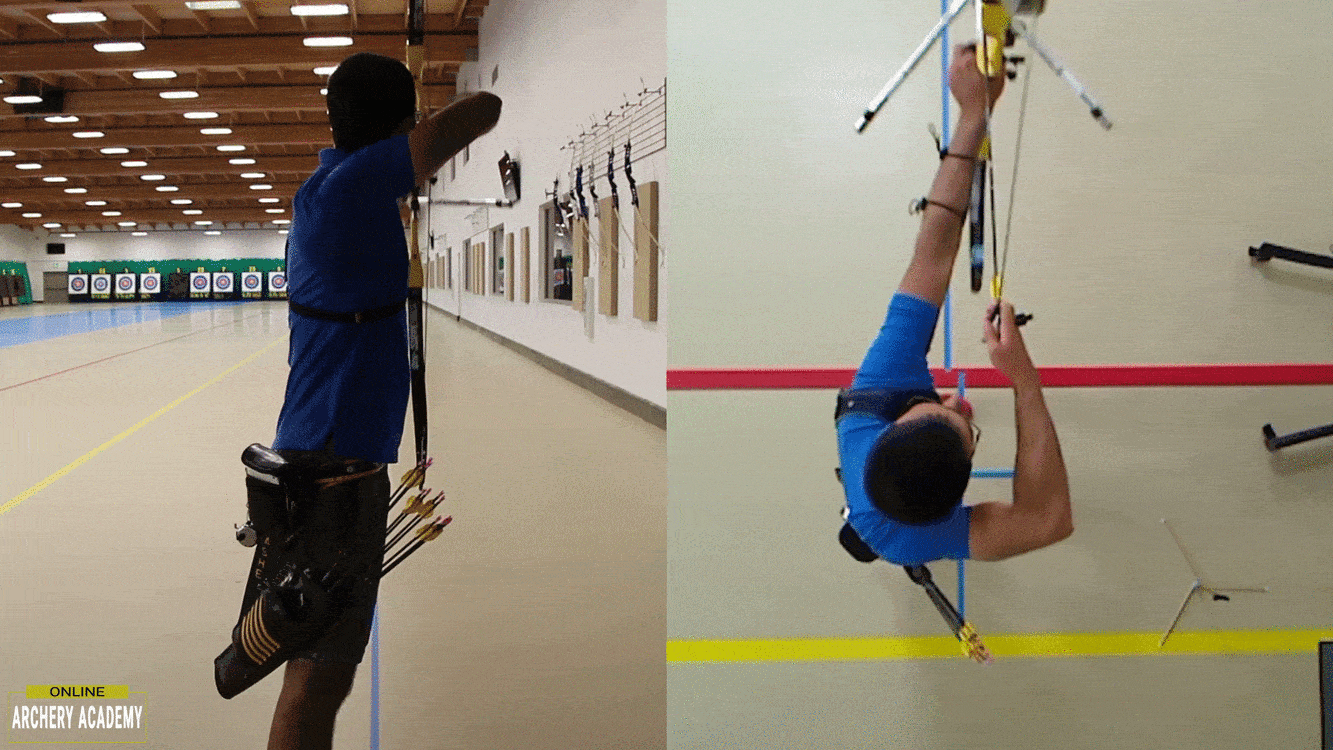
Master Your Stance First
Your stance is the base of every shot. Get it wrong, and nothing else matters.
Stand Shoulder-Width, Toes Forward
Place your feet shoulder-width apart, directly under your hips. For compound shooting, face the target squarely with toes pointing forward. Slightly turn them outward for better balance. Use a chalk line or arrow on the ground to align your feet the same way every time. Top pros trace their foot positions on cardboard for instant consistency.
Stack Shoulders Over Hips
Keep your posture neutral: shoulders over hips, hips over feet. Distribute weight evenly or slightly forward on the balls of your feet to prevent leaning back. Avoid hunching or twisting. Think of your stance like a house foundation: if it’s shaky, the whole structure fails.
Practice the Batter Box Method
Mark your foot positions with chalk or tape. Step into it before every shot to build muscle memory. This simple habit ensures repeatable alignment, especially under pressure.
Load the Arrow Correctly
One mistake here can cause injury or poor arrow flight.
Place Arrow on Rest, Fletching Up
Set the arrow on the arrow rest with the off-color fletching pointing upward. This prevents the feather from hitting the rest during release. Clip the nock firmly onto the D-loop until it clicks. Make sure the arrow sits at 90 degrees to the string, not angled. Double-check: never dry fire. An un-nocked bow can destroy limbs and injure you.
Grip the Bow the Right Way
How you hold the bow affects accuracy more than you think.
Rest Bow in Webbing, Not Palm
Hold your bow hand like you’re signaling stop with thumb up at 45 degrees, relaxed. Let the bow rest in the webbing between thumb and index finger, extending down to the heel of your palm. Don’t grip it like a hammer. Tension causes torque, which throws arrows off target.
Support with Bone, Not Muscle
The bow should be supported by your skeletal structure, not muscle. Imagine leaning against a door frame, resting not holding. Keep your wrist flat. If your knuckles turn white, you’re squeezing too hard. A correct grip lets the bow recoil naturally after release, reducing hand shock.
Draw with Back Muscles, Not Arms
The draw is not a strength contest. It’s a movement pattern.
Raise Both Arms Together
Start by lifting your bow arm forward and draw hand near your cheek simultaneously. Keep your bow arm straight but slightly bent. A locked elbow increases tension. Pull using your back muscles, not your biceps. Imagine pulling a barn door closed behind you, not starting a lawnmower.
Drive Elbow Back and Up
As you draw, guide your draw elbow backward and upward, above shoulder level. This engages your back muscles fully and reduces strain. Maintain the mirroring principle: bow hand thumb up at 45 degrees, draw hand thumb down at 45 degrees. This keeps your wrists neutral and promotes natural alignment.
Anchor Consistently Every Time
Your anchor point is your aiming reference. Make it unchanging.
Index Finger Under Jawbone
The most reliable anchor is placing your index finger under the jawbone, just behind the corner of your mouth. Your middle finger can rest slightly higher for confirmation. This spot is easy to find by touch, even blindfolded. Avoid anchoring at the corner of the mouth or chin because these vary too much.
Keep Head Still, Peep to Eye
Your head should not move forward or backward to meet the string. Instead, rotate it slightly, like checking a rearview mirror, so the peep sight aligns with your front sight and target. Think: head on a swivel. Practice anchoring with eyes closed to verify consistency.
Align Head and Shoulders Properly
Body alignment ensures clean, repeatable shots.
Relax the Bow Shoulder
Keep your front shoulder low and relaxed. Don’t hike it up defensively. Your back shoulder rolls slightly back and down at full draw, engaging the scapula. This creates a stable platform. Keep your chest open, spine straight, and core gently engaged.
Maintain Neutral Posture
Avoid leaning forward or backward. Your body should form a straight line from bow hand through torso. If you’re craning your neck to see the sight, your anchor is wrong. Let the peep come to your eye, not the other way around.
Aim with Focus, Not Perfection
Aiming isn’t about holding still. It’s about trusting your process.
Focus on Target Center
For compound bows, focus on the center of the bullseye, not on keeping the pin perfectly still. Some float is normal. Trying to stop it causes tension and flinching. Accept the movement. Your brain adjusts automatically over time.
Use the Right Aiming Style
Command-style works well for hunters. Draw, anchor, aim at 10-15 yards. Lay your finger lightly on the trigger. Focus on slowing the pin’s movement. When it drifts over the center, fire decisively. Maintain 70% pull, 30% push tension. Avoid punching the trigger because this causes flinching.
Surprise release is used by Olympic-style shooters. Focus entirely on the center of the target. Gradually increase pressure on a thumb or hinge release. The shot should come as a surprise every time.
Execute the Release Cleanly
How you let go determines arrow flight.
Command-Style: Controlled Trigger Pull
Ideal for hunting. Draw, anchor, aim at 10-15 yards. Lay your finger lightly on the trigger. Focus on slowing the pin’s movement. When it drifts over the center, fire decisively. Maintain 70% pull, 30% push tension. Avoid punching the trigger because this causes flinching.
Surprise Release: Let It Happen
Used by Olympic-style shooters. Focus entirely on the center of the target. Gradually increase pressure on a thumb or hinge release. The shot should come as a surprise every time.
Back Tension: Train for Elite Control
Requires a back-tension release. Follow a 3-week plan. Week one: close eyes, draw, squeeze shoulder blades together, 15 reps daily. Week two: shoot 15-20 yards, eyes open, then close-up, eyes closed. Week three: extend to 20-30 yards, focus on burning the pin into the target. This method builds supreme consistency but can cause target panic under stress.
Follow Through Completely
Don’t drop the bow the second you shoot.
Hold Position Until Arrow Hits
Keep your anchor point, bow arm up, and body still until the arrow strikes. Dropping early pulls the bow off line and ruins accuracy. Follow-through is part of the shot, not an afterthought.
Practice Smart, Not Just Hard
How you practice matters more than how much.
Replicate Real-World Conditions
Hunters should practice at 40-50 yards even if they hunt at 30. Test kneeling, sitting, and leaning shots. Use 3D targets or bag-style deer targets. Practice in the wind, practice elevated.
Train for First-Arrow Accuracy
The first arrow is the only one that counts in real life. Do low-volume, high-focus sessions. Shoot 3-5 arrows, treat each as your one shot. Analyze your mental state and tendencies.
Warm Up Before Shooting
Do 10-25 dry draws before live shooting. This activates your muscles, prevents injury, and sharpens form, especially after days off.
Maintain Safety and Equipment
Long-term success depends on care and caution.
Never Dry Fire
Shooting without an arrow can shatter limbs, damage cams, and send debris flying. Always double-check the arrow is nocked before drawing.
Tune Your Arrows
Match arrow spine to your bow’s draw weight. Too soft or too stiff causes fishtailing or veering. Learn tuning via video tutorials or a pro shop setup.
String Traditional Bows Safely
Use a bowstringer for recurves and longbows. Loop string over limb tips, step on center, pull bow up and secure top loop. Avoid the leg method unless necessary because it risks slipping and injury.
Frequently Asked Questions About Shooting a Bow for Beginners
What is the best bow type for a beginner?
A compound bow is best for most beginners because its pulley system provides let-off, reducing holding weight at full draw by up to 80%. This makes it easier to aim steadily while building consistent form.
How much draw weight should a beginner start with?
Adults should start with 30-45 lb for a compound or 25-35 lb for a traditional bow. Smaller or younger shooters may begin at 15-20 lb. The rule is to use half your maximum comfortable draw weight to allow shooting 100+ arrows without fatigue.
What equipment do I need to start archery?
Essential equipment includes a bow, arrows, arm guard, finger protection (gloves or tabs), D-loop, release aid, peep sight, and arrow rest. A compound bow with adjustable settings is ideal for beginners.
How do I aim properly with a compound bow?
Focus on the center of the bullseye rather than trying to hold the pin perfectly still. Some pin float is normal and expected. Use either command-style (fire when pin passes center) or surprise release (let shot break naturally).
What is the proper stance for shooting a bow?
Stand with feet shoulder-width apart, toes slightly turned outward. Face the target squarely for compound shooting. Keep shoulders over hips, hips over feet, with weight distributed evenly or slightly forward.
Key Takeaways for Learning to Shoot a Bow
Learning how to shoot a bow for beginners is about building a repeatable process, not chasing perfect shots. Start with a compound bow, use proper form, and practice with intention. Focus on stance, grip, draw, anchor, and release. Master these fundamentals, and accuracy follows naturally.
Switch to a release aid, install a peep sight, and shorten your release stem for better control. Most importantly, relax. Tension kills consistency. Define your goal, whether hunting, competition, or recreation, and tailor your training accordingly.
With patience and consistent practice, you’ll shoot confidently and accurately. The fundamentals you learn today will be the foundation for all your future advancement in the sport.


