
How to Install a Peep Sight on a Compound Bow
If your arrow groupings are inconsistent or you struggle to align your sight at full draw, the problem might not be your aim. Installing a peep sight on a compound bow is essential for achieving repeatable accuracy, proper eye alignment, and consistent anchor points. This small rear aperture ensures your dominant eye, front sight, and target line up perfectly every time you draw. Without it, even the most precise front sight becomes unreliable. This guide walks you through every step from measuring the ideal peep height to final alignment checks.
Mark Your Eye-Level String Position
Draw and Mark at Full Anchor
The most accurate way to position your peep sight starts with your natural shooting form. Stand in your normal stance, nock an arrow, and draw the bow to full draw, settling into your consistent anchor point. Keep your head upright and eyes focused forward, just as you would during a real shot. Do not adjust your head position to meet the string.
Have an assistant stand to the side and visualize a straight horizontal line from your dominant eye’s pupil to the bowstring. Where that line intersects the string is your ideal peep center. Use a Sharpie or permanent marker to place a small dot at that exact spot. Repeat this process 3 to 5 times to confirm consistency. If the marks cluster within 1/16 inch, average their position. If they vary more, refine your anchor or have your assistant double-check alignment.
Pro Tip: Some archers intentionally lower the final mark by 1/16 to 1/8 inch to account for natural string stretch or slight head drop during release.
Use a Bow Square for Measurement
If you do not have help, use a bow square to estimate peep height. At full draw, place the square against the riser and measure the vertical distance from the arrow shaft centerline to your intended peep location. Most archers position the peep 0.5 to 1.5 inches above the arrow shaft, depending on anchor style and bow geometry. Record this measurement so you can replicate it on future strings or bows.
Test with a Temporary Insert
Before final installation, do a dry run. Gently split the string fibers at the marked spot and slide the peep in without securing it. Draw the bow several times and observe how it aligns. If you have to crane your neck or tilt your head, reposition the mark and try again. This test prevents costly mistakes during serving.
Prepare the Bow with a Bow Press
Relieve String Tension Safely
Never attempt to install a peep sight on a fully tensioned compound bowstring. Modern strings operate under 60 plus pounds of force, making any manipulation dangerous. The safest and most effective method is using a bow press. Place your bow horizontally in the press, ensuring cams and cables are aligned. Slowly compress the limbs until you see about 1 inch of slack in the string. At this point, you should be able to lift the string easily with two fingers.
Warning: Never use sharp tools like awls or needles to split a tensioned string. Doing so can cut fibers and weaken the entire string.
Avoid Risky Alternative Methods
Some archers try workarounds like adjusting limb bolts, pinning cams, or using ratchet straps. While limb bolt adjustment may reduce tension slightly, it only works on bows with sufficient adjustment range and does not fully eliminate risk. Cam pinning is unpredictable and can lead to sudden release, causing injury or equipment damage. Ratchet straps and foot pull methods are unstable and strongly discouraged.
Expert Advice: Most archery shops install peep sights for 8 to 25 dollars, including press use and professional serving. Going to a bow shop ensures safety and proper installation.
When to Use a Portable Press
If you plan frequent string work, investing in a portable bow press pays off quickly. It allows safe peep installation, string changes, and D-loop replacements at home or in the field. Always inspect your press for wear and follow manufacturer instructions to avoid limb or cam damage.
Insert the Peep into the String
Find the String Center Accurately
Peep placement must be centered between the main string bundles. For two-color strings, use the manufacturer color split or center tag as a guide. On single-color strings, look for a factory center mark. If none exists, measure from each end using calipers or dividers to locate the true center. The peep should sit between the two primary fiber bundles forming the string loop, not on top of them.
Orient the Peep Correctly
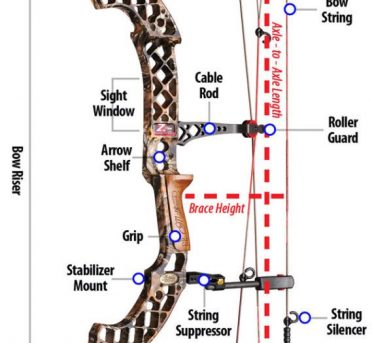
Peep sights have notches or grooves on both sides designed to cradle the string fibers and prevent rotation. The orientation depends on your bow axle to axle length and draw length. Shorter axle to axle bows have a steeper string angle, so grooves often face down. Longer axle to axle bows have a shallower angle, so grooves may face up. The goal is to have the peep facing straight back toward you when the bow is at rest.
Slide the Peep into the Split
Use a string separator tool or awl to gently part the fibers at your marked position. Insert the peep so the string fibers seat fully into the grooves. Ensure the peep is flat and centered on the mark. Hold light tension on the string to prevent shifting during serving.
Secure the Peep with Dual Serving Bundles
Wrap Top and Bottom Servings
The most secure method uses two dense serving bundles that sandwich the peep. Use BCY 3D End Serving thread with 0.016 inch diameter. Never use fishing line, floss, or regular thread, which lack grip and durability.
Top Bundle:
1. Insert the tag end above the peep between fiber bundles.
2. Wrap downward for 10 tight wraps, trapping the tail.
3. Add 5 more wraps over the tail to lock it in.
Bottom Bundle:
1. Begin below the peep and wrap upward for 8 to 10 tight wraps.
2. Lay the thread end along the top of the loop and wrap over it.
3. Pull tight with longnose pliers.
Repeat the entire process to create a second set of bundles, fully enclosing the peep in serving. This allows minor sliding for adjustment but prevents rotation.
Serving Length: Aim for 3/8 to 1/2 inch of serving on each side of the peep for maximum hold.
Seal and Finish the Ends
After wrapping, trim excess thread to about 1/8 inch. Use a horizontal flame to melt the ends. Never hold the flame vertically to avoid igniting the string. Pull the tail out mid-wrap during serving to keep the melt point away from bare fibers. Press the melted stubs flat with a finger for a smooth finish.
Add Back-Serving for Extra Security
For added protection, wrap a separate piece of serving around the outer edge of the peep. Tie an overhand knot at the bottom groove, another at the top, then finish with a square knot. This acts as a fail-safe in case of dry fire or serving failure.
Fine-Tune Peep Alignment After Shooting

Let the String Settle
Once installed, remove the bow from the press and draw it 5 to 10 times. Shoot 25 to 50 arrows to allow the string and servings to settle. During this period, the peep may rotate slightly due to string torque.
Check Full-Draw Alignment
At full draw, verify that the peep aligns naturally with your dominant eye. You should not need to tilt your head or crane your neck. The front sight should be clearly visible through the aperture. If misaligned, return the bow to the press and adjust string twist. One full twist in the end loop equals 45 degrees of string rotation. Two twists equal 90 degrees rotation. Always add twist rather than remove it, as untwisting can loosen the string. Adjust in 1/8 turn increments until the peep faces directly back and aligns perfectly at full draw.
Walk the D-Loop for Micro-Adjustments
If alignment is close but not perfect, you can walk the D-loop slightly left or right to optimize peep position without altering string twist. Use loop pliers to stretch and reposition the D-loop while maintaining neutral alignment.
Verify and Maintain Peep Position
Mark the Peep for Future Checks
Use a Sharpie to trace the outer edges of the peep where it meets the string. This outline lets you quickly detect if the peep rotates or shifts over time. If movement occurs, return to the press, reposition, and re-serve.
Inspect Before Every Session
Before shooting, visually check for frayed or loose serving. Check for peep rotation. Check for string wear in the grooves. Check for aperture deformation. Even minor wear can compromise safety and accuracy.
Follow a Maintenance Schedule
Before each session: Visual inspection
Before hunting season: Full check and re-serve if needed
Every 1 to 3 years: Replace or re-serve based on use
High-use archers or those in harsh conditions may need more frequent maintenance.
Choose the Right Peep and Tools
Pick the Correct Aperture Size
Peep diameters range from 1/8 to 5/16 inch. Smaller apertures provide sharper focus and better long-range precision but have a narrower field of view. Larger apertures make target acquisition easier in low light and work better for hunting. Choose based on your shooting environment and preference.
Consider a Super Peep for Flexibility
The Super Peep features a removable hex-key insert that lets you change aperture sizes without re-tying. This is ideal for archers who switch between target and hunting setups or adjust for lighting conditions.
Prioritize Safety and Precision
Never Work on a Tensioned String
Cutting or splitting a live string risks catastrophic failure, including dry fire, limb breakage, or injury. Always use a bow press. If you lack one, visit a certified archery shop. The small cost ensures safety and proper installation.
Buy Quality Tools and Materials
Invest in a bow press, BCY 3D serving thread, string separator tool, longnose pliers, and a Sharpie. These tools ensure professional results and long-term reliability.
Frequently Asked Questions About Installing a Peep Sight on a Compound Bow
What happens if I install a peep sight without a bow press?
Working on a tensioned string is dangerous and can cause string breakage, dry fire, or limb damage. The string tension on modern compound bows exceeds 60 pounds, making it impossible to safely insert a peep without first relieving that pressure. Always use a bow press or take your bow to a professional shop.
How do I know if my peep sight is properly aligned?
At full draw, the peep should align naturally with your dominant eye without requiring head tilt or neck strain. The front sight should be clearly visible through the aperture. If you must crane your neck or adjust your head to see through the peep, it is misaligned and needs adjustment.
Can I reuse my old peep sight when changing strings?
Yes, you can transfer a peep sight to a new string. However, you must install it using the same process: relieve string tension with a bow press, position it at the correct height, and re-serve it securely. Simply untying the old peep and transferring it without proper serving will result in an insecure installation.
How often should I check my peep sight for wear?
Inspect your peep sight before every shooting session. Look for frayed serving, rotation, or string wear in the grooves. Before hunting season, perform a thorough inspection and re-serve if needed. Depending on usage, expect to replace or re-serve the peep every 1 to 3 years.
What is the best peep sight size for hunting versus target shooting?
For hunting, larger peep sizes like 1/4 to 5/16 inch provide easier target acquisition in low light and faster aiming. For target shooting, smaller sizes like 1/8 to 3/16 inch offer sharper focus and better long-range precision. Many archers use a Super Peep to switch between sizes based on the activity.
Key Takeaways for Installing Your Peep Sight
A properly installed peep sight becomes invisible in use but remains vital to your shooting performance. The process requires accurate eye-level marking at full draw, proper string center location, and secure dual serving bundles to prevent rotation. Always use a bow press to relieve string tension safely, and fine-tune alignment after the string settles by adding twists in 1/8 turn increments. Whether you DIY with proper tools or opt for professional installation at an archery shop, the result is the same: a rock-solid aiming system built for repeatable accuracy and confidence with every shot.


