
How to Adjust Compound Bow Sight: Quick Steps
You’ve just set up your compound bow, drawn back, and released, only to watch your arrows consistently miss the mark. Don’t worry: learning how to adjust compound bow sight isn’t about guesswork. It’s a precise, repeatable process built on one golden rule: move the sight in the direction your arrow group lands. Whether you’re using a multi-pin or single-pin sight, this guide walks you through every step, from initial setup to long-range tuning, so you can hit bullseyes with confidence.
Most archers make the mistake of adjusting after every shot or blaming their sight when the real issue is form. A perfectly tuned bow won’t compensate for inconsistent anchor points or grip torque, but a properly adjusted sight will reveal your true shooting ability. In the next few minutes, you’ll learn how to isolate mechanical issues from human error, dial in each pin with precision, and maintain accuracy across distances. Let’s get your sight aligned and your arrows flying true.
Mount and Align the Sight
Before any adjustments, your compound bow sight must be correctly installed and aligned. A misaligned housing leads to inaccurate shots no matter how many clicks you make.
Secure the Sight in the Riser
Attach the sight to the bow’s riser using Allen screws. Place it into the sight window and tighten just enough to hold it firmly. Do not over-torque, as this can strip threads. Position the sight so the pins line up vertically with the bowstring and arrow nock when drawn. For most right-handed archers, the pins will sit slightly to the left of the arrow shaft due to anchor point alignment.
Use a bubble level mounted on the sight housing to ensure the unit is perfectly vertical. Even a slight tilt causes windage errors at longer distances. Check the level both at rest and at full draw if possible.
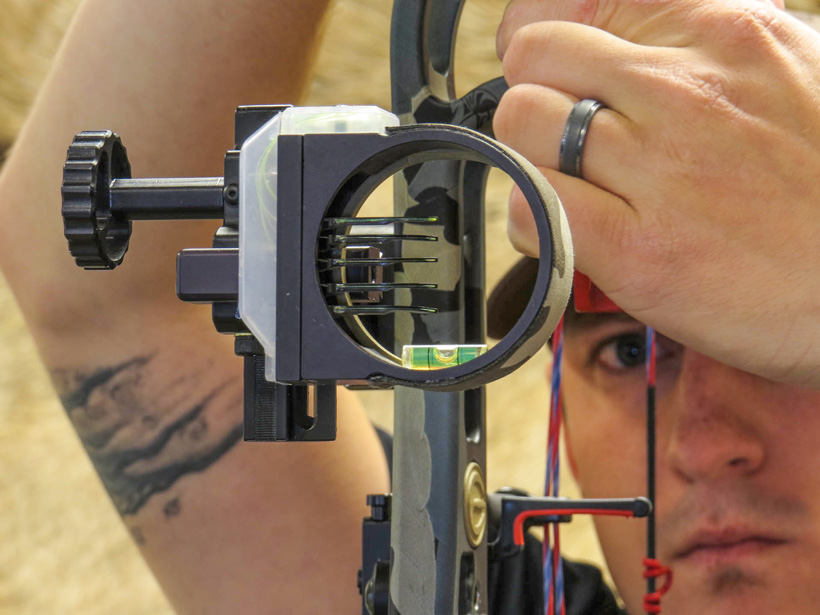
Center the Pin in the Peep Sight
Draw the bow to your anchor point and look through the peep sight. Adjust the housing left or right until the middle pin (such as the 30-yard pin) appears centered in the peep. This creates a consistent sight picture. If you use a high anchor near the jaw, centering the 30-yard pin preserves vertical adjustment range for longer shots.
Never skip this step. Misalignment here leads to chasing arrows during the sighting-in process.
Start at 10 Yards for Coarse Alignment

Begin all sight adjustments at 10 yards. At this close range, even large errors are easy to correct, and small movements have minimal effect.
Shoot a 3-Arrow Group
Set up a target with a clear aiming point. Use your top pin, which is usually set for 20 or 30 yards. If it’s set for 20, expect arrows to hit slightly high. If set for 30, they should land near center.
Shoot three to five arrows, focusing on consistent form. Ignore flyers. Look for the group center.
Adjust Housing to Follow Arrow Group
Apply the core rule: move the sight in the direction the group lands.
• Arrows left? Move sight left.
• Arrows low? Move sight down.
Use windage and elevation knobs for fine-tuned shifts. On most sights, clockwise on the windage knob moves the pin right for right-handed shooters. Clockwise on the elevation knob moves the pin up.
Make small adjustments, about one-quarter turn at a time. Re-shoot after each change. Repeat until the group hits center. Once centered, proceed to your top pin’s actual yardage.
Zero the Top Pin at Full Distance
Now that your sight is roughly aligned, fine-tune the top pin at its designated range.
Move to 20 or 30 Yards
Go to the distance your top pin is meant for, commonly 20 or 30 yards. Shoot another three-arrow group.
Adjust the entire housing, not individual pins, to bring the group to center. Use the same directional logic. High impact? Move housing up. Right impact? Move housing right.
This step locks in your baseline. Once done, do not adjust the housing again unless restarting the entire process.
Lock the Housing in Place
After zeroing, ensure all mounting screws are snug. Some archers use thread locker on set screws to prevent vibration shifts. From this point forward, only individual pins on multi-pin sights or the slider/dial on single-pin sights will be adjusted.
Adjust Remaining Pins Individually
With the top pin set, calibrate each additional pin at its intended yardage.
Progress to Longer Distances
Move to 40, 50, then 60 yards in sequence. For each distance, use the corresponding pin, shoot a three-arrow group, and adjust only that pin up or down.
Remember these key points. If arrows hit low, move the pin down. If arrows hit high, move the pin up.
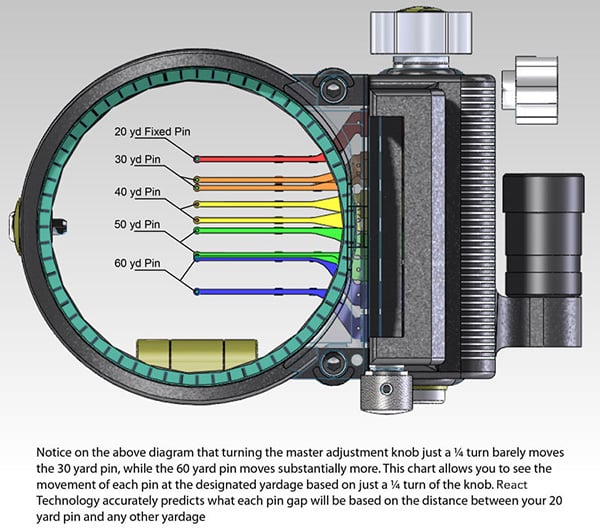
Fine-Tune Pin Spacing (Gap Shooting)
After setting each pin, test gap accuracy. This means how well intermediate distances align between pins.
With the 30-yard pin fixed, at 20 yards, if arrows hit high, lower the 20-yard pin. At 40 yards, if arrows hit low, raise the 40-yard pin.
This ensures smooth transitions when estimating yardages between pins. Avoid adjusting the housing, as doing so invalidates your top-pin zero.
Calibrate Single-Pin Sliders and Dials
Single-pin sights require different handling due to their adjustable sliders or dials.
Set the Bracket Height First
Loosen the bracket screws and position the bracket so the pin can slide from 20 to 70-plus yards without hitting the housing limits. Raise it if the pin bottoms out at long range.
Use Dial or Slider for Yardage
Start at 20 yards and zero the pin. Then move back in 10-yard increments. At 30 yards, slide the pin down slightly. At 40, lower more, because arrow drop increases exponentially.
Mark each setting with a pen or use sight tape for quick reference.
Re-Slide Scope if Windage Range Is Lost
On single-pin models, the entire scope can slide left or right in the bracket. If the windage knob runs out of travel, loosen the scope-to-bracket screw, shift the scope inward or outward, re-center, and tighten.
This restores lateral adjustment range.
Align the Peep Sight for Consistency
A poorly aligned peep ruins even the best sight setup.
Install and Rotate the Peep
Insert the peep into the bowstring between fiber bundles. Draw the bow and align it with your eye and front sight. Serve it in place with string material.
If the peep rotates at full draw, use a bow press to unhook one limb. Add or remove half-twists in the string until the peep stays square.
Let the String Settle
Shoot 10 to 20 times to let the string settle. Recheck peep alignment weekly for the first two weeks. Once stabilized, it may stay fixed for months or years, especially with pre-stretched strings.
Troubleshoot Common Sighting Issues
Even with proper setup, problems arise. Here’s how to fix them fast.
Arrows Drifting Left or Right at Long Range
Cause: Bow tilt or second axis misalignment.
Fix: Use the bubble level to keep the bow vertical. Have a pro shop check center shot and second axis alignment.
Note: A tilted bow causes increasing windage error with distance.
Inconsistent Groupings After Adjustment
Likely cause: Form inconsistency.
Check for these issues:
• Gripping too tightly, which causes torque
• Inconsistent anchor point
• Left arm dropping due to fatigue
One archer lowered his sight after low shots, only to hit high the next day when rested. The issue was fatigue, not sight misalignment.
Running Out of Adjustment Range
Vertical? Lower the entire housing or reposition the bracket.
Horizontal? On single-pin sights, slide the scope in the bracket. On multi-pin, re-center the housing if the windage knob is maxed out.
Avoid Common Adjustment Mistakes
Many archers sabotage their progress with preventable errors.
Do Not Adjust After Every Shot
One flyer does not mean the sight is off. Always shoot three or more arrows to identify a pattern. Reacting to single shots leads to over-adjusting.
Pro tip: Adjust every few shots when you have a group, because an individual arrow may fly off due to form, not the sight.
Do Not Confuse Form Errors with Sight Problems
If arrows scatter randomly, the issue is likely technique, not the sight. Focus on smooth release, consistent stance, and relaxed grip.
Only adjust the sight once groups stabilize.
Use Tools and Track Adjustments
Precision comes from consistency and record-keeping.
Essential Tools
• Allen wrenches in various sizes
• Bow press for peep work
• Bubble level
• Rangefinder, critical for single-pin users
• Notebook or app to log settings
Record Every Change
Track these details for each session:
• Yardage shot
• Pin position
• Number of clicks adjusted
• Weather and lighting conditions
This lets you replicate settings season to season.
Maintain Accuracy Over Time
A sighted-in bow does not stay perfect forever.
Inspect Regularly
Check pin tightness before each session. Verify screw tension and housing alignment. Test level function.
Recheck Before Hunting or Competition
Even with perfect settings, conditions change. Always shoot a quick verification group before critical use.
Use your recorded baseline, then make micro-adjustments as needed.
Frequently Asked Questions About Adjusting a Compound Bow Sight
What is the golden rule for adjusting a bow sight?
Move the sight in the same direction your arrow group is landing. If arrows hit left, move the sight left. If they hit low, move it down. This principle applies to all sight types and archer handedness.
How many arrows should I shoot before adjusting the sight?
Always shoot at least three arrows to form a group. Reacting to single shots, especially flyers, leads to over-adjusting and chasing your sight rather than fixing the real issue.
Should I start sighting in at 10 yards or 20 yards?
Start at 10 yards for coarse alignment. At this close range, large errors are easy to correct, and small movements have minimal effect. Once centered, move to your top pin’s actual distance.
Why do my arrows drift left or right at longer distances?
This is usually caused by bow tilt or second axis misalignment. Use a bubble level to keep the bow vertical. Have a professional check your center shot and second axis alignment.
Can I adjust individual pins on a multi-pin sight?
Yes. After zeroing your top pin and locking the housing in place, adjust each remaining pin individually at its intended yardage. Never adjust the housing again unless restarting the entire process.
How often should I recheck my sight alignment?
Inspect your sight before each session. Verify pin tightness, screw tension, and housing alignment. Always shoot a quick verification group before hunting or competition.
Key Takeaways for Adjusting Your Compound Bow Sight
Success with sight adjustment comes from patience, consistency, and understanding the relationship between mechanical precision and human error. The foundational rule remains simple: move the sight in the direction your arrows land. Start at 10 yards for coarse alignment, shoot groups of three or more arrows before making any adjustment, and lock the housing in place once your top pin is zeroed.
Remember that form issues often masquerade as sight problems. Gripping too tightly, inconsistent anchor points, and fatigue all cause arrow scatter that no sight adjustment can fix. Focus on consistent technique before blaming your equipment. Use tools like bubble levels and rangefinders, record every change, and spread your sighting-in process over multiple sessions to average out minor variables.
With the right setup, disciplined adjustments, and consistent form, your compound bow sight becomes an extension of your skill, delivering precision from 10 to 70-plus yards. Now grab your arrows, trust the process, and start hitting where you aim.


