
How to Make a Bow Drill Fire: Step-by-Step Guide
Making fire with a bow drill is one of the most primal and rewarding survival skills. It requires no modern tools, just friction, patience, and precision. This ancient method has kept humans warm, safe, and fed for thousands of years. While it may seem daunting at first, how to make a bow drill fire successfully comes down to the right materials, proper technique, and relentless persistence.
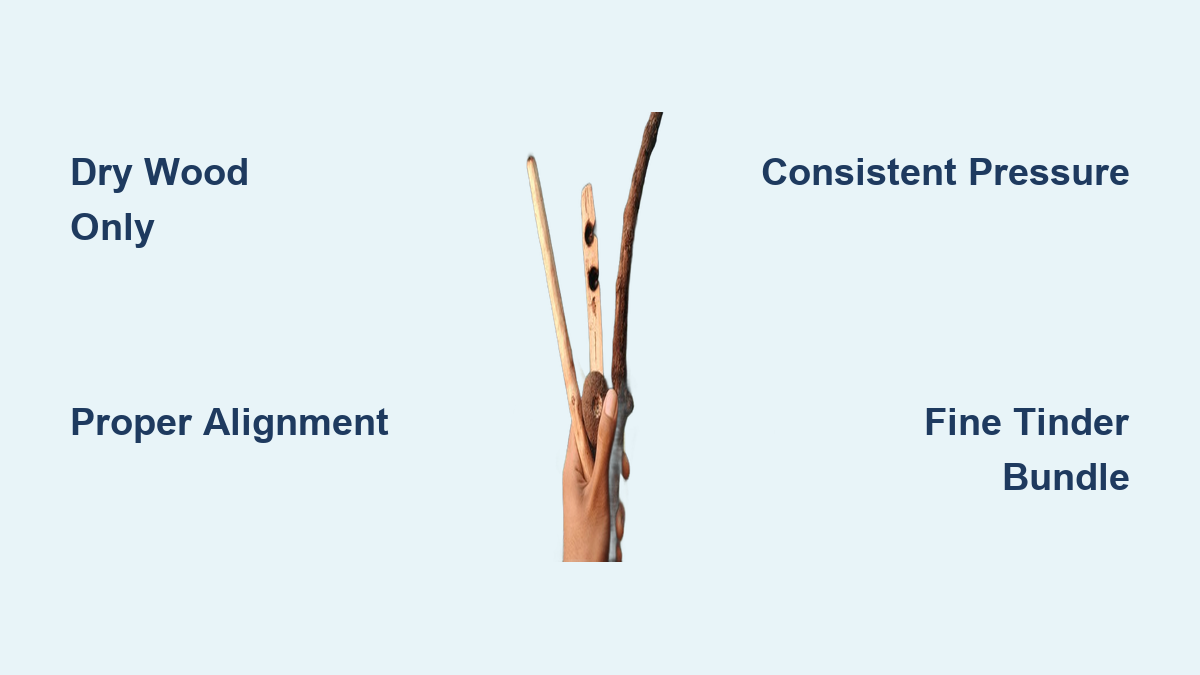
Most beginners fail not from lack of strength, but from poor alignment, wet wood, or inconsistent pressure. The key is not brute force, but controlled, rhythmic motion that generates heat through friction. With dry, softwood components and a steady hand, you can produce an ember in under a minute. But even experienced practitioners often spend weeks mastering the skill. This guide breaks down every component, step, and troubleshooting tip so you can create fire from scratch, anywhere, anytime.
Select the Right Wood for Your Bow Drill
The foundation of a successful bow drill is wood dryness and compatibility. Moisture is the enemy. Wood must be bone-dry, ideally seasoned for months or baked at 170°F for several hours. Green or damp wood will never produce an ember.
Choose soft, non-resinous hardwoods. Ideal species include basswood, willow, cottonwood, sycamore, cedar inner bark, yucca, and juniper for advanced users. Avoid pine, spruce, and other resinous woods. They glaze easily and resist ignition.
Always use the same species and dryness level for both spindle and fireboard. Willow-on-willow, cedar-on-cedar, and basswood-on-basswood are proven combinations. Mismatched woods create uneven wear and reduce heat transfer.
Pro Tip: Kiln-dried 2×4 lumber (usually spruce or pine) can work if completely dry and stripped of bark. But avoid pressure-treated wood. It is toxic when burned.
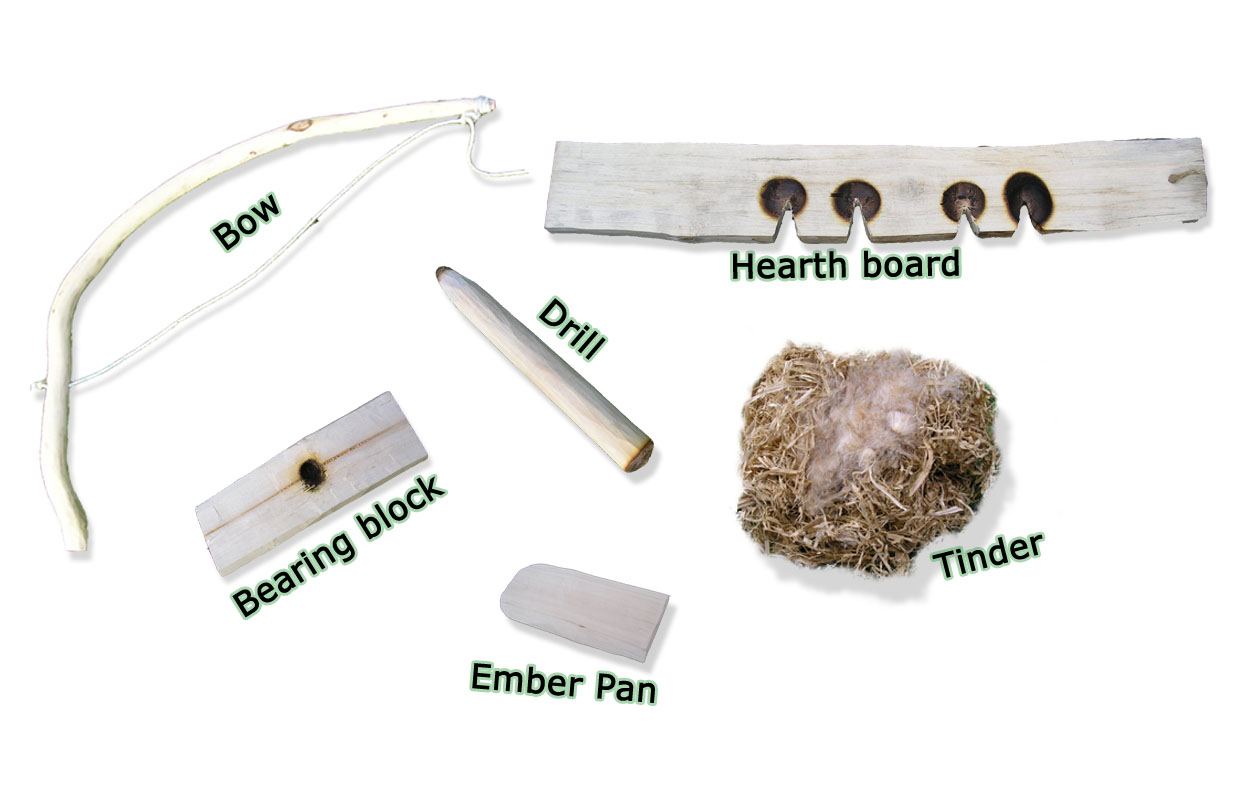
Craft the Perfect Spindle
The spindle is the rotating shaft that creates friction. Its dimensions are critical for success.
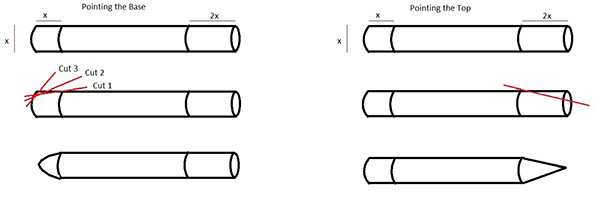
Cut and shape your spindle to these specifications. Length should be 6 to 7 inches for beginners. Diameter should be one-half to three-quarters inch. The spindle must be perfectly straight. Any warp causes wobble and energy loss.
Use a sharp knife to shape both ends. The bottom end needs a blunt or slightly beveled point for maximum contact with the fireboard. The top end should be rounded or slightly concave to fit snugly in the bearing block. Strip all bark before use. Only seasoned or charred wood should touch the fireboard.
Optionally, lightly blacken the bottom tip with a flame to improve heat retention. A charred surface grips better and resists polishing. Never expose fresh, white wood during operation.
Build the Fireboard

The fireboard is where the ember forms. It must be 6 to 12 inches long, at least 2 inches wide, and 15 to 20 mm thick.
Carve the notch and divot carefully. Punch a shallow depression in the center using the spindle or knife. Then carve a V-shaped notch from the edge of the divot to the board’s side. The notch should occupy about one-eighth of the circle. Too large and dust escapes. Too small and it will not smolder.
This notch collects char dust and exposes it to oxygen, essential for ember formation. Flip the board and carve a shallow groove behind the notch to improve airflow to the coal.
Rotate the spindle briefly to polish and char the groove. If the surface becomes shiny (glazed), rub in dry sand to restore friction.
Construct the Bow
The bow converts arm motion into spindle rotation. It should be 24 to 33 inches long, as thick as a broom handle, and stiff, not flexible.
Choose a rigid stick for your bow. Use dead hardwood branches or straight sticks. A slightly curved Y-shape works well. Flex causes string slippage, so rigidity matters more than flexibility.
Carve small grooves or holes at both ends for string attachment. Secure the bowstring with overhand knots, bowline knots, or wrapping technique. Wrap the cord 2 to 3 times near one end to prevent slippage during use.
Pro Tip: A longer bow allows full-arm strokes, increasing momentum and reducing fatigue.
Choose the Right Bowstring
The bowstring must grip the spindle without stretching or breaking.
Best options include paracord, nylon cord, pull-start cord from lawnmowers or weed whackers (most durable), and leather shoelaces. Avoid cotton or elastic cords. They stretch and fail under heat.
Set proper tension by looping the string around the bow, then wrapping it once around the spindle. Adjust so it holds firmly but does not bind. Too loose means slippage. Too tight means resistance.
Test: You should be able to press the spindle into the fireboard without the string slipping or the bow flexing.
Make the Bearing Block
The bearing block stabilizes the top of the spindle. It must be harder than the spindle to resist charring, comfortable to grip, and with a deep socket.
Best materials include yew, holly, oak, elder, juniper or resin-rich knots, bone, antler, or smooth stone with a cup. Avoid soft or dry wood. It chars quickly and fails.
Carve a deep, rounded hole in the center. It should hold the spindle firmly without wobbling. A deeper socket improves control and reduces hand fatigue.
Optionally, insert a fresh leaf (ivy, not poison ivy) or dry moss into the socket to reduce friction. This keeps the block cooler and extends its life. Avoid oily substances. They can ignite.
Expert Note: Still-living hardwood with internal moisture works exceptionally well. It resists heat and does not char.
Prepare the Tinder Bundle
Your tinder must catch the ember instantly. It should be bone-dry, fibrous, and loosely packed.
Best natural options include basswood bark, cedar inner bark (shaved fluffy), thistle or reedmace down, dried grass, fungi, or bird’s nest material, and cattail fluff. Modern alternatives include dryer lint (extremely effective), cotton balls with petroleum jelly, and char cloth.
Build a nest by rubbing the material between your hands to create a fluffy, loose bundle. Make it larger than you think you need. A big nest protects the ember from wind and mishandling.
Place a small amount of ultra-fine tinder (like thistle down) in the center. This acts as an ember extender.
Use an ember pan. Place a thin piece of bark, leaf, or cardboard under the fireboard notch. This catches the coal cleanly and allows easy transfer without crushing it.
Assemble and Operate the Bow Drill
Kneel with one knee down. Place your foot on the fireboard to pin it to the ground. Sit upright and relaxed. Hold the bearing block against your shin or thigh for stability. Lock your wrist and forearm against your leg to prevent wobble.
Start with burn-in. Loop the bowstring around the spindle. Place the bottom tip in the fireboard divot. Begin slow, full-stroke motions to burn a clean groove. Goal: Create a charred, polished circle. This prevents slipping.
Once the groove is set, increase speed with smooth, full-arm strokes. Apply maximum downward pressure through the bearing block. Use your body weight. Press hard without stalling the spindle.
Too little pressure creates polishing. Too much causes binding. Rhythm is key. Long, fluid strokes generate more heat than short, jerky ones.
As heat builds, smoke appears (good sign), dark char dust fills the notch (close to ember), and a glowing coal forms. Stop and check.
If smoke stops, the surfaces may be glazed. Sprinkle in dry sand to restore friction.
Once the notch is full of dust, slightly tilt the spindle toward the notch. This focuses heat and pressure on the char pile, helping it ignite.
Transfer the Ember to Tinder
Carefully lift the fireboard. Look for a small, glowing coal in the notch, about the size of a pencil tip.
It should smolder after stopping, not just glow briefly.
Use fingers or a stick to transfer the coal to the center of your tinder bundle. Do not crush it. Support it with a thin blade or stick if needed. This prevents it from falling through the nest.
Blow the Ember Into Flame
Fold the tinder loosely around the ember. Begin gentle, steady blowing.
Best techniques include using a drinking straw (delivers dry, focused air without moisture) or hand waving with a baseball cap (creates soft breeze, conserves breath).
Blow long, light puffs, not heavy exhalations. Moisture from breath can extinguish the coal.
As the ember spreads, increase airflow gradually. Watch for first flames. Once lit, transfer to your kindling structure (teepee or log cabin). Add small twigs, then larger fuel as the fire grows.
Troubleshoot Common Bow Drill Problems
No smoke indicates wet wood, poor pressure, or misalignment. Fix by using drier materials, pressing harder, and ensuring the spindle is straight.
Thin smoke that stops means glazed (polished) surfaces. Fix by rubbing dry sand into the notch and restarting.
Spindle wobbles due to loose bearing block or weak stabilization. Fix by deepening the socket, bracing arm against leg, and pinning fireboard with foot.
String slips from loose tension, flexible bow, or smooth spindle. Fix by tightening string, using a rigid bow, and roughening the spindle slightly.
Coal will not ignite due to damp tinder, poor airflow, or crushed ember. Fix by using drier tinder, blowing with a straw, and handling gently.
Bearing block chars from using soft wood. Fix by switching to harder material or still-living wood.
Boost Your Success Rate With These Tips
Use sand for friction. After burn-in, sprinkle dry sand into the notch. It breaks glaze and increases friction. Just ensure the sand is completely dry.
Optimize your stability. Press your foot tightly beside the fireboard. Wrap your hand around your leg and tense muscles. Use core strength to stay rigid.
Practice smart. Start with indoor-dried wood and paracord. Get your first ember quickly. This builds confidence. Once technique is solid, try field-collected, unprocessed materials.
Keep a pre-made kit in your survival pack: carved spindle and fireboard, paracord, and dry tinder.
Final Thoughts on Making Bow Drill Fire
The single most important success factor is using extremely dry wood. Ensure perfect alignment to avoid wobble. Apply maximum downward pressure without stalling the spindle. Use a long, rigid bow for full, efficient strokes. Prepare fine, dry tinder before you start drilling. Blow with a straw for dry, controlled airflow. Practice with forgiving materials first to build skill. Stay calm and persistent.
The bow drill is more than a survival method. It is a test of patience, precision, and connection to ancient knowledge. With the right setup and mindset, how to make a bow drill fire becomes not just possible, but reliable. Start today. Your first ember is closer than you think.
Frequently Asked Questions About Bow Drill Fire
How long does it take to make a bow drill fire?
With kiln-dried wood and perfect technique, you can produce an ember in 30 seconds to 1 minute. Beginners typically need 5 to 15 minutes of continuous drilling.
What is the best wood for a bow drill?
Basswood, willow, cottonwood, and cedar are the best choices. They are soft, non-resinous, and produce embers quickly when dry.
Why does my bow drill not produce smoke?
Insufficient pressure, wet wood, or poor alignment prevents smoke. Ensure your materials are bone-dry, apply maximum downward pressure, and check that the spindle is straight and properly seated.
Why does the spindle wobble during drilling?
A loose bearing block socket or weak body stabilization causes wobble. Deepen the socket in your bearing block and brace your arm firmly against your leg.
How do I fix glazed surfaces on my fireboard?
Glazed (shiny) surfaces reduce friction and prevent ember formation. Rub dry sand into the notch and restart the drilling process.
Can I use pine wood for a bow drill?
Avoid pine and other resinous softwoods. They glaze easily and resist ignition. Stick to basswood, willow, cottonwood, or cedar for reliable results.


