
How to Build a Bow Stand: Easy DIY Guide
If you’re an archer who shoots in the backyard, heads to hunting spots, or walks 3D courses, knowing how to build a bow stand can completely change your experience. A well-built stand keeps your bow upright, protects delicate parts like cams and strings, and gives you a place to store arrows, tools, and drinks, all for far less than buying a commercial model. Whether you need something portable for field use or a sturdy setup for your home range, DIY bow stands give you flexibility that pre-made options simply cannot match.
This guide covers four proven designs: compact PVC, folding PVC, wooden 2×4 racks, and Magnus-style metal stands. Each uses affordable materials you can find at any hardware store, and I’ll walk you through exact measurements, assembly steps, stability fixes, and pro tips from real-world testing. By the end, you’ll know exactly which design fits your needs and how to build it right the first time.
Choose the Right Bow Stand Design for Your Needs
Before you cut any material, pick the design that matches your primary use case. Each type has distinct strengths and trade-offs.
Quick recommendation by scenario:
• Hunters and field archers should choose folding PVC or Magnus-style stands
• Home range owners benefit from glued PVC or wooden 2×4 racks
• Tactical setups work well with camo-wrapped PVC
• Youth programs need the durability of 2×4 wooden racks
Compare key specifications:
| Feature | Compact PVC | Folding PVC | Wooden 2×4 | Magnus-Style |
|---|---|---|---|---|
| Best For | Backyard range | Truck-bed transport | Permanent storage | Hunting in field |
| Build Time | 1–2 hours | 1.5–2.5 hours | 2–3 hours | 15–30 minutes |
| Cost | $25–$40 | $20–$35 | $30–$50 | Under $9 |
| Portability | Low | High | None | Very high |
| Stability | High (glued) | Moderate | Very high | High (mounted) |
Build a Compact PVC Bow Stand

This glued PVC design creates a stable, permanent stand with built-in arrow holders and a cup holder. The 2-inch pipe provides rigidity, and the 20-inch square base keeps everything steady.
Cut and Assemble the Base
Materials needed:
• 2-inch PVC pipe (2 × 10 ft)
• Four 90-degree T fittings (2-inch)
• PVC cement and primer
• Measuring tape, marker, PVC cutter
Steps:
- Cut two pieces to 2¾ inches and two pieces to 3 inches for side connectors
- Connect these with four T fittings to form a square base
- Insert T fittings at the midpoint of each side for vertical and arrow holder attachments
Critical fix: Earlier builds using 4-inch cuts caused serious misalignment. Using 2¾-inch and 3-inch pieces creates snug, wobble-free joints.
Install Vertical Support and Arrow Holders
Add height and arrow storage with upward-facing T outlets.
Steps:
- Attach 8-inch vertical supports at opposing corners using T fittings
- On one side, install this sequence: 2¾-inch → T → 3-inch → T (center) → 3-inch → T → 2¾-inch
- Insert 11-inch PVC segments into upward-facing T outlets for arrow tubes
- Use 1.5-inch PVC for wider arrow capacity if you need to hold more shafts
Pro tip: Duplicate the arrow holder on the opposite side for dual quivers.
Set Height and Add Cup Holder
Optimize ergonomics and add convenient drink storage.
Steps:
- Insert 35-inch vertical 2-inch pipe into the center T fitting
- Test with your actual bow and adjust height so the limbs rest securely
- Stack couplings in this order: 1¼-inch × 1½-inch, then 1½-inch × 2-inch, then 2-inch × 3-inch
- Insert a 2-inch pipe spacer between couplings to elevate the top cup
- Cap the final 3-inch section
Why it works: Stepped couplings fit Gatorade bottles, soda cans, and Capri Sun pouches without needing any adapters.
Finalize and Reinforce
Lock everything in place for long-term stability.
Steps:
- Glue all joints with PVC cement after dry-fitting
- Wipe excess cement with a rag before it dries
- Wrap with camo tape for a stealth look if desired
- Avoid painting PVC without special primer
User-tested result: This design holds 3 fully equipped bows (10–12 lbs total) with zero tipping.
Build a Folding PVC Bow Stand for Portability
This version collapses to half its size, making it perfect for truck-bed transport and seasonal storage. The key difference from the compact version is using 1¼-inch pipe with unglued joints and snapper pins.
Construct the Base Frame
Materials needed:
• 1¼-inch PVC pipe (2 × 8 ft)
• Four 90-degree elbows (1¼-inch)
• Four T fittings (1¼-inch)
• 3/8-inch snapper pins (4–6)
• 7/16-inch drill bit for clearance
Base dimensions: 28 inches × 20 inches rectangle. Use elbows at corners and do not glue these joints. Install one center T fitting on one 20-inch side for the upright, and add two T fittings on the opposite side for arrow holders.
Add Upright and Bow Cradle
Create a secure bow hanger that folds flat.
Steps:
- Insert a 35-inch 1¼-inch PVC into the center T fitting
- Attach a T fitting at the top
- Add two 8-inch horizontal arms into side outlets
- Cap both ends to form a U-shaped cradle that holds 3–4 bows securely
Visual cue: The cradle should sit just below the bow’s axle-to-axle midpoint when the bow rests in place.
Install Folding Mechanism
Enable tool-free setup and breakdown.
Steps:
- Drill 3/8-inch holes through elbows and connected pipes
- Use a 7/16-inch bit for slight clearance, which eases pin insertion
- Insert snapper pins to lock the open position
- Drill a second set of holes and insert pins for the folded position
- Mark positions with black marker lines for quick alignment
Pro tip: Angle the upright slightly inward to shift the center of gravity over the base and prevent forward tipping.
Optimize Stability and Storage
Ensure reliability in the field.
Steps:
- Test with a loaded bow before first use
- Add self-tapping screws at the base-to-upright joint if wobble occurs
- Folded size measures approximately 14 inches × 28 inches, fitting under truck seats
- Deployment time is under 60 seconds
User feedback: This design is called “perfect for seasonal storage” and “easy to toss in the bed.”
Build a Wall-Mounted Wooden Bow Rack
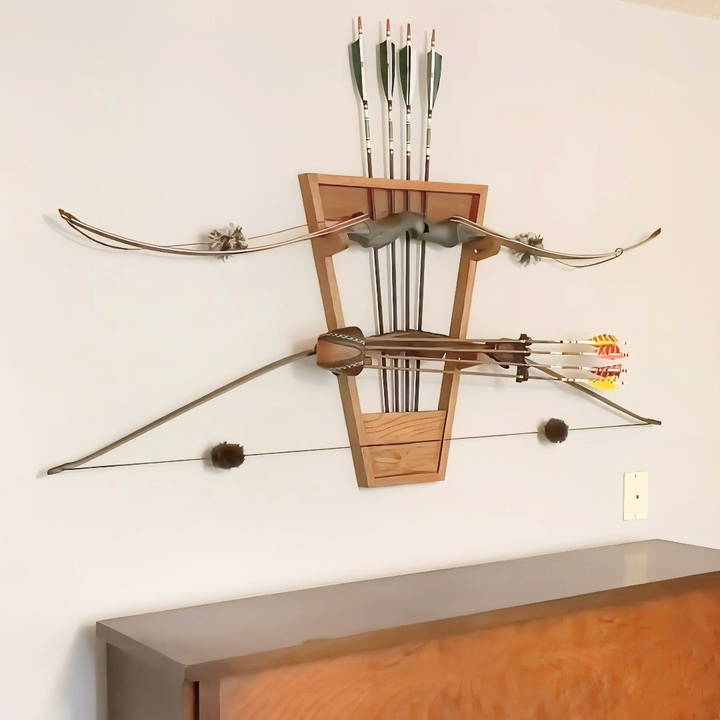
Create a rugged, long-lasting storage solution for your garage or archery room. This design works especially well for home ranges and youth programs.
Cut and Assemble 2×4 Frame
Materials needed:
• 2×4 pressure-treated or kiln-dried pine (2–3 × 8 ft)
• 2.5-inch exterior wood screws
• L-brackets (4–6)
• Carpenter’s square
Dimensions:
• Vertical side boards: 72 inches
• Horizontal crossboard: 36 inches
• Spacing: 5 inches apart for traditional bows, 12+ inches apart for compound bows
Steps:
- Cut pieces using a saw
- Assemble the rectangle with screws and L-brackets
- Reinforce corners with wood glue
- Ensure 90-degree angles with a carpenter’s square
Sand and Finish for Weather Resistance
Protect wood from sun, rain, and warping.
Steps:
- Sand all surfaces with 120–150 grit paper
- Wipe clean
- Apply oil-based stain-varnish combo with a foam brush
- Wait 6+ hours between coats and apply 2–3 coats
- Optional: Seal with polyurethane for UV and moisture protection
Pro tip: Let stain rags dry flat and sealed in plastic. Oily rags are highly flammable.
Install Leather Bow Straps
Securely suspend bows with adjustable retention.
Steps:
- Cut leather straps to length (must wrap around the limb)
- Attach snaps (male/female) using upholstery nails
- Space evenly and mark positions first with pencil
- Test fit your bows and adjust strap length if needed
Challenge noted: Measuring snap placement takes time. Dry-fit first, then mark.
Add Custom Accessories
Turn functional storage into personalized gear.
Options include:
• Mount vintage arrows as decor
• Install a phone holder for tuning videos
• Add a cup holder or release aid hook
• Include a tool tray for small parts
Ideal for: Home garages, youth archery programs, and display setups.
Build a Magnus-Style Portable Bow Stand
This lightweight design attaches directly to your bow and uses repurposed broken arrows for legs. It adds negligible weight and doesn’t interfere with shooting.
Prepare Arrow Shaft Legs
Repurpose broken arrows into lightweight legs.
Materials needed:
• Two arrow shafts (carbon or aluminum)
• 8×32 threaded inserts (4)
• Epoxy or hot melt glue
• Hacksaw or Dremel
Steps:
- Cut one shaft to 14 inches and one to 14.5 inches (different lengths balance bow weight)
- Insert 8×32 threaded inserts into both ends of each shaft
- Secure with epoxy or hot glue and let cure fully
Why different lengths: The longer leg goes on the heavier side (sight/rest side) to balance the bow’s weight distribution.
Modify Heavy-Duty Tie Plate
Create a stable base that mounts near the stabilizer.
Steps:
- Use a 6-inch × ¾-inch tie plate from the hardware store
- Drill a 3/8-inch center hole for the stabilizer shaft
- Remove one corner tab to reduce bulk
- Bend side tabs downward and backward using a vise
- Match the angle to your bow’s limb curve
Mounting tip: Position so limbs sit approximately 1.5 inches above ground when standing.
Attach Legs and Mount to Bow
Assemble and balance the final unit.
Steps:
- Screw legs to the plate using 8×32 machine screws, washers, and nuts
- Tighten securely
- Mount the plate near your stabilizer mount
- Ensure the longer leg is on the heavier side (sight/rest side)
Field-tested: This adds negligible weight and doesn’t interfere with shooting.
Enable Compact Storage
Store legs in your quiver when not in use.
Steps:
- Cut the head off a spare screw to make an all-thread rod
- Thread legs together as a single unit
- Store in your quiver
- If stuck, heat the joint with a lighter to loosen the glue
Hack: Use Loctite or hot glue, which is heat-reversible and secure.
Boost Stability and Prevent Forward Tipping

The most common failure mode is tipping forward when the bow is placed. These solutions address that directly.
Angle the Upright Inward
Tilt the vertical support 5–10 degrees toward the back of the stand. This shifts the center of gravity over the base rather than forward of it.
Use a Wider Base
A minimum base of 28 inches × 20 inches provides sufficient moment arm. Anything smaller risks tipping under load.
Glue or Reinforce Joints
PVC stands should have all joints glued. Wooden stands need screws and wood glue. Folding PVC should use self-tapping screws at critical joints if wobble develops.
Balance Weight Distribution
Place arrow holders opposite the bow cradle. Use dual cradles symmetrically. Never hang heavy quivers or gear off one side.
Tested: Folding PVC held 3 loaded bows with no tipping, even on a slight incline.
Add Practical Upgrades and Accessories
Install a Universal Cup Holder
Stack these couplings in order: 1¼-inch × 1½-inch, then 1½-inch × 2-inch, then 2-inch × 3-inch. Insert a 2-inch pipe between layers to raise the top. This fits 20 oz soda, Gatorade, and energy drink cans.
Integrate Phone or Light Mounts
Use 3D-printed clamps or attach to vertical pipe with zip ties or hose clamps. This lets you mount a phone for recording your form or add a USB LED light for low-light practice.
Customize with Camo or Tactical Finish
Wrap PVC with camo tape in woodland, desert, or digital patterns. Use matte black spray paint on metal parts with proper primer. Avoid shiny finishes that reflect light and spook game.
Maintain Your Bow Stand and Extend Its Lifespan
PVC Care
Inspect annually for UV cracks or brittleness. Re-pin joints if snapper pins loosen. Store indoors when not in use, which extends life to 5–7 years. Replace cracked sections easily thanks to the modular design.
Wood and Metal Maintenance
| Material | Maintenance Routine |
|---|---|
| Wood | Reapply sealant every 6–12 months; check screws |
| Metal | Clean inserts; re-tighten nuts; prevent rust |
| Magnus-Style | Heat-clean stuck joints; inspect glue bonds |
Final Thoughts on Building Your Own Bow Stand
Building a bow stand comes down to matching the design to your specific needs. For backyard ranges, glued PVC or wooden 2×4 racks provide permanent, stable solutions. For hunting and field use, folding PVC or Magnus-style stands offer portability that commercial models cannot match at this price point.
All four designs covered here are field-proven, cost between $9 and $50, and can be built with basic tools in under three hours. The Magnus-style build costs under $9 and uses repurposed materials, making it the most budget-friendly option. PVC designs offer the most customization with cup holders, phone mounts, and camo finishes. Wooden racks excel in durability and work perfectly for home garages and youth programs.
The key to success is testing with your actual bow before field use. Check height, confirm balance, and verify clearance to prevent string contact. A DIY bow stand isn’t just functional, it’s a mark of pride. Build it, use it, and improve it. Your next shot starts with a stable setup.
Frequently Asked Questions About Building a Bow Stand
What is the cheapest way to build a bow stand?
The Magnus-style portable stand costs under $9, using broken arrow shafts, a tie plate, and basic hardware. This is roughly 80% cheaper than commercial models.
How long does it take to build a PVC bow stand?
A compact glued PVC stand takes 1–2 hours. A folding PVC stand takes 1.5–2.5 hours due to the drilling and pinning mechanism.
Can I use regular PVC pipe for outdoor bow stands?
Yes, but outdoor use reduces lifespan to 3–5 years due to UV exposure. Store indoors when not in use or cover with camo tape for some UV protection.
What bow stand holds the most weight?
The wooden 2×4 rack holds 4+ bows with very high stability. The compact glued PVC holds 3–4 bows (10–12 lbs total) with zero tipping in testing.
Do I need special tools to build a bow stand?
Basic tools suffice: measuring tape, PVC cutter or hacksaw, drill with bits, and a carpenter’s square. No specialized equipment required.
Can I add a cup holder to any bow stand design?
Yes, the coupling stack method (1¼-inch → 1½-inch → 2-inch → 3-inch) works with any PVC stand. Wooden racks can have cup holders attached with screws.


