
How to Pull a Compound Bow: Proper Technique Guide
Pulling a compound bow correctly is not about brute strength. It is about precision, alignment, and biomechanical efficiency. When you learn how to pull a compound bow with proper form, you gain accuracy, consistency, and long-term shooting comfort. This guide breaks down every critical step from stance and grip to anchor, release, and follow through.
Whether you are a beginner or refining your technique, mastering the draw sequence transforms your shooting. You will reduce fatigue, prevent injury, and shoot tighter groups. We will cover equipment setup, real-time cues, and pro drills that build repeatable muscle memory for flawless shots.
Build a Stable Shooting Stance
Your stance is the foundation of a consistent draw. Without balance and alignment, errors multiply through the entire shot cycle.
Align Feet for Target Accuracy
Position your feet hip-width apart with the ball of your back foot and the big toe of your front foot aligned on an imaginary line pointing at the target. This creates a balanced platform that supports smooth drawing and clean release.
Distribute your weight evenly with a slight forward bias on the front foot. This prevents leaning backward under draw tension and keeps your center of gravity centered.
Stack Joints for Maximum Stability
Maintain vertical skeletal alignment throughout your body. Keep feet under hips, hips under shoulders, and shoulders stacked over the pelvis. This stacking minimizes muscular compensation, reduces swaying, and ensures force transfers efficiently from the ground up.
Grip the Bow with Zero Tension
A tense bow hand ruins accuracy. Learn to hold the bow passively using bone, not muscle.
Place Hand in the Webbing
Rest the grip in the webbing between your thumb and index finger, not in your palm. The bow should contact from the base of your thumb to your wrist crease. Think of holding the bow like propping against a door frame. Your hand supports it but does not squeeze.
Avoid Over-Gripping
White knuckles mean you are gripping too hard. Over-gripping causes torque on the riser, arrow fishtailing, and inconsistent grouping. Keep fingers relaxed and slightly bent with your thumb at a 45-degree angle. This creates a repeatable, neutral hand position.
Use a Wrist Sling for Full Relaxation
Attach a wrist sling to prevent dropping the bow after release. It lets you go completely limp post-shot, eliminating the instinct to grip tightly for security. A proper grip means the bow falls forward naturally after release, not sideways or backward.
Nock Arrow and Attach Release Safely
Before drawing, ensure your equipment is ready and safe.
Nock the Arrow Correctly
Slide the arrow onto the string so the index vane (cock feather) faces away from the riser. Push until it clicks securely onto the nocking point. Double-check that it is seated fully because partial nocking risks dry-firing.
Hook the D-Loop Securely
Clip your mechanical release aid onto the D-loop, a short segment of serving between two knots on the string. Make sure the hook engages cleanly and does not wobble. Practice attaching the release under field conditions to build confidence.
Never Dry-Fire the Bow
Releasing the string without an arrow can destroy limbs, cams, and cables. Always confirm an arrow is nocked before drawing.
Start the Draw with Full-Body Engagement
The draw begins long before your hand moves. It starts with mental focus and joint alignment.
Raise Both Arms Simultaneously
Lift your bow arm and draw hand together toward the target. Keep the bow arm extended but not locked. This pre-aligns your body and prepares your back muscles for engagement. Avoid raising just one arm because this throws off balance and delays proper form.
Begin Drawing Only After Alignment
Wait until both arms are oriented toward the target before initiating the pull. Rushing the draw leads to misalignment, shoulder strain, and inconsistent anchors. Your bow arm should point directly at the target like a laser beam.
Pull Straight Back Using Back Muscles

The key to a powerful, sustainable draw is engaging the correct muscles, your back, not your arms.
Follow a Lever-Like Draw Path
Pull the string straight back, not up or sideways. Think of closing a heavy barn door behind you. This path maximizes mechanical advantage and minimizes shoulder stress. Lateral pulls cause cam lean, string torque, and poor arrow flight.
Keep Elbow Above Shoulder Height
Maintain your draw elbow elevated above shoulder height throughout the motion. A high elbow engages the lats, rhomboids, and traps while preventing shoulder impingement and allowing full range of motion. A low elbow wastes energy, strains the rotator cuff, and makes it hard to reach full draw.
Rotate Torso Gently Toward Target
As you draw, rotate your torso slightly toward the target. This activates core muscles, distributes load across larger muscle groups, reduces isolated shoulder strain, and improves balance in tight spaces. Think of turning like checking a side mirror, small controlled motion.
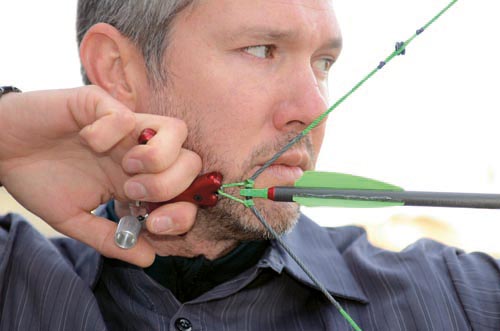
Anchor Consistently with Two-Point Contact
At full draw, your hand must stop at the same spot every time. Use a two-point anchor for unmatched repeatability.
Touch String to Nose Tip
At full draw, the string should lightly touch the tip of your nose. This confirms consistent draw length and head position even in low light. If the string does not reach your nose, you are not at full draw. If it hits your cheek, your head is tilted.
Position Hand at Jaw Corner
Form a V between your index and middle fingers and place it against the corner of your jawbone. The jaw should be between the two fingers, providing tactile feedback you can feel with eyes closed. This dual contact ensures perfect alignment shot after shot.
Use Anchoring Aids for Precision
Use a kisser button, a small rubber nub on the string that touches your lips or mouth corner at full draw. This confirms draw length. Also ensure the rear peep lines up perfectly with the front sight pin. Misalignment means incorrect anchor or draw length. The peep comes to the eye, not the eye to the peep.
Achieve Full Draw with Mechanical Let-Off
Compound bows use cams to reduce holding weight at full draw. This is called let-off.
Draw Until the Cam Stops
Continue pulling until the cam system reaches its mechanical stop. At this point, the let-off engages, reducing holding weight by 65 to 80 percent. For example, a 60-lb peak draw with 80 percent let-off means only 12 lbs to hold at full draw.
Let Off-Weight Stabilize the Bow
Once at full draw, the bow becomes mechanically stable. Any shaking or drifting indicates poor form, excessive draw weight, or inconsistent anchor. Your sight pin should float slightly above the target, ideally 10 inches to 1 foot, then settle naturally into aim.
Release with Surprise, Not Anticipation
The release determines accuracy. A jerky, anticipated shot ruins everything.
Choose the Right Release Type
Index trigger releases fire like a gun and are easy to learn but can encourage trigger panic. Tension-activated back tension releases fire when back muscles apply pressure and promote surprise release, ideal for consistency.
Keep Hand Flat and Pressure Balanced
Hold the release with a flat back of the hand, do not curl into a fist. Distribute 60 to 65 percent of pressure on your index finger with the remainder on middle and ring fingers. Avoid brass knuckles grip because it introduces tension and disrupts alignment.
Break the Shot During Breath Pause
Inhale deeply, exhale fully, then release during the respiratory pause. Exhalation stabilizes your body and reduces micro-movements. Increase back tension gradually until the release fires. Do not flinch or jerk. The shot should surprise you.
Follow Through with Natural Motion
The shot is not over when the arrow flies. Your body must stay committed.
Push and Pull After Release
Push the bow arm forward into the riser and drive the release elbow straight back along the jawline. This creates a natural push-pull motion that stabilizes the bow and ensures clean energy transfer. The bow will fall forward naturally. Do not fight it.
Keep Head Still and Eyes on Target
Do not drop your head or look at the target impact. Eyes stay locked forward and head remains upright as if suspended by a string from the crown.
Analyze with Video Review
Record your shots in slow motion to check for punchy thumb or finger movements, confirm elbow path and anchor consistency, and evaluate balance and follow-through. Film side, front, and rear angles to catch subtle flaws.
Fix Common Drawing Mistakes
Even experienced archers fall into bad habits. Know the signs and correct them fast.
Stop Drawing Into the Chest
Pulling the string into your chest limits motion, drops the elbow, and disengages the back. Focus on pulling straight back, not inward. Use mirror or video feedback to correct this habit.
Correct Low Elbow Immediately
A low elbow strains the shoulder and reduces power. Symptoms include pin dropping below target, arm feeling heavy, and inability to reach anchor. Use the tennis ball drill and consciously raise the elbow during draw.
Avoid Sky Drawing
Drawing too high risks safety and violates NFAA and ASA rules. Dangers include indoor ceiling strikes, outdoor overshoots, and disqualification. Keep your draw path level and aligned with the target line.
Train Smart with Drills and Strength Work
Consistent practice builds mastery. Use targeted drills to lock in perfect form.
Reinforce Form with Key Drills
Use the tennis ball drill to ensure high elbow. Use a dry-fire practice device to build muscle memory without arrows. Practice blank bale shooting to eliminate aiming distraction and focus on draw, anchor, and release.
Build Draw-Specific Strength
Perform upright rows targeting rear delts, upper back, and rhomboids. Keep elbows closer to your head than behind your body. Use light weights or resistance bands. Train 2 to 3 times per week and avoid overtraining.
Track Progress with a Shooting Journal
Log your draw weight, shots per session, form notes, and accuracy trends. This reveals plateaus and guides improvement.
Optimize Performance: Pro Checklist
Use this reference to verify proper technique:
Draw weight should match your strength and increase gradually. Elbow position must stay above shoulder height at all times. Anchor point requires two-point contact, nose plus jaw V. Draw path must be straight back in a lever-like motion. Torso rotation engages the core gently. Grip pressure stays light, and use a wrist sling. Follow-through should be natural push-pull motion. Training tools include tennis ball, video, and blank bale. Strength focus targets lats, rhomboids, traps, and rear delts. Release type should be tension-activated for surprise. Breathing requires full exhale before release.
Final Tips for Long-Term Mastery
Prioritize form over poundage because a 40-lb bow shot perfectly beats a 60-lb bow shot poorly. Practice consistently to build automaticity. Protect your body with proper mechanics to prevent injury. Use technology like video, journals, and trainers to accelerate growth. Test in real conditions by practicing drawing seated or from cover for hunting readiness. Start light and progress slowly because quality form beats quantity every time. Maintain equipment by inspecting strings, cables, bolts, and rest monthly. Store in a case to protect from moisture, impacts, and temperature swings.
Frequently Asked Questions About Pulling a Compound Bow
What is the proper way to grip a compound bow?
Hold the bow in the webbing between your thumb and index finger with minimal pressure. Keep fingers relaxed and slightly bent with your thumb at a 45-degree angle. Use a wrist sling for security so you can maintain a completely relaxed grip.
Which muscles should I use to draw a compound bow?
Engage your back muscles, specifically the latissimus dorsi, rhomboids, trapezius, and posterior deltoids. The draw should feel like pulling with your back, not your arms. This provides more power and reduces fatigue.
What is a two-point anchor and why is it important?
A two-point anchor involves the string touching your nose tip while your hand forms a V at the jaw corner. This dual contact creates a repeatable reference point that ensures consistent draw length and head position for accurate shooting.
How do I prevent target panic when releasing?
Use a tension-activated back tension release that fires when your back muscles apply pressure. Practice the surprise release by gradually increasing back tension until the shot breaks naturally. Breathe deeply and exhale fully before release.
What is let-off in a compound bow?
Let-off is the mechanical reduction in holding weight at full draw provided by the cam system. Most compound bows offer 65 to 80 percent let-off, meaning a 60-lb bow only requires 12 lbs of holding weight at full draw.
How do I know if my draw weight is too heavy?
Signs of excessive draw weight include straining during the draw, shoulder shrugging, inability to reach full draw comfortably, and shaking at full draw. Start with a manageable weight and increase only after maintaining proper form consistently.
Key Takeaways for Mastering Your Compound Bow Draw
Mastering how to pull a compound bow is the cornerstone of archery excellence. It is not about strength. It is about leverage, alignment, and control. When you pull correctly, every shot feels effortless, accurate, and repeatable.
Focus on these three priorities. First, engage your back muscles throughout the entire draw rather than relying on arm strength. Second, maintain a consistent two-point anchor using your nose and jaw for perfect shot repeatability. Third, execute a surprise release with proper follow-through to transfer energy cleanly.
Train with intention, prioritize form over poundage, and shoot with confidence. The perfect draw is not just a motion. It is a discipline that separates good archers from great ones.


