
How to Fix Lewmar Bow Thruster Not Working
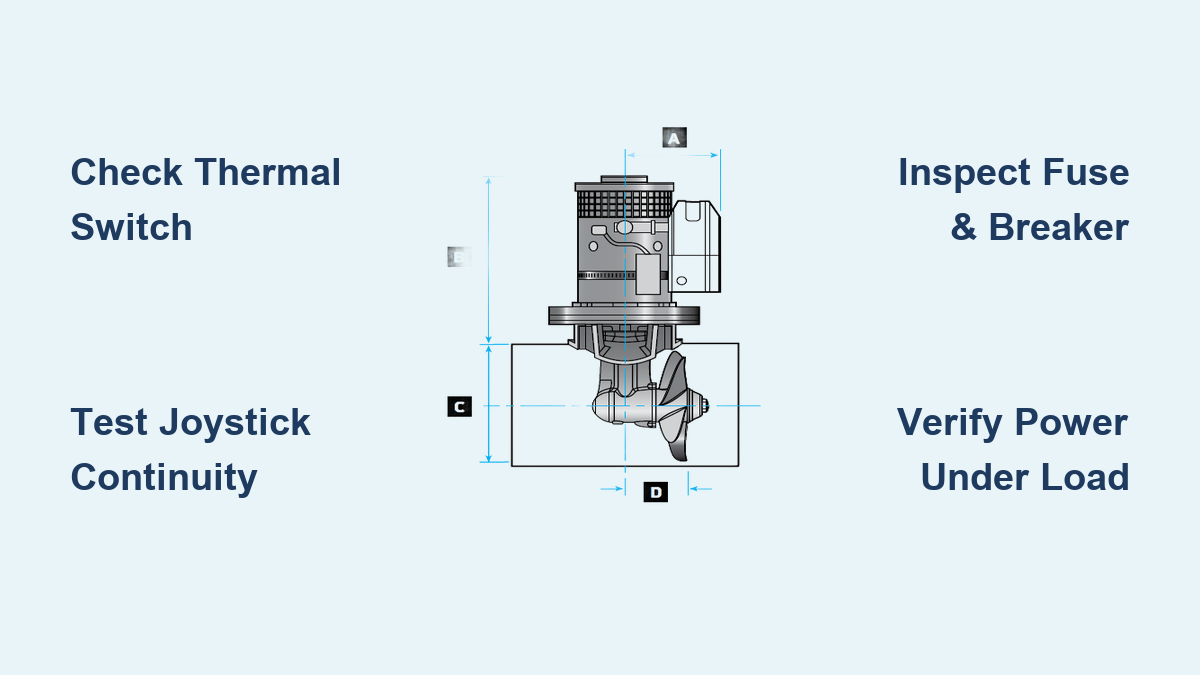
If your Lewmar bow thruster isn’t working, especially the popular 185TT model, you’re not alone. Many boat owners report sudden failures, indicator lights that refuse to turn off, or complete power loss despite a healthy battery. The issue often isn’t the motor but hidden electrical faults in overlooked components. This guide cuts through the confusion with actionable diagnostics, real-world fixes, and critical warnings missed in official manuals. You’ll learn how to pinpoint whether the problem is a blown fuse, faulty joystick, stuck control unit, or a hidden thermal switch failure that mimics expensive electronic breakdowns. Whether you’re troubleshooting a silent thruster or a control box that stays live indefinitely, this step-by-step repair roadmap will get you back in control fast.
Verify Battery and Power Supply
Before tearing apart electronics, confirm your power source is truly delivering what the thruster needs.
Check Voltage Under Load
Use a multimeter to measure voltage at the battery terminals. A fully charged 12V system should read 12.6V or higher, while a 24V system should read 25.2V or higher. Then re-test at the thruster’s power input while attempting activation. A drop below 19V on a 24V system during operation signals weak batteries or high resistance in cabling, which is common on older boats.
Inspect Battery Isolation and Cabling
Ensure the main DC breaker or isolator switch is ON and functional. Test for voltage drop across connections by placing multimeter probes on each end of a cable. Look for warm spots, discoloration, or loose terminals, as these are signs of poor conductivity. Even if voltage reads fine at rest, undersized or corroded cables cannot deliver the hundreds of amps a Lewmar 185TT demands. If the motor clicks but won’t spin, suspect cabling first.
Test Fuse and Circuit Breaker
The fuse and circuit breaker are the first actual failure points in most no-power cases.
Locate and Inspect Main Fuse
The main fuse is typically a 50-100A blade or ANL fuse located near the battery or distribution panel. Remove it and check for a visible break in the fuse element. Use a multimeter in continuity mode: no beep means the fuse is blown. Replace only with the correct amperage rating. Never jumper a fuse as a permanent fix.
Diagnose Tripped or Failed Breaker
Reset any manual-reset circuit breaker in the thruster circuit. Test continuity across the terminals. No continuity when reset indicates a faulty breaker. If it trips immediately when powered, there is a short circuit downstream in the motor or wiring. A breaker that trips repeatedly indicates a serious fault. Do not bypass it.
Examine Wiring Connections
Loose, corroded, or water-damaged wires are silent killers of marine electronics.
Inspect Three Critical Junctions
Focus on these connection points. First, check the battery terminals and clean with baking soda and water mixture, then retighten securely. Second, open the motor junction box carefully and look for moisture, green corrosion, or burnt insulation. Third, unplug the joystick harness and check for pin corrosion or bent contacts.
Look for These Red Flags
Watch for white or green corrosion on terminals, spongy or cracked insulation, water inside connectors, and discolored or warm wiring after use. After cleaning, apply dielectric grease to prevent future moisture ingress. Saltwater accelerates corrosion, so on offshore boats, inspect every three months.
Test Joystick Switch Function
A faulty joystick is a common culprit, but do not replace it blindly.
Use Multimeter to Check Continuity
Set the meter to continuity mode. Unplug the joystick from the control box. Test these circuits: the on/off button should beep when pressed, the port direction should beep when the joystick is moved left, and the starboard direction should beep when moved right. No beep indicates internal switch failure.
Bypass Joystick Temporarily
To isolate whether the joystick is the problem, jumper the power input to the control unit’s activation wire, which is usually red. If the system powers on, the joystick is faulty. Only do this briefly. Never leave the system jumpered due to the risk of accidental thruster activation.
Diagnose Control Unit

When lights stay on but the thruster won’t respond, or worse, won’t turn off at all, the black box may be failing.
Decode Indicator Light Behavior
No lights means no power, a blown fuse, or a dead control unit. Lights on with no response indicates a faulty joystick signal or internal relay failure. Lights that stay on after use point to a stuck relay or logic failure where the unit won’t auto-shutdown.
Why the Black Box Fails
The control unit is potted in epoxy, so no internal repair is possible. Heat and moisture damage degrade components even with sealing. Stuck relays can keep power flowing even when the joystick is off. Some users report replacing three units in five years, with lifespan often under 12 months in harsh environments.
Fix Persistent Power-On Issue
When your Lewmar thruster control stays live and won’t shut down, safety logic is compromised.
Confirm Auto-Off Failure
The system should cut power after 20 minutes of inactivity and prevent motor overuse with a 3-minute duty cycle limit. If neither works, the safety features are not functioning.
Common Causes
A faulty on/off switch in the joystick may be sending a constant on signal. An internal short in the control unit could be keeping relays engaged. Degraded potting compound may allow moisture into the circuit board.
Immediate Workaround
Install a manual isolator switch on the thruster’s positive feed. This lets you kill power completely when not in use and prevents battery drain and accidental activation. Simply break the main positive line. Label the switch clearly and train all crew to use it.
Don’t Skip: Test the Thermal Switch
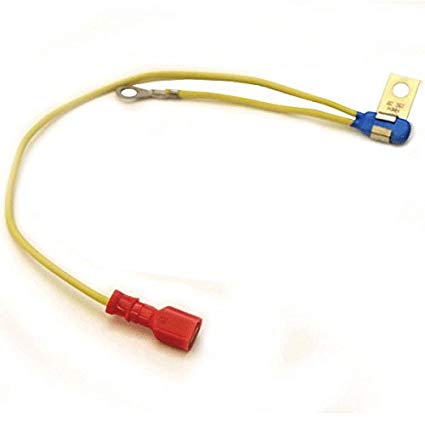
This is the most overlooked failure point and often the real reason your thruster won’t start.
Why It Matters
The thermal switch cuts power if the motor overheats. If it fails open, no power reaches the motor even if everything else works perfectly. The official Lewmar guide doesn’t list it in basic troubleshooting, which is why it gets missed.
How to Test It
Locate the switch, which is usually inside the motor housing or inline in the control circuit. Disconnect the wires. Set the multimeter to continuity. At room temperature, it should beep, indicating a closed circuit. If it shows open, replace the thermal switch.
When to Suspect It
Suspect a thermal switch failure when the motor feels cool but the system won’t activate, when fault codes point to the black box but a new unit doesn’t solve it, or when operation is intermittent after running for a few minutes.
Replace Control Unit Correctly
When all else fails, replacement is the only option.
Gather What You Need
You will need the correct model match, such as a Lewmar 185TT control box, a 4-wire connector kit if re-terminating, a wrench for the two mounting nuts, and dielectric grease.
Step-by-Step Swap
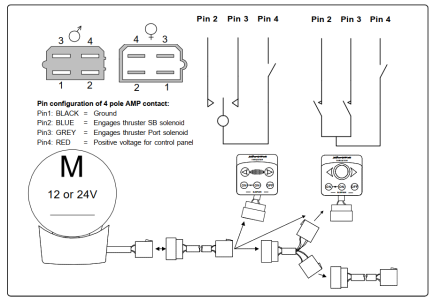
Disconnect the battery at the main switch first. Unplug the 4-wire harness from the old unit. Remove the two mounting nuts securing the box and pull out the old unit, noting the wire routing. Install the new unit and reattach the nuts. Reconnect the wires: red for power, black for ground, blue for port, and green for starboard. Restore power and test.
On many boats, this requires removing ceiling panels or pedestal trim, so plan for 30 to 60 minutes.
Consider Aftermarket Alternatives
Tired of replacing failed Lewmar units? Explore other options.
Vetus Controller Compatibility
Some users report that Vetus digital controllers work with Lewmar motors. You must match voltage, which is 12V or 24V, and signal type, which should be momentary push-button. This requires rewiring and testing.
Upgrade Benefits
Aftermarket controllers often offer better diagnostic LEDs, sealed and serviceable housings, and longer warranties. Not all are plug-and-play, so consult a marine electrician before swapping.
Follow Diagnostic Flowchart
Use this sequence to avoid costly mistakes.
Step 1: Battery and Fuse Check
Check if voltage is 19V or higher under load and whether the fuse is intact.
Step 2: Wiring and Connections
Verify all terminals are tight and corrosion-free.
Step 3: Joystick Test
Use a multimeter to check continuity on the button and joystick.
Step 4: Bypass Test
Apply 12V directly to the motor briefly. If it spins, the problem is in the joystick, wiring, or control unit. If it doesn’t spin, the motor or internal circuit is faulty.
Step 5: Control Unit Output
With the joystick activated, check if output wires show 12V. Yes means the motor is likely faulty. No means the control unit is bad.
Step 6: Thermal Switch
Test continuity. Closed at room temperature is good. Open means replace the thermal switch. Always replace the control unit only after ruling out all other causes.
Prevent Future Failures
Avoid repeat breakdowns with smart maintenance.
Install Master Isolator Switch
Cut power completely when docked or underway. This eliminates risk of accidental activation and reduces wear on control electronics.
Perform Quarterly Checks
Clean all connections, test the auto-off timer, inspect wires for chafe, and verify battery health every three months.
Monitor for New Models
Rumors suggest improved Lewmar control units with better sealing may be coming. Watch for official release, as older units appear unchanged despite reliability complaints.
Key Takeaways
A Lewmar bow thruster not working is often due to simple issues like a blown fuse, wiring problems, or faulty joystick. The thermal switch is a hidden failure point, so test it before replacing the expensive black box. Control units fail frequently and cannot be repaired, so plan for replacements. If lights stay on, install a manual isolator switch for safety. Consider aftermarket controllers for better reliability. Always bypass and test before assuming electronic failure.
Fix it right the first time to save time, money, and stress on the water.
Frequently Asked Questions About Lewmar Bow Thrusters
Why won’t my Lewmar bow thruster turn on even with a good battery?
If your battery voltage checks out at 19V or higher but the thruster still won’t activate, the problem likely lies elsewhere. Check the main fuse first, then inspect all wiring connections for corrosion or loose terminals. The thermal switch inside the motor housing may have failed open, cutting power to the motor even though everything else appears functional.
How do I test if my Lewmar joystick is faulty?
Set your multimeter to continuity mode. Unplug the joystick from the control box and test the on/off button, port direction, and starboard direction. Each should beep when activated. No beep indicates internal switch failure. You can also temporarily bypass the joystick by jumpering the power input to the activation wire to confirm whether the joystick is the culprit.
What does it mean if the Lewmar control unit lights stay on?
If the indicator lights remain on after releasing the joystick and exceed the 20-minute auto-shutdown window, the control unit has a stuck relay or logic failure. This compromises the safety features, including the 3-minute duty cycle limit and auto-shutdown timer. Install a manual isolator switch immediately and do not operate the thruster until the unit is repaired or replaced.
Can I replace the Lewmar control unit myself?
Yes, with basic tools and careful wire identification. You will need to disconnect the battery, unplug the 4-wire harness, remove two mounting nuts, and swap in the new unit. Wire colors are standard: red for power, black for ground, blue for port, and green for starboard. Access may require removing ceiling panels, so plan for 30 to 60 minutes.
Is the thermal switch really that important?
Absolutely. User reports confirm the thermal switch is a commonly overlooked failure point. User Rick Peterson replaced both the joystick and black box with no success, only to discover the thermal switch was the $50 fix that restored full functionality. Always test this before spending $400 on a new control unit.


