
How to Tune a Compound Bow: Step-by-Step Guide
Tuning a compound bow is essential for achieving tight arrow groups, consistent broadhead flight, and maximum accuracy in the field. A poorly tuned bow may shoot straight at 20 yards but drift off target at longer distances, costing hunters clean kills and competitors their scores. This guide walks you through every critical step using proven methods like paper tuning, walk back testing, and bare shaft diagnostics.
Whether you’re a first-time bow owner or refining your hunting rig, this step-by-step approach delivers reliable results. You’ll learn how to set draw length, time cams, adjust your rest, and validate arrow spine without guesswork.
Confirm Draw Length First
Before any tuning begins, your draw length must be set correctly. An incorrect draw length throws off anchor points, sight alignment, and string timing.
Check Your Anchor Point
At full draw, your release hand should anchor firmly against the back corner of your jaw, just in front of the earlobe. Your draw-arm elbow should line up directly behind the arrow when viewed from above.
A draw length that’s too short causes poor shoulder engagement and inconsistent aiming. One that’s too long creates tension, forcing you to stretch or drop your bow arm during the shot.
Adjust Draw Length Modules
Most modern compound bows use interchangeable draw length modules on the cam. Refer to your manufacturer’s chart to select the correct module for your draw length. Use an Allen wrench to remove and replace the module, ensuring it’s fully seated and tightened.
Never attempt cam timing or paper tuning with an incorrect draw length. Doing so masks real issues and leads to wasted adjustments.
Set Axle-to-Axle and Brace Height
Your bow’s physical dimensions must match factory specifications before fine-tuning begins.
Measure Axle-to-Axle Length
Axle-to-axle length is the distance between the centers of the top and bottom axles. For example, a Matthews V3X33 should measure exactly 33 inches. Use a tape measure to verify this dimension.
If your ATA is too long, twist the main string and both cables to shorten it. Each full twist shortens the string slightly. Conversely, untwist to increase ATA length.
Verify Brace Height
Brace height is the distance from the throat of the grip to the string at rest. It typically ranges from 6 to 7 inches depending on the model. Check your bow’s manual for the correct specification.
Brace height affects speed, forgiveness, and stability. A shorter brace height increases speed but reduces forgiveness. Adjust indirectly by adding or removing twists in the string and cables after cam timing.
Time the Cams Properly
Cam synchronization ensures both cams rotate and stop at the same time, delivering balanced energy transfer.
Use a Draw Board to Test Timing
Mount your bow in a draw board and slowly pull it through the draw cycle. Watch when each cam contacts its draw stop. Both should hit the stop simultaneously.
If one cam hits first, adjust the cables. Add twists to the top cable or remove twists from the bottom cable to delay the early cam. Since cable adjustments have a greater effect than string changes, focus there first.
Make Micro-Adjustments if Needed
For fine-tuning, insert a small piece of D-loop material between the strands of a cable to effectively shorten it. This creates a subtle timing shift without over-twisting.
After each change, re-draw the bow and recheck stop contact. Repeat until both cams land at the same moment.
Flip the Yoke if Required
On certain models like the Matthews V3X33, the bottom cam yoke must face downward. An upside-down yoke throws off cam lean and degrades performance. Simply flip it into the correct orientation.
Align the Arrow Rest Correctly
Proper rest positioning ensures the arrow leaves the bow straight and centered.
Set Center Shot
Center shot is the horizontal alignment of the arrow relative to the riser. Most modern bows require the arrow to sit 13/16 inch from the inside edge of the riser to the center of the shaft.
Use a ruler or center shot gauge to measure this. Align the arrow so it bisects the Berger hole. Do not move the rest more than 1/8 inch laterally. Beyond that, consider cam shimming or cable guard adjustment.
Adjust Nock Height with a Bow Square
Nock height determines the vertical position of the arrow on the string. Use a 90-degree bow square. Place it on the string and align the arrow so the shaft is perfectly horizontal.
Alternatively, use a business card held vertically against the string. The arrow should line up with the card’s long edge.
Install D-Loop and Nocking Point
The D-loop and nocking point secure the arrow to the string and influence nocking angle.
Tie the D-Loop Correctly
For right-handed shooters, tie the D-loop so the top knot faces away from you and the bottom knot faces toward you. Left-handed shooters reverse this. Use high-strength material like BCY Dacron for durability.
Ensure the loop is snug but allows smooth travel through the rest.
Set the Nocking Point
Tie a soft nock set just above the bottom of the D-loop. This is your lower nocking point. Some archers add a second nock set above the D-loop to fix the nock position, but a single nock set often allows better alignment at full draw.
Leave about one serving width between the upper knot of the D-loop and the arrow nock to prevent pinching.
Fix Nock Pinch Issues
Nock pinch occurs when the string pushes down on the nock at full draw, lifting the arrow’s front off the rest.
Test for Nock Pinch
Remove the field point and draw the bow. If the arrow lifts off the rest, nock pinch is present.
Add a Threaded Nock Set
Fix this by tying a small threaded nock set below the arrow nock on the D-loop. Use dental floss or center serving material. Make 8-10 overhand knots, finish with 2-3 locking knots, trim excess, and burn the end flush.
This lifts the nock slightly, eliminating downward pressure while maintaining clean alignment.
Paper Tune for Flight Diagnostics

Paper tuning reveals arrow flight flaws by analyzing the tear pattern in a sheet of paper.
Set Up the Paper Frame
Stretch painter’s tape or butcher paper tightly over a 16×16-inch frame. Place it 4-6 feet in front of a target butt. Shoot through it so the arrow fully embeds in the target.
For advanced tuning, some archers use 6-8 yards to observe stabilization.
Shoot Bare Shafts for Clarity
Strip vanes from one arrow to create a bare shaft. Add 3-4 inches of electrical tape to the rear to maintain balance. Bare shafts eliminate fletching correction, showing true flight behavior.
Read Vertical Tears
A tail-high tear means the nock is too low or rest is too high. Lower the D-loop or raise the rest. A tail-low tear means the nock is too high or rest is too low. Raise the D-loop or lower the rest.
Always fix vertical issues before horizontal ones.
Read Horizontal Tears
For right-handed shooters, a tail-left tear means the arrow hits the riser from the left. Move the rest right or cam left. A tail-right tear means the arrow hits from the right. Move the rest left or cam right.
Use the rule: move the rest in the direction of the nock for vertical tears, move in the direction of the point for horizontal tears.
Perform Walk Back Tuning
Walk back tuning validates rest alignment over distance using consistent aiming.
Set a Vertical Reference Line
Apply duct tape vertically down the center of a large target face, forming a T. Start at 10-20 yards and sight in your top pin to hit exactly at the intersection.
Shoot at Increasing Distances
Without changing sight pins, move back 10 yards at a time. At each distance, shoot using the same 20-yard pin and aim at the same T intersection.
Analyze Horizontal Drift
Arrows drift left over distance. Move the rest right in 1/16-inch increments. Arrows drift right. Move the rest left. Tiny adjustments make big differences. Repeat until all impacts align vertically.
Bare Shaft Tune for Precision
Bare shaft tuning is the most accurate method because it removes fletching’s corrective effect.
Compare Fletched vs. Bare Shafts
Ensure fletched arrows group tightly. Stand at 20 yards. Shoot one fletched arrow, then one bare shaft at the same dot.
Interpret Impact Points
Bare shaft hits left of fletched. The arrow is over-spined and too stiff. Weaken the spine by using a longer arrow, lighter point, or lower draw weight. Bare shaft hits right. The arrow is under-spined and too weak. Stiffen the spine by using a shorter arrow or heavier point.
Bare shaft hits high. Nock is too low. Raise nock height. Bare shaft hits low. Nock is too high. Lower nock height.
Adjust rest in 1/64-inch to 1/32-inch increments. Small changes have large effects.
Diagnose Persistent Issues
If bare shaft won’t group with fletched, check for cam timing issues. Test for nock pinch. Evaluate shooter form inconsistency, since this method is highly sensitive to technique.
Match Arrow Spine to Your Bow
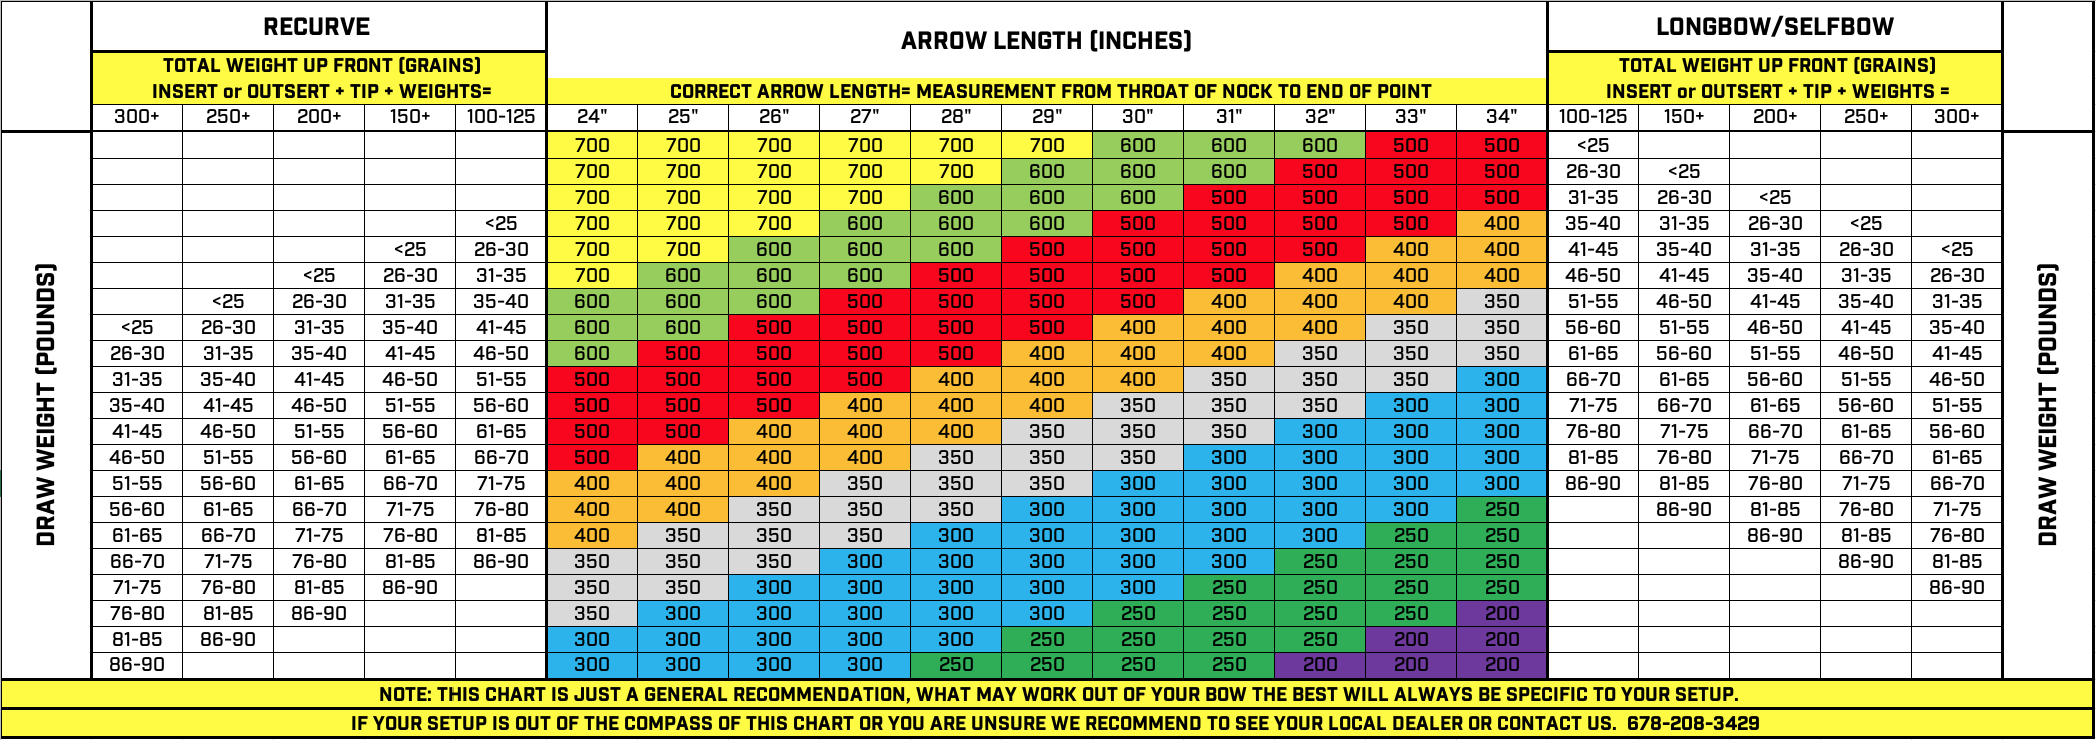
Arrow spine must match your bow’s draw weight, length, and setup.
Understand Static vs. Dynamic Spine
Static spine is measured deflection under 1.94 pounds at center. For example, 500 spine equals 0.500-inch bend. Dynamic spine is how the arrow behaves during launch, affected by point weight, draw length, fletching, and insert.
Adjust Spine Through Build Changes
Changing arrow length affects spine. Shortening arrow stiffens it. Lengthening arrow weakens it. Increasing point weight weakens spine. Increasing fletching weight stiffens spine. Increasing draw weight weakens spine because more force is applied.
Use tools like Archers Advantage software or manufacturer charts to select the right spine based on your specs.
Validate with Final System Checks
After tuning, confirm all settings with a complete system check.
Recheck Key Specifications
Verify axle-to-axle matches factory spec. Confirm cam timing shows simultaneous stop contact. Paper tear should show bullet-hole. Center shot should measure 13/16 inch from riser edge. Nock height should show 90-degree arrow-to-string angle. Broadhead flight should match field points at 20-40 yards.
Install Stabilizers Before Final Test
Attach front stabilizer and backbar. They affect balance and vibration. Never tune without them if used in the field.
Retune After Component Changes
Any change, peep sight, D-loop, or rest may require retuning. Recheck cam timing after peep or loop adjustments.
Maintain Tune Over Time
A bow’s tune is not permanent. Regular checks preserve performance.
When to Retune
Retune after 10-20 hours of shooting. Seasonal humidity and temperature shifts affect performance. Long-term storage requires verification. String and cable stretch occurs during the first 500 shots. Changing arrows or broadheads may need retuning. Dry fire or impact damage demands immediate checks.
New strings stretch, altering ATA, brace height, and timing. Monitor and adjust during break-in.
Seek Professional Help When Needed
Not every archer needs to tune alone.
Get Help If You Lack Tools
Without a bow press or draw board, cam timing and yoke adjustments are unsafe. Local shops offer tuning services for under $100.
Learn from Experts
Manufacturer guides, online videos, and pro shop workshops provide hands-on learning. For yoke tuning or tiller adjustments, professional insight is invaluable.
Frequently Asked Questions About Tuning a Compound Bow
How long does it take to tune a compound bow properly?
The initial tuning process takes 2-4 hours for experienced archers. First-time tuners should allow additional time for learning each method. Paper tuning alone requires 20-30 minutes per session. Walk back tuning adds another 1-2 hours across multiple distances.
Can I tune my compound bow without a bow press?
You can perform most tuning steps without a bow press. Paper tuning, walk back tuning, rest adjustment, and nock height changes don’t require one. However, cam timing adjustments and yoke orientation changes need a bow press for safety. Consider professional help for these procedures.
What is the most important step in compound bow tuning?
Draw length verification is the most critical first step. An incorrect draw length affects every other adjustment. If your draw length is wrong, cam timing, rest position, and sight alignment all become unreliable. Always confirm draw length before proceeding with other tuning steps.
Why do my arrows group well at close range but spread at distance?
This typically indicates rest alignment issues rather than arrow spine problems. Perform walk back tuning to identify left or right drift over distance. Small rest adjustments in 1/16-inch increments correct this. Also verify cam timing, since off-timing cams cause inconsistent arrow flight at longer distances.
How do I know if my arrow spine is wrong?
Bare shaft tuning reveals spine issues most clearly. A bare shaft hitting left of fletched arrows indicates over-spined arrow. Hit right indicates under-spined arrow. Vertical impact differences point to nock height problems. Paper tuning also shows spine issues through tear patterns.
Should I tune with field points or broadheads first?
Always tune with field points first. Broadheads fly differently due to their aerodynamic profile. Once your bow shoots consistent groups with field points, then test broadhead alignment. Many archers need separate sight pins for field points and broadheads.
Final Thoughts on Tuning Your Compound Bow for Maximum Accuracy
A properly tuned compound bow delivers bullet-hole paper tears, consistent grouping, and broadheads that fly like field points. By following this sequence, you ensure mechanical precision and ballistic harmony. Start with draw length, then cam timing, rest setup, paper tuning, and distance validation.
Whether hunting elk at 50 yards or competing in target archery, precision tuning builds confidence and accuracy. With patience and attention to detail, any archer can achieve professional-level results. Remember to retune after seasonal changes, equipment swaps, or extended use to maintain peak performance.


