
How to Fix Bow Thruster Not Working
Is your bow thruster not working when you need it most? A malfunctioning bow thruster can turn docking into a stressful ordeal, especially in tight marinas or strong winds. Whether you’re dealing with a complete shutdown, one-direction failure, or intermittent operation, most issues stem from a handful of common electrical, mechanical, or operational problems. The good news: with a systematic approach, you can diagnose and often fix the problem yourself without calling in a technician.
This guide walks you through every step to troubleshoot a bow thruster not working, using real-world insights and manufacturer-backed diagnostics. You’ll learn how to pinpoint whether the issue is power-related, control-based, or mechanical, and what to do next. From checking fuses and testing solenoids to replacing shear pins and upgrading components, this is your complete action plan for restoring full control.
Check Power Supply First

No power means no thruster. Start here, even if the control panel lights seem fine. Many owners overlook the battery and fuse checks, wasting hours on complex diagnostics when the solution was simple.
Test Battery Voltage Under Load
A battery reading 12.6V at rest might still fail under load. Use a multimeter to test voltage at the battery terminals. At rest, minimum acceptable voltage is 12.0V. Under load (thruster engaged), voltage should stay above 11.5V. If voltage drops below 11.5V or collapses to 7-8V, the battery is weak or failing, even if lights flicker.
Pro Tip: A battery showing 11.53V at rest that drops to 7V under load is defective. Replace it with an AGM, gel, or lithium unit rated for high current draw.
Inspect In-Line Fuse
The main fuse, usually within 72 inches of the battery, is a frequent failure point. Locate the fuse (often near the battery or in a junction box) and check for visible blow or corrosion. Replace only with correct amperage (e.g., 100A, 150A).
Hidden Fuse Alert: Some systems (e.g., Jeanneau NC 1095) have a separate 8A control fuse located under a berth or behind panels. Check all fuses.
Verify Battery Switch and Connections
Ensure battery switch is ON and not corroded. Clean terminals with a wire brush and tighten all connections, as loose wires cause voltage drop.
Diagnose Control Panel and Joystick
If the panel lights up but the thruster does not respond, the fault is likely in the control system. Follow these steps to isolate whether the joystick or upstream wiring is at fault.
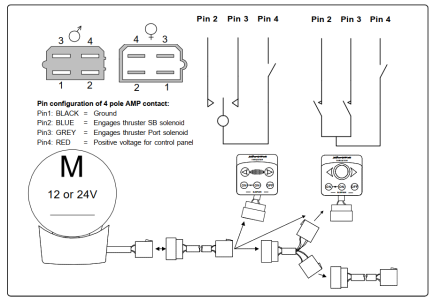
Confirm Voltage at Control Harness
- Disconnect the joystick
- Measure voltage between red (positive) and black (negative) wires
- Should read full battery voltage (12-13.8V)
Voltage present indicates the joystick is likely defective. No voltage means the fault is upstream (fuse, relay, or wiring).
Real Case: A loose connection tucked behind cabin seating caused intermittent failure. Always trace wiring fully.
Bypass the Joystick
Test if the control box receives signals by disconnecting the joystick and using a paperclip or jumper wire. Bridge red to blue for starboard thrust, red to gray for port thrust. Never bridge red to black, as this can destroy the IPC control box.
Thruster runs in both directions indicates a faulty joystick. No response means move to control box testing.
Test the Control Box and Solenoid
The control box (IPC) manages power delivery. Bypass it to isolate whether the fault lies in the control electronics or the motor/solenoid assembly.
Listen for Solenoid Clicks
Have someone activate the thruster while you listen at the motor. Clicks in both directions but thruster runs one way only indicates solenoid contact failure. No click means test solenoid coil or control signal.
Note: Solenoids are often mounted on the motor itself. Look for burn marks or corrosion.
Bypass the Control Box
To test solenoid and motor directly, disconnect the white IPC sensor wire from A2 terminal. Then jumper battery negative to D1 (gray wire) for port, or D2 (blue wire) for starboard.
Motor runs indicates control box or sensor is faulty. No movement means test solenoid output.
Check Solenoid Output Voltage
Keep IPC sensor disconnected. Connect multimeter one lead to motor negative and one to A2 terminal. Repeat jumper test. No voltage at A2 means solenoid failed, replace it. Voltage present indicates motor is likely dead.
Caution: Newer IPC boxes use solid-state relays (MOSFETs), so there is no audible click. Test electronically.
Rule Out Thermal Protection
A failed thermoswitch can shut down the system unexpectedly. This safety device prevents motor overheating, but it can fail and falsely indicate a thermal problem.
Bypass the Thermoswitch (Test Only)
- Locate brown wire from control box to motor
- Unplug at motor end
- Jumper brown wire (control-box side) to motor negative
Test thruster operation. It runs now indicates thermoswitch is open and needs replacement. Still dead means this is not the cause.
Warning: Never operate thruster long-term with thermoswitch bypassed. Risk of motor fire is real.
Diagnose Mechanical Failures

If the motor runs but there is no thrust, the problem is mechanical. The propeller assembly is not receiving power from the motor due to a broken connection or loose component.
Inspect the Shear Pin
The shear pin protects the gearbox by breaking under overload. Symptoms include motor running but propeller not turning, plus history of debris or hard docking. To check, remove motor if access allows, extract broken pin fragments, and inspect shaft and hub for damage. Install new stainless steel shear pin.
Upgrade Tip: Replace old brass pins with stainless steel. They last longer and resist fatigue. Dispose of brass pins to avoid accidental reuse.
User Find: Brass pins can wear down to a few thousandths of an inch before failing. Inspect annually.
Tighten the Propeller Set Nut
A loose propeller slips under thrust. Symptoms include working in one direction only, motor runs, but no thrust in reverse direction. To fix, use a wood dowel in blades to prevent rotation, then retorque set nut to 7.4 ft-lbs (Lewmar TT110/140 spec). Apply Loctite 243 (blue) to threads.
Success Story: A loose nut caused directional failure, fixed with thread locker and proper torque.
Prevent Water Intrusion Damage
Saltwater inside the motor means disaster. Water ingress destroys electrical components and causes corrosion that can total the unit.
Secure Internal Electrical Plugs
A dislodged plug exposes gears to seawater. One thruster failed due to a loose internal plug, water ingress destroyed components. Unit replaced under warranty after over one month delay.
Prevention: Inspect connectors annually. Use marine-grade dielectric grease. Ensure plugs are fully seated and locked.
Troubleshoot Uncontrolled Operation
If the thruster runs on its own, act fast. This is dangerous and can cause injury or damage.
Immediate Steps
- Cut battery power
- Unplug joystick
- Reconnect one component at a time
Diagnostic Sequence: Thruster runs after unplugging joystick indicates solenoid contacts welded shut, replace. Runs after reconnecting IPC box indicates IPC box faulty, replace. Runs after reconnecting joystick indicates joystick shorted, replace.
Multi-Station Warning: If you have helm and flybridge controls, any one faulty station can cause runaway operation.
Address Environmental Factors
External conditions can mimic system failure. Do not overlook these before assuming a component is defective.
Clear Debris from Tunnel
Seaweed, fishing line, or algae can jam the propeller. Hire a diver to clean tunnel, or do it yourself with boat out of water. Prevention includes avoiding prolonged use in weedy areas and installing thruster tunnel guards if available.
Avoid Cavitation
Air in the tunnel reduces thrust and can shear pins. Causes include shallow draft, docking on steep ramps, and rapid direction changes while cavitating. Operate thruster only when fully submerged, and wait for water to settle after movement.
Decode Vetus Error Signals
Vetus systems use beeps and lights to indicate faults. Learn what your system is telling you.
| Signal | Cause | Action |
|---|---|---|
| Single beep | Low voltage | Charge or replace battery |
| Multiple beeps | Overheating or wiring fault | Cool motor, inspect connections |
| Red light at helm | Relay or system fault | Check relay, solenoid, wiring |
| No light on | Power failure | Test fuses, voltage, connections |
| Joystick unresponsive | Loose 4-pin connector | Inspect and reseat connector |
Note: Red light means fault active. Must be cleared before thruster works.
Upgrade for Reliability
Prevent future failures with smart upgrades. These investments pay off quickly compared to repair costs.
Replace Brass Shear Pins with Stainless
| Feature | Brass | Stainless Steel |
|---|---|---|
| Lifespan | Short, wears gradually | Long, resists fatigue |
| Failure Mode | Shears cleanly | May transfer damage |
| Cost | Low | $20-$40 per pin |
| Recommendation | Retire | Use in bow and stern |
Expert Consensus: Stainless pins save money long-term. Thruster rebuild costs $1,000+ vs. $200-$400 for pin replacement.
Apply Loctite 243 to Set Nut
Prevents loosening from vibration and thrust cycles. Use medium-strength thread locker and reapply during annual maintenance. Replace with nylon lock nut if recurring.
Use Dielectric Grease on Connectors
Prevents corrosion and ensures solid contact. Apply to all electrical plugs and re-grease annually to ensure waterproof seal.
Follow a Maintenance Schedule
Prevention beats repair. Stay ahead of problems with routine checks.
| Task | Frequency | Notes |
|---|---|---|
| Battery voltage check | Monthly | 12.4V or higher |
| Fuse and connection inspection | Annually | Look for corrosion |
| Shear pin inspection | Annually or after heavy use | Replace if worn |
| Propeller torque check | Annually | 7.4 ft-lbs maximum |
| Tunnel cleaning | Before season | Remove algae, debris |
| Connector check | Annually | Seat and grease |
Carry Spares: At minimum, keep 2-3 stainless shear pins, wrench, and Loctite onboard.
Know When to Call Support
Some jobs need pros. Recognize when to escalate.
Contact Manufacturer If
- Motor fails despite power
- Internal water damage occurred
- Alignment is suspect
- Warranty claim needed
Support Info: Imtra (Sleipner/Side-Power) at 508-995-7000, Lewmar at lewmar.com, Vetus by type number on motor.
Warranty Tip: Document all maintenance. Debris damage may not be covered.
Key Takeaways for Fixing Your Bow Thruster
A bow thruster not working does not have to ruin your day. Start with power, move to controls, then inspect mechanics. Most issues are fixable with basic tools and a multimeter.
| Symptom | Likely Cause | Solution |
|---|---|---|
| No power, no lights | Blown fuse, dead battery | Test voltage, replace fuse |
| Panel lit, no response | Bad joystick or solenoid | Bypass panel, test solenoid |
| Runs continuously | Welded solenoid or shorted joystick | Replace solenoid or IPC box |
| Motor runs, no thrust | Broken shear pin or loose prop | Replace pin, retorque nut |
| Works one direction only | Loose propeller or partial shear | Tighten set nut, inspect pin |
| Water in motor | Disconnected internal plug | Replace thruster, seal connectors |
| Repeated failures | Debris, misalignment, cavitation | Clean tunnel, realign, avoid air |
Upgrade to stainless shear pins, use thread locker, and maintain clean connections to avoid repeat problems. Always carry spares. With this guide, you are ready to diagnose, repair, and prevent thruster failures like a pro.
Frequently Asked Questions About Bow Thruster Not Working
Why is my bow thruster not working even though the control panel lights up?
The issue is likely in the control system, not power supply. Test voltage at the control harness first. If voltage is present, the joystick is probably defective. If no voltage exists, check upstream components like the fuse, relay, or wiring.
Can a weak battery cause bow thruster failure?
Yes. A battery reading 12.6V at rest may drop to 7V under load, causing failure. Test voltage both at rest and while pressing the thruster button. Replace battery if voltage drops below 11.5V under load.
How do I know if the shear pin is broken?
Motor runs audibly but propeller does not turn. You may also notice reduced thrust or heard grinding sounds. Access the motor and inspect the shear pin for breakage or fragments.
What causes a bow thruster to work in only one direction?
A loose propeller set nut or partial shear pin failure causes this. The propeller slips in one direction but engages in the other. Tighten the set nut with thread locker, or replace the shear pin.
Can I replace brass shear pins with stainless steel?
Yes, and it is recommended. Stainless pins last longer and resist fatigue better than brass. They cost $20-$40 but save $1,000+ in potential gearbox damage.
How do I prevent water damage to my bow thruster?
Inspect all internal electrical connectors annually. Use marine-grade dielectric grease on all plugs. Ensure connections are fully seated and locked. Check for signs of moisture or corrosion regularly.


