
How to Fix a Broken Bow: Quick Repair Tips
A broken bow—whether for archery or a violin—can feel like a devastating setback. But before you give up on it, know this: many broken bows can be repaired, reinforced, or creatively repurposed. This guide covers proven repair methods for both archery and string instrument bows, including step-by-step fixes, structural reinforcements, and expert-backed alternatives when restoration is not possible.
We focus on traditional wooden bows, from hickory longbows to pernambuco violin bows, offering clear and cost-effective strategies. You will learn how to assess damage, choose the right repair path, avoid common mistakes, and even turn a broken bow into something beautiful again.
Assess the Damage First
Before any repair, determine if the bow is fixable. A thorough evaluation saves time and prevents further damage.
Identify the Break Type
Clean splits have edges that align neatly, making them ideal for glue repair. Splintered fractures involve torn fibers and require reinforcement. Shattered tips with multiple missing fragments are likely beyond DIY repair.
Locate the Damage
For archery bows, the tip experiences high stress and is repairable if the break is clean. A crack on the back (outer curve) is dangerous and needs backing. Handle structural failure carries high risk. For string bows, the head (tip) is most fragile and the common break point. Warping or cracks in the midsection require professional repair.
Judge Repair Feasibility
Fixable issues include clean cracks, loose tip plates, and minor splits. Likely irreparable items are shattered tips, deep back cracks, and warped staves. Professional help is needed for head breaks, stick realignment, and spline repairs.
Repair a Cracked Archery Bow

Simple glue repairs work for clean cracks in limbs or tips.
Glue the Split with Wood Adhesive
Use this method when you have a clean crack in the limb or tip. You will need yellow PVA wood glue, clamps or strong string, a damp cloth, and fine steel wool.
Clean both sides of the crack thoroughly. Apply liberal wood glue into the split. Press pieces together firmly and wrap tightly with string or clamp. Wipe excess glue with a damp cloth immediately. Dry for 24 or more hours. Letting glue cure fully ensures maximum bond strength.
After drying, sand lightly with fine steel wool. Avoid cross-grain sanding to prevent weakening the wood.
Reinforce with Fiberglass Tape and Epoxy
Use when the repair needs extra strength. You will need fiberglass drywall tape, 5-minute epoxy, and an artist’s brush.
Wrap the glued area with fiberglass tape. Mix epoxy and brush it over the tape, extending the coating slightly beyond the crack. Let cure for 10 or more minutes initially, and wait for full cure before use. A hardened brush means full epoxy cure.
Strengthen with Seat-Belt Backing
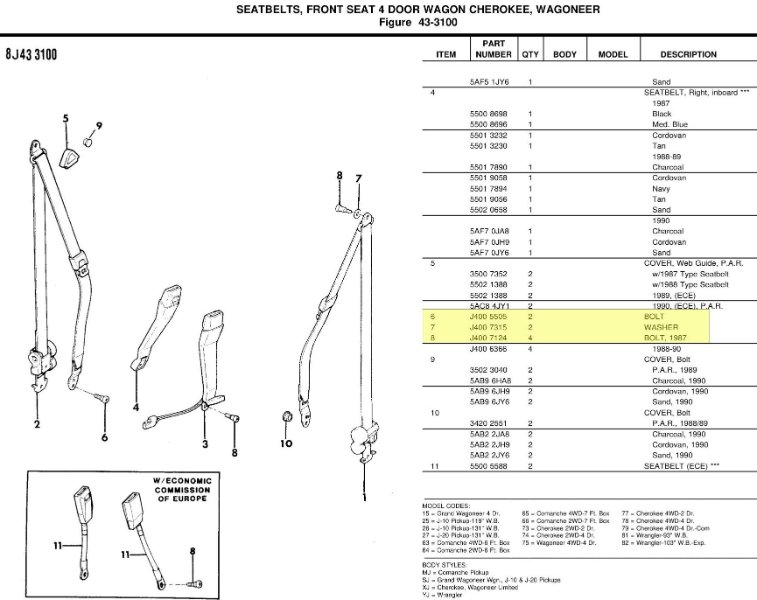
This advanced technique prevents catastrophic back failure and works best for flawed or broken wooden staves.
Why Seat-Belt Backing Works
The seat belt acts as a structural safety net. It prevents crack propagation under draw and allows use of imperfect or salvaged wood. Without backing, glued splits often fail at 40 to 50 lb draw.
Apply the Backing
Materials needed include polyester seat belt webbing, wood glue (PVA), CA glue with accelerator, string, sandpaper, and calipers.
Glue and clamp the split first, then let dry overnight. Apply wood glue to the back of the stave. Lay seat belt over it and wrap with string. Let cure overnight. Seal edges with CA glue and accelerator. Sand lightly to remove fluff.
Test and Tillering the Repaired Bow
Shape the bow for safe performance after repairs.
Follow Target Specifications
Target specs include 40 lb draw weight (adjustable), approximately 30 inches draw length, limb tip thickness around 3/8 inch, and handle thickness around 1/2 inch.
Tillering Process
Mark reference lines with pencil. Use a tape measure to check bend from belly to string. Scrape limbs gradually and test bend every few strokes. Adjust until draw weight matches your target.
Repair a Broken String Instrument Bow
Save all fragments immediately after a break. Store in a dry, stable place. Keep the beak (very tip) because it is critical for repair. Humidity changes can warp wood, so avoid plastic bags unless sealed.
Perform a Headspline Repair (Advanced)
This method restores a broken head with strength and is best for clean breaks at the head.
Tools required include thin CA glue, a sharpened toothpick, lathe with jig, .035 inch saw blade with 110 teeth, pernambuco spline, digital calipers, safety glasses, and baking soda as accelerant.
Remove hair and clean with alcohol first. Document spine profile and alignment. Clean old glue from the joint without damaging wood. Apply one drop of CA at a single point and check alignment before gluing the full seam. Set up the lathe with the saw blade teeth cutting downward. Use a gasket-lined jig to protect the bow. Align the cut to bisect the front spine. Set speed to 600 RPM.
Cut the spline slot by pushing the bow into the blade. Stop to check head temperature because heat weakens glue. Cut only through the head, not past the back. Measure the slot for spline fit.
Fit the spline by cutting pernambuco to approximately 30 mm by 1.5 mm by 1.5 mm. Thin to approximately 0.86 mm to fit snugly. Grain must run perpendicular to bow grain. File flat and test fit with no rocking.
For gluing, this is a two-person job. The assistant holds the head with a plastic sheet. Position the spline with tip forward approximately 1 mm to create a gap. Apply 3 to 5 drops of CA into the back of the slot. Rock spline back and look away because CA can cause eye injury. Dust joint with baking soda to cure instantly. Repeat if needed.
Shape and finish by trimming with a sharp knife used like a scraper. File with half-round file using mineral spirits to see grain. Sand with 600-grit paper lubricated. Blend contour using backlighting.
Color match by applying potassium permanganate to darken the spline. Use nylon brush and water to blend. Polish to match original.
Final steps include installing a new tip plate if needed and rehairing the bow. Even expert repairs reduce value by 50 percent but restore function.
Fix or Replace the Tip Plate
The tip plate reinforces the head, distributes hair tension, and protects against wear.
Common Tip Issues
Unglued tips must be reglued immediately. Broken beaks require gluing the fragment back if available. Cracked plates need replacement because risking failure is not worth it.
Replacement Options
Faux-ivory (polymer) is durable, easy to carve, and common on student bows. Natural mastodon ivory is traditional and expensive but brittle. Pre-glued plastic tips are functional but less refined. Use a professional because poor tip work ruins value.
Prevent Future Breaks
Maintain your string bow to extend its life significantly.
Rehair Every 6 to 12 Months
Rehairing prevents warping from uneven tension. It stops hair shrinkage from pulling the head off. It avoids over-turning the button that can crack the butt end.
Warning signs include not being able to loosen hair fully (rehair now), thumb touching the stick (rehair needed), and hair not reaching playing tension (risk of cracking the butt end).
Replace Worn Grips and Leather
Replace thumb leather when worn through. Upgrade to lizard skin for durability. Repair or replace winding early because loose wraps affect feel and weight.
Fix Frog and Screw Issues
A stable frog is critical for control and balance. Keep the mechanism working properly.
Replace worn eyelets with matching thread. Bush the hole if the screw is enlarged. Glue cracked frog areas that must seat flush. Replace missing pearl inlay to prevent enlarged mortise.
When Repair Is Not Possible
Creative repurposing honors the bow’s legacy when it cannot be repaired.
Display as Wall Art
Hang vertically like a sword. Use as a teaching tool. One violin teacher displays her broken bow to teach students about careful instrument handling.
Build a Sculpture
Combine multiple bows into art. Frame one in a long vertical display. A user made an abstract piece from broken bows.
Use in the Garden
Stake for tomatoes or climbing plants. One teacher used bows as tomato stakes, functional and meaningful.
Harvest Spare Parts
Save usable components. Horsehair, if intact, works for future rehairs. Store frog, button, winding, tip plate, and metal fittings for future repairs or to sell.
Turn Into a Wizard Wand
Sand and polish the stick. Add decorative elements. Use in costumes or themed rooms. This fantasy upgrade has community approval.
Avoid Burning Broken Bows
Do not burn varnished or painted wood. It releases noxious fumes that are hazardous and possibly illegal.
When to Call a Professional
Critical repairs need expert hands. Seek help for any crack in the stick, head separation or breakage, frog wobble or instability, stripped eyelet or screw, loose or missing pearl inlays, and unglued or damaged tip.
DIY risks include heat or pressure ruining the stick and wrong glue or alignment causing permanent damage. Poor repairs can destroy a bow’s value.
Value Impact of Repairs
| Repair Type | Value Impact | Notes |
|---|---|---|
| Rehair | No change | Routine maintenance |
| Grip/leather replacement | Minimal | No loss if done well |
| Eyelet/screw fix | Minimal | Acceptable |
| Frog crack repair | Slight reduction | Noticeable |
| Head break with spline | 50% reduction | Even if expert |
| Poor DIY job | Destroyed | Especially on fine bows |
Expertise matters, especially on valuable instruments.
Frequently Asked Questions About Fixing a Broken Bow
Can a broken archery bow be repaired at home?
Yes, clean cracks in archery bows can be repaired at home using wood glue and clamping. For added strength, reinforce with fiberglass tape and epoxy or apply seat-belt backing. Deep back cracks and shattered tips require professional help or replacement.
How much does it cost to fix a broken violin bow?
Simple repairs like rehairing or replacing a tip plate cost less than professional spline repair. A headspline repair by an expert can reduce the bow’s value by 50 percent even when done professionally. Poor DIY repairs can destroy value entirely.
Is seat-belt backing safe for archery bows?
Yes, seat-belt backing is a proven reinforcement method. It does not improve arrow speed or shooting smoothness, but it prevents catastrophic back failure. The total material cost is approximately $3, making it highly affordable.
Can I use a broken bow for parts?
Absolutely. Harvest usable components including horsehair, frogs, buttons, windings, tip plates, and metal fittings. Store these parts for future repairs or sell them to other musicians or archers.
What is the most common break on string instrument bows?
The head (tip) is the most fragile part and the most common break point. This occurs because the head is thin and constantly exposed to maximum hair tension. Headspline repair is the standard professional solution.
How do I know if my bow needs rehairing?
Warning signs include not being able to loosen hair fully, thumb touching the stick between hair and frog, and hair no longer reaching playing tension. Rehair every 6 to 12 months to prevent warping and cracking.
Key Takeaways for Fixing Your Broken Bow
Whether you are fixing a cracked longbow with seat-belt backing or restoring a violin bow with a precision headspline, repair is often possible even with minimal tools. Simple glue jobs are DIY-friendly, but head breaks and stick realignments need professional attention. For irreparable breaks, creative repurposing honors the bow’s legacy through wall art, sculptures, garden stakes, or spare parts harvesting.
With under $3 in materials, you can turn a broken stave into a functional bow. The key is knowing your limits and acting promptly. Assess damage immediately, store fragments safely, and choose the appropriate repair path. With proper care, you can extend the life of your instrument and give that broken bow a dignified second act on your wall, in your garden, or in your stories.


