

How to Install a Bowstring: Step-by-Step Guide
Installing a bow string correctly is essential for safety, accuracy, and equipment longevity. Whether you’re replacing a worn string or setting up a new bow, improper installation can lead to limb damage, poor arrow flight, or even catastrophic failure. This guide covers step-by-step procedures for both traditional and compound bows, the right tools, critical safety practices, and post-installation tuning to ensure peak performance.
Match Your Installation Method to Your Bow Type
The method you use depends entirely on your bow type. Using the wrong technique can damage limbs or void warranties. Traditional bows such as recurves and longbows require gentle, even pressure, ideally via a bow stringer. Compound bows operate under high tension and must be serviced with a bow press. Never attempt manual stringing on a compound bow.
Pro Tip: If you’re unsure of your bow type or model-specific routing, consult the manufacturer manual or video tutorials from trusted builders like Selway Archery or Jake Kaminski.
Gather the Right Tools for Your Bow Type

Tools for Traditional Bows
For recurve and longbow setups, you only need a few key tools. A bow stringer (step-through type) safely bends the limbs without hand strain. Gloves prevent blisters and improve grip. Foot protection means wearing shoes when stepping on the stringer.
Recommended: Selway Archery’s step-through stringer is durable, easy to use, and widely endorsed by Archery GB. Avoid push-pull or step-through leg methods unless the bow is under 40 pounds and you’re experienced. These increase risk of limb twist or personal injury.
Tools for Compound Bows
Compound installations demand specialized equipment. A bow press (vertical or horizontal) relieves limb tension safely. You’ll also need a smartphone or camera to document cable routing before disassembly. Marker and masking tape mark cam-to-limb alignment. A twisting tool or leather gloves adjusts cable twists for tuning. A tape measure and draw board verify brace height, draw length, and cam sync.
Cost-Saving Hack: Share a bow press with fellow archers. A quality press costs around $500 but pays off over time compared to shop fees.
Prepare Your Bow for String Installation

Mark Cam Positions for Accuracy
Before removing any cables, apply masking tape behind each limb, extending onto the cam. Use a permanent marker to draw a line where the limb meets the cam edge. Repeat for top and bottom cams.
These marks let you verify axle-to-axle length, cam lean, draw stop alignment, and factory timing settings. This is critical for Mathews, BowTech, and Elite models where small misalignments affect performance.
Document Cable Routing Visually
Take multiple high-resolution photos from different angles. Capture the top and bottom cams, roller guard and cable tracks, peep sight orientation, and split-yoke paths if applicable. Record a short video walkthrough narrating the routing path. Misrouting a buss cable or control cable can cause cam derailment or dry-fire conditions.
Warning: On a Mathews Halon 32, switching left and right cables causes major issues according to experienced archers.
Install a Bow String on Traditional Bows Step by Step
Use a Bow Stringer (Safest Method)
Follow these steps to install your bow string safely.
- Place the large loop of the stringer around the top limb.
- Slide the saddle down until near the tip.
- Hook the free end over the bottom limb tip.
- Position the saddle on the top limb, ensuring the bow string sits beneath it.
- Step on the strap with one or both feet.
- Pull the bow upward while bending forward, lifting the string over the top limb tip.
- Once seated, remove the stringer and check that both loops are fully in the limb grooves.
Pluck the string several times to help it settle into place.
Alternative: Push-Pull Method (Under 40 Pounds Only)
This method works best for youth or training bows.
- Place the bottom limb against your foot (shoe on).
- Hold the handle with one hand.
- Press the top limb forward with the other while pulling the grip toward you.
- Slide the string over the top limb tip.
- Release slowly and verify seating.
Do not use this method on wooden recurves. It risks warping the wood.
Avoid Step-Through Stringing
Though common, this method applies uneven pressure and can twist limbs. One archer reported paying $30 at a shop to correct limb warping from this technique. If you must use it, keep your face clear and apply force gradually. Safer alternatives exist, so use them.
Replace a Bow String on Compound Bows Safely
Secure Bow in Press
Place bow in a compatible vertical or horizontal press. Apply just enough tension to hold it steady. Do not compress limbs yet. Confirm press arms clear all components.
Horizontal presses offer better access for dual-cam systems.
Replace Components One at a Time
Never remove all strings and cables at once unless you’re highly experienced.
For the main bowstring, remove one end of the old string from the cam post. Immediately attach the new string to the same post. Route it identically around the cam and into the track. Ensure it’s fully seated before releasing press tension.
For cable replacement, after the main string is installed, replace one cable at a time. Follow original routing, especially important for split-yoke systems. The power cable (Y-shaped) routes to the inside roller with no crossing. For Mathews AVS cams, you must fully unpress and remove the axle to replace yoke cables.
Pro Tip: Hook old and new loops together when removing. This preserves twist count.
Tune Your Bow After String Installation
Verify Cam Alignment Using Marks
After releasing the press, check your tape marks. If the mark is behind the limb, the cam rotated too far. Add twists to the cable. If marks are aligned or close, timing and lean are acceptable. The goal is returning to factory position or equal offset on both limbs.
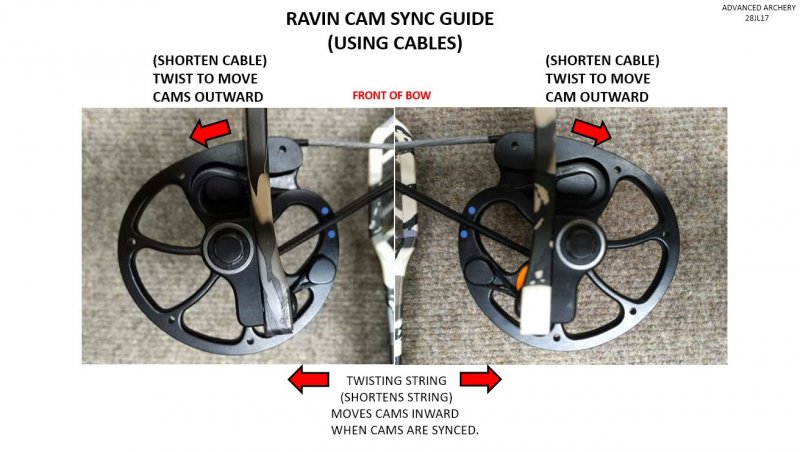
Synchronize Cams (Timing)
Out-of-sync cams reduce accuracy and power.
Test with a draw board for the best results. Lock the bow at full draw. Observe when each draw stop contacts the limb. The cam that stops first is ahead in rotation.
To adjust timing, identify the leading cam. Add twists to the cable attached to that cam. This shortens the cable and delays rotation. Re-draw and recheck. Repeat in half-turn increments until both cams stop simultaneously.
Warning: Over-twisting causes cable fatigue. Adjust slowly.
Correct Cam Lean (Yoke Systems)
If the cam doesn’t roll over vertically, address the lean. If it leans left, add twists to the right yoke and remove the same number from the left yoke. If it leans right, add twists to the left yoke and remove from the right yoke.
Always balance twist changes. Uneven adjustments ruin cam sync.
Single-Cam Systems: Focus on Rotation
Use the timing hole or mark. The cable should run through the center at full draw. Adjust by adding or removing twists in the single cable. Verify with a draw board.
Optimize Bow Performance After String Replacement
Select the Right String Material
High-performance strings use advanced fibers. BCY 452X offers low stretch, ideal for target shooting. BCY 8190 provides a softer feel with slight stretch, good for hunting. Dyneema and Spectra blends are lightweight and strong.
Winner’s Choice strings are praised for peep stability and consistency.
Allow for String Stretch and Break-In
All new strings stretch initially. Shoot 50 or more arrows or wait 2 weeks before final tuning. Let strings settle overnight in the press before fine adjustments. Don’t panic if brace height or draw weight seems off at first. This is normal.
Final peep sight installation should wait until strings are settled.
Stay Safe While Installing Your Bow String
Follow Critical Safety Rules
Never dry-fire the bow. This can destroy limbs and void warranties. Keep face and body clear during stringing. Use proper tools only. No makeshift solutions. Work slowly and deliberately. This is not a race. Inspect all strands and servings before and after installation.
Recognize Common Risks
Limb twist occurs when using improper stringing methods. Prevent it by using a bow stringer and avoiding step-through methods. Cable misrouting happens when photos aren’t taken. Prevent it by documenting before disassembly. Eye injury results from snapping strings. Wear eye protection and avoid string snaps. Bow recoil happens with unstable footing. Use proper stance and don’t overbend limbs.
When to Call a Professional for Bow String Installation
DIY installation saves money and builds skill. However, some situations demand professional help. First-time compound string replacement qualifies. Unfamiliar cam systems such as AVS or hybrid designs qualify. Doubt about routing or tension qualifies. Signs of limb damage or excessive wear qualify.
A local pro shop can press, tune, and verify specs for $50 to $100. This is worth it for peace of mind.
Test Your Bow After String Installation
Reinstall Accessories
Peep sight installs after break-in at your natural anchor. D-loop and nocking point use brass crimps or servings. Silencers and rest need verification of no interference with string or cables.
Verify Key Measurements
Brace height must match manufacturer spec (plus or minus 1/8 inch). Axle-to-axle length confirms using tape measure. Draw weight tests with scale and should match original setting.
Perform Functional Test
Dry fire with a safety arrow or in a safe direction. Listen for pops, clicks, or vibrations. Use a draw board to check draw cycle smoothness. Shoot dozens of arrows at a blank bale to settle strings.
Final tuning (nock point, rest alignment) comes after stabilization.
Frequently Asked Questions About Installing a Bow String
What tools do I need to install a bow string on a traditional bow?
You need a bow stringer (step-through type), gloves, and foot protection. These tools distribute force evenly across limbs and prevent damage during stringing.
Can I install a compound bow string without a bow press?
No. A bow press is essential for safely relieving tension on compound bow limbs. Attempting to string a compound bow manually can cause catastrophic equipment failure and injury.
How do I know if my bow string needs replacing?
Signs of wear include fraying or broken strands, serving separation, peep creep, loss of speed or accuracy, and string stretch beyond adjustment range. Target bows typically need annual replacement. Hunting bows need replacement every two years.
How long does it take for a new bow string to settle?
Allow 2 weeks of shooting or 50 or more shots before final tuning. Let strings settle overnight in the press before making fine adjustments.
What happens if I don’t sync my compound bow cams properly?
Out-of-sync cams cause tuning issues, accuracy loss, and reduced power. Both cams must reach full draw simultaneously for optimal performance.
Can I use the step-through method to string my recurve bow?
This method is not recommended. It applies uneven pressure and can twist limbs. Use a bow stringer instead for safest results.
Key Takeaways for Installing Your Bow String
Installing a bow string correctly protects your equipment and ensures accurate shooting. Traditional bows require a bow stringer for safe installation, while compound bows need a bow press. Document everything before disassembly, including photos and measurements. Replace components one at a time to avoid routing errors. Allow new strings to stretch and settle before final tuning. When in doubt, consult a professional.
Your bow performs best when properly maintained. Take your time, use the right tools, and prioritize safety at every step.


