
How to Make a Bamboo Recurve Bow
Crafting your own bamboo recurve bow brings together ancient tradition, material wisdom, and hands-on precision. Whether you are a bushcrafter, archery enthusiast, or DIY artisan, building a high-performance bamboo bow is both a technical challenge and an incredibly rewarding project. This guide delivers a clear, actionable roadmap based on proven techniques from traditional Asian bowmaking and modern composite practices.
From selecting the right culm to final tillering, every step is designed to help you create a durable, smooth-drawing recurve that performs reliably for years. You will learn how to avoid common pitfalls like delamination, tiller imbalance, and compression failure while working with one of nature’s strongest, most sustainable materials.
Select and Season Your Bamboo Properly
Choosing the right bamboo species is the foundation of a successful bow build. Thick-walled varieties used in traditional Bhutanese, Korean, or Mongolian bowmaking deliver the stiffness and structural integrity your limbs need. Avoid soft varieties like Japanese cedar, which lack the density required for reliable performance.
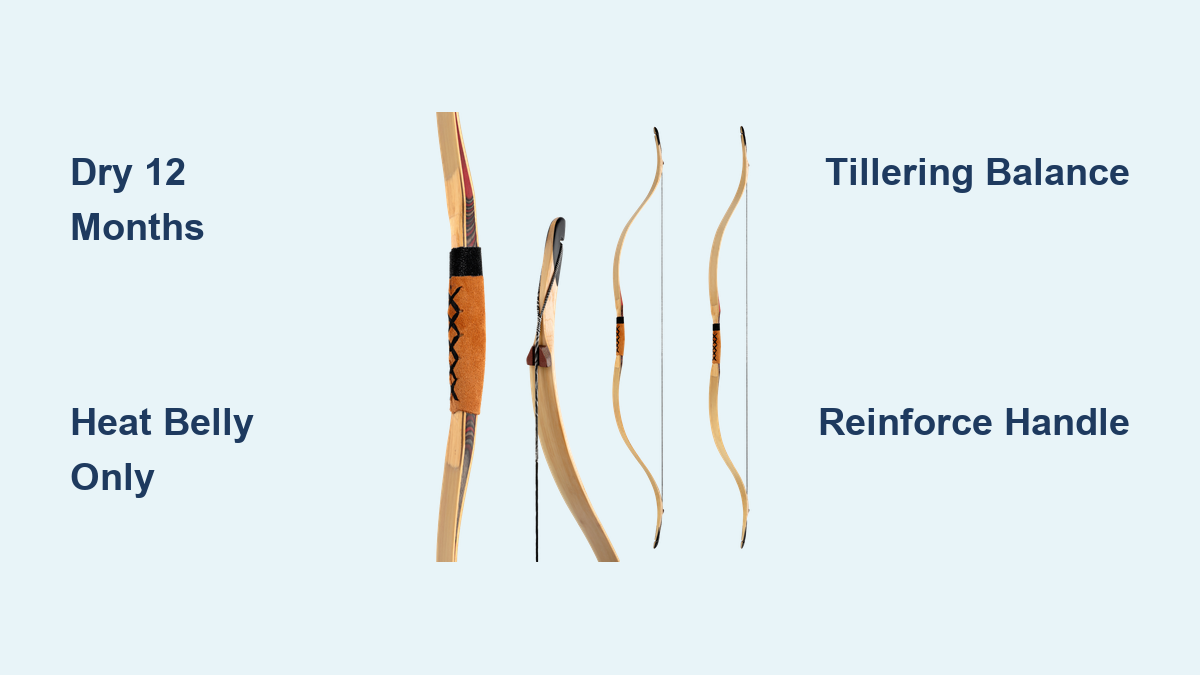
Air-dry all bamboo for at least 12 months in a shaded, well-ventilated space. Fresh culms start at 12% or higher moisture content. Your target is approximately 3% to prevent warping, cracking, and long-term tiller shift. Store vertically or horizontally with consistent airflow, and avoid humidity swings or direct sun exposure, which cause uneven shrinkage and internal stress.
Choose the Right Culm Dimensions
For laminated designs, use strips 1 to 3 inches wide with walls around 1/8 inch (3 to 3.2 mm). For self-bows or wide flatbows, look for culms 4 to 6 inches in diameter that can be split into quarters. Culm length typically ranges from 60 to 72 inches for most recurve designs.
Test for Proper Dryness
Tap the bamboo and listen for a sharp, hollow sound. Bend a small piece gently. If it bends cleanly without cracking or feeling rubbery, it is ready. Bamboo that feels heavy or produces a dull thud still contains too much moisture.
Prepare the Bamboo Surface Correctly

The outer layer of bamboo is its tensile back, the most critical structural component under draw tension. Never sand this surface. Instead, gently scrape off the waxy cuticle with a sharp knife or card scraper. This preserves the strong fiber layer while creating a clean surface for gluing.
Apply heat to the inner (belly) side only to increase stiffness, reduce moisture, and stabilize the wood. Use a propane torch, heat gun, or stove top to slowly toast the surface until it turns golden brown. Do not char or scorch the bamboo. This step enhances compression resistance and prevents permanent set after stringing. Never heat the back, as it damages the tension-bearing fibers and compromises safety.
Manage Nodes for Balanced Performance
Nodes are not weak points. They add structural reinforcement when managed correctly. Align nodes symmetrically on both limbs during tillering to ensure balanced flex. Trim edges so node positions match across the limb width. Consider leaving slight node protrusions at the handle area to form a natural finger rest, a subtle ergonomic touch that improves shooting comfort.
Pick a Proven Construction Method
Multiple construction techniques exist, each suited to different skill levels, tools, and performance goals. Select the method that matches your experience and resources.
Build a Simple Bhutanese-Style Bow
This design uses two thick bamboo splints overlapped and lashed at the center. It is ideal for beginners or tool-limited builders.
Split a culm into two long splints. Scrape the inner pith thin to create a flexible belly while preserving the outer fiber layer on the back. Overlap the splints by 4 to 6 inches at the handle and bind tightly with sinew, silk thread, or strong cord. This method requires minimal tools and offers decent performance, perfect for youth programs or survival builds. Draw weight is limited, and tiller control is less precise than laminated designs.
Try a Step-Lap Lamination
Used in Southeast Asian crossbows and performance recurves, this layered stair-step design ensures smooth flex and natural recurve formation.
Stack 3 to 5 bamboo slats of decreasing length, such as 160 cm, 120 cm, and 90 cm. Taper the last 15 cm of each slat for seamless transitions. Bind the entire stack with sinew or high-strength thread at multiple points. For recurve tips, pre-bend the top lamination using heat. This method reduces stress concentration and delivers a fast, forgiving shot.
Reinforce with a Cable Back
If you are working with a solid bamboo stave, a rattan or thin bamboo cable on the back can prevent compression failure.
Notch the stave at nodes to anchor the cable. Run the cable from tip to tip with multiple wraps for strength. Insert rattan spacers between the cable and stave to increase pre-tension and lift. You can heat-bend the tips beyond the cable anchors to form true recurves. This classic design sacrifices some speed for exceptional durability.
Laminate for High Performance
For maximum power and smoothness, build an all-bamboo laminated recurve.
Use vertical bamboo flooring planks as ready-made blanks. Glue multiple thin strips side-by-side, ensuring the outer bark (tensile layer) faces out on both back and belly. Clamp aggressively with epoxy or high-strength wood glue. Lightly abrade bonding surfaces with less than 60 grit sandpaper to improve adhesion. This method allows full control over limb profile and tiller.
Use Bamboo as a Core in Composites
Bamboo excels as a core material in hybrid laminations.
Try a bamboo-fiberglass-bamboo-fiberglass stack for Olympic-style performance. Combine with carbon-fiber inserts or wood limbs for enhanced speed and vibration damping. Test data shows bamboo cores outperform maple in draw smoothness, shot speed, and forgiveness. The balanced strength-to-weight ratio makes it ideal for competitive-grade builds.
Design a Strong, Comfortable Handle
Sudden width changes create weak zones at the limb-handle junction. Solve this with bound fadeouts. Attach a 1-inch wide, 10 to 12-inch long reinforcing slat to the belly side, tapered at both ends. Add a fingertip overlay to the back of the handle to prevent hand digging and improve grip. Both methods are beginner-friendly and dramatically increase longevity.
Shape Critical Transition Zones
Focus on three key areas. First, ensure attachment angles align perfectly with the handle. Second, create gradual fade angles that taper from limb to grip for even flex. Third, contour the grip girth slightly for comfort, but avoid over-shaping early. Use a forward-grip style for better arrow alignment and control. Always sight down each limb to check for twist or tilt before final shaping.
Assemble with Precision
Warm components before gluing to open pores and improve adhesion. Use a handheld propane torch to briefly warm limbs and handle. Do not overheat. A few seconds per section is enough.
Apply glue in a U-shape pattern on the mating surface to ensure full contact without excess squeeze-out. Use even thumb pressure to form a thin, consistent joint. Work quickly, as heat speeds up cure time.
Assemble Limbs One at a Time
Warm one limb, apply glue, and lay across your lap. Warm the handle and apply glue to the mating surface. Align the limb to your marked position and press evenly. Hold for 20 to 30 seconds. Re-check alignment from multiple angles. Adjust only near the joint, never at the tip. Repeat for the second limb. If glue sets too fast, re-heat the joint to restore workability.
Wrap and Seal the Joints
Soak adhesive wrap briefly in room-temperature water for 1 to 2 seconds. You have 3 to 4 minutes to work before it hardens.
Start wrapping at the base with 2 to 4 wraps, overlapping by 1/4 to 1/2 inch (6 to 12 mm). Add 2 to 3 wraps at the center. Transition smoothly to the opposite limb. Finish 1/4 inch (6 mm) from the end. Smooth any bumps with a drop of water. Let cure for 20 minutes. Hang or lay on the side to avoid contact with the wrapped area.
After hardening, file high spots with a fine file. The goal is to eliminate string-catching edges. Perfection is not required. Function over form.
Tillering for Balanced Performance

Tiller is the difference in bend between upper and lower limbs. Target slight positive tiller, approximately +1/4 inch (upper limb bends slightly more). Negative tiller causes hand shock and inefficiency.
Tillering Step-by-Step
String the bow lightly. Use a tillering stick to draw incrementally. Observe bend symmetry. Remove small amounts of material from stiff sections, usually the belly. Re-measure after each adjustment.
For quick feedback, try knee-tillering. Place your knee at the limb center, grip the handle, and gently flex. Remove equal material from both limbs, counting strokes for consistency.
Check frequently during sanding. Every bit of material removed affects tiller. Stop often to recheck symmetry. Use progressive grits (80 to 120 to 220) and round sharp edges where back meets belly. A block sander provides control.
String and Test Safely
Make a proper bowstring using Dacron, FastFlight, or high-strength cord.
Twist 16 to 18 inches (40 to 45 cm) of one end. Place the loop in the seal groove below the heel. Tie an overhand knot under the heel so it lies flat. Trap excess and pull tight. Twist the rest in the opposite direction to cancel loop twist. Create a second loop approximately 6 inches (15 cm) from the first, insert, and tie. Do not tighten yet.
String using the step-through method. Place one limb over your shin. Center the handle on your thigh. Flex the string into the second groove.
Adjust brace height gradually. Start with a long string to allow tiller checks. Shorten by tying overhand knots that trap excess. Target 4.5 to 5 inches (11.4 to 12.7 cm), about fist-and-a-half height.
Exercise the limbs. Perform approximately 300 test draws before full use. This settles the materials, stabilizes the structure, and ensures consistent performance.
Finish and Protect the Bow
Apply traditional lacquer for maximum durability. Use Asian lacquer from Toxicodendron vernicifluum. Apply one coat and cure for 7 days in a humidity-controlled room. Repeat seven times (49 total days). The bow darkens over time, with full color achieved by week six. This finish is insect-repellent, moisture-resistant, and rot-proof.
If lacquer is unavailable, use polyurethane, tung oil, or marine varnish. These provide solid protection with easier application.
Sand smoothly and safely after finishing. Hand-sand to 220 grit. Focus on transitions and edges. Avoid aggressive shaping after final tiller, as small changes can ruin balance.
Evaluate Performance and Longevity
Bamboo offers excellent draw smoothness, high shot speed, and superior vibration damping. Compared to maple, bamboo delivers better performance-to-cost ratio, especially in Olympic-style recurves. It is more forgiving than maple and far cheaper than carbon-fiber.
Prevent splice failures. Never use laminated bamboo alone under tension. Reinforce with fiberglass or wood layers. Splice failures are the number one cause of catastrophic breakage.
Limit bamboo to 50% of the cross-section. Due to compression weakness, keep bamboo to 50% or less of limb thickness when used as a core. Balance with stronger compression materials like hardwood or fiberglass.
Maintain for Long-Term Use
Inspect joints and grooves regularly. Check seal wrap for cracking. Check string grooves for wear. Check handle bindings for looseness. Re-wrap or re-glue as needed. A well-maintained bow lasts over a decade.
Store unstrung in dry conditions. Always unstring the bow when not in use. Store in a temperature-stable, dry place. Avoid garages or attics with humidity swings.
Re-oil every 6 to 12 months. Apply tung oil or light varnish to wooden components to prevent drying and cracking, especially in dry climates.
Frequently Asked Questions About Bamboo Recurve Bows
What bamboo species work best for bow making?
Thick-walled species used in traditional Bhutanese, Korean, or Mongolian bowmaking perform best. Look for dense culms with walls around 1/8 inch (3 to 3.2 mm). Avoid soft or thin-walled varieties that lack the necessary stiffness.
How long does bamboo need to dry before making a bow?
Air-dry bamboo for a minimum of 12 months in a shaded, well-ventilated space. Target approximately 3% moisture content. Fresh bamboo starts at 12% or higher, and inadequate drying leads to tiller shift, permanent set, and increased failure risk.
Can I use bamboo as the only material in a recurve bow?
Yes, but with precautions. All-bamboo laminated recurves work well when properly constructed. However, limit bamboo to 50% or less of limb cross-section due to compression weakness. Reinforce with fiberglass or wood layers to prevent catastrophic splice failures.
What is the best construction method for beginners?
The Bhutanese-style bow is ideal for beginners. It uses two thick bamboo splints overlapped and lashed at the center. This method requires minimal tools and offers decent performance. It is perfect for youth programs, bushcraft builds, or anyone with limited workshop equipment.
How do I prevent the bow from breaking at the handle?
Prevent stress at the limb-handle junction by using bound fadeouts. Attach a 1-inch wide, 10 to 12-inch long reinforcing slat to the belly side, tapered at both ends. Add a fingertip overlay to the back of the handle. Both methods distribute stress gradually and dramatically increase longevity.
Key Takeaways for Building Your Bamboo Recurve Bow
Making a bamboo recurve bow is a craft of patience and precision. Follow the 12-month drying rule to ensure stable materials. Heat-treat only the belly side, never the back. Tillering with care produces balanced performance and prevents hand shock.
Start simple with Bhutanese or step-lap designs. These methods are forgiving and effective for first-time builders. As you gain skill, move to laminated or composite builds for higher performance.
With the right technique, your bamboo recurve will not just work. It will perform like a pro-grade bow, smooth, fast, and built to last over a decade with proper care.


