
How to Use a Bow and Arrow: Quick Steps
Learning how to use a bow and arrow is both a timeless skill and a rewarding modern pursuit that blends focus, precision, and physical awareness. Whether you’re interested in traditional archery, Olympic-style target shooting, or hunting with a compound bow, mastering the fundamentals ensures safety, consistency, and success from your very first shot. This guide walks you through every critical step, from selecting the right equipment to executing a clean release, with clear instructions based on proven techniques used by archers worldwide. You’ll learn proper stance, grip, draw, aim, and follow-through techniques while avoiding common mistakes that can hinder progress or lead to injury.
Choose the Right Bow Type for Your Skill Level
Selecting the correct bow sets the foundation for your entire archery journey. The two most common types serve different goals and experience levels.
Recurve Bow Basics
A recurve bow features limbs that curve away from the archer when unstrung, delivering more power in a compact design. It is mechanically simple, making it ideal for beginners who want to learn fundamental technique without added complexity. With no pulleys or cables, a recurve teaches pure strength and proper form. These bows are standard in Olympic competitions and widely used in target, field, and traditional archery. They are lightweight, easy to maintain, and often more affordable than compound models.
Compound Bow Advantages
Compound bows use a system of cams and cables to reduce the holding weight at full draw, known as let-off, typically ranging from 65 to 80 percent. This allows for longer aiming periods and improved accuracy, especially at longer distances. These bows generate higher arrow speeds and are preferred for hunting and precision shooting. However, they require more maintenance and have a steeper learning curve due to added components like sights, rests, and release aids.
Match Bow Specifications to Your Body Size
Using a bow that fits your physique ensures better control, accuracy, and comfort. Two key measurements determine proper fit.
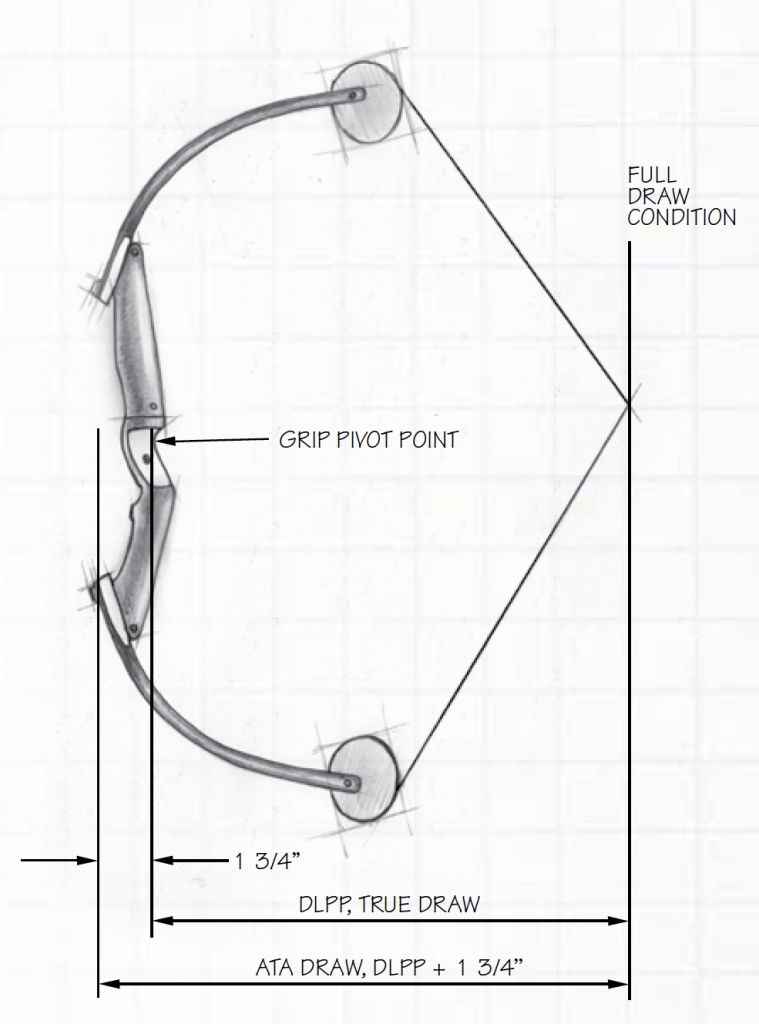
Determine Your Draw Length
Draw length is the distance from the arrow nock to your anchor point when fully drawn. To estimate it, divide your arm span in inches by 2.5. For example, if your arm span is 70 inches, your approximate draw length is 28 inches. An incorrect draw length causes poor form, inconsistency, and potential injury. Many compound bows offer adjustable draw lengths, while recurves may require selecting the right model size.
Select the Correct Draw Weight
Draw weight refers to the pounds of force needed to pull the string back to full draw. Beginners should start light to focus on technique rather than raw power.
Adults should begin with 20 to 30 pounds. Youth or smaller-framed archers should start with 10 to 20 pounds. Using too heavy a draw weight leads to fatigue, shaky aim, and compromised form. As your strength and technique improve, increase the weight gradually by 2 to 5 pounds at a time.
Wear Essential Safety Gear Every Time You Shoot

Archery is safe when practiced correctly, but protective gear prevents avoidable injuries and builds confidence.
Use an Armguard
An armguard protects your bow-holding forearm from string slap, a painful sting caused when the string strikes your skin upon release. Wear it on the inside of your forearm, the side facing the bowstring. Left-handed shooters hold the bow in their right hand, so they wear the armguard on the right forearm. Even experienced archers use armguards, and beginners should never shoot without one.
Protect Your Fingers
Shooting without finger protection causes blisters, calluses, and pain. Use one of these options.
A shooting tab is a small leather or synthetic pad that shields your fingertips and allows precise string contact and clean release. Finger gloves are three-finger gloves with reinforced tips, preferred in cold weather or by archers who prefer full-hand coverage. Never use bare fingers long-term, as proper protection ensures comfort and consistency.
Never Dry Fire Your Bow
Dry firing means releasing the string without an arrow nocked, and it is extremely dangerous. The stored energy has nowhere to go and rebounds into the limbs, risking catastrophic damage like cracked limbs, broken cams, or exploded strings. This can result in serious injury to you or bystanders. Always double-check that an arrow is properly nocked before drawing. If you suspect a dry fire occurred, inspect the bow thoroughly before using it again.
Nock the Arrow Correctly for Safe Launch
Proper arrow placement ensures consistent flight and prevents equipment damage.
Attach Arrow to String
Clip the nock, the plastic tip at the rear of the arrow, onto the bowstring just below the nocking point, marked by a brass or metal bead. You should hear a soft snap when it is secure. The arrow must stay in place during the draw without wobbling or detaching.
Orient the Cock Feather
Arrows have three fletchings, and one is a different color. This is the cock feather or index vane. On most recurve bows with a shelf, this feather must face outward, away from the bow. This prevents it from scraping the riser during release. For compound bows with a whisker biscuit or drop-away rest, orientation is less critical but still recommended for consistency.
Check Arrow Rest Position
Ensure the arrow rests flat on the bow’s rest or shelf. It should not tilt up, down, or sideways. On compound bows, verify that the rest is functioning properly, fully raised before shooting and dropping away cleanly after release.
Adopt a Stable Shooting Stance
Your stance provides balance and repeatability, forming the base of your entire shooting platform.
Position Your Feet
Stand with your feet shoulder-width apart, perpendicular to the target line. For right-handed shooters, your left foot should be forward. For left-handed shooters, the right foot leads. Distribute your weight evenly across both feet. Avoid leaning forward or backward. Stay centered and balanced throughout the shot.
Maintain Proper Posture
Keep your spine straight, chest open, and shoulders relaxed. Slight knee flex helps absorb tension and improves stability. Keep your head upright and eyes on the target throughout the shot. This posture supports consistent alignment and reduces fatigue during extended practice sessions.
Grip the Bow Without Introducing Torque
How you hold the bow directly affects accuracy. A poor grip introduces rotational force, causing the bow to twist and arrows to veer off course.
Use a Relaxed Hand Position
Hold the bow handle with the webbing between your thumb and index finger, not wrapped tightly around the riser. Your fingers should rest lightly on the grip, almost as if the bow is balancing itself. A death grip creates hand tension and rotational force, leading to inconsistent shots.
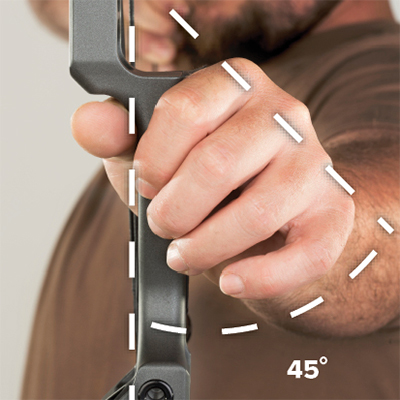
Align Your Bow Arm Elbow
Rotate your bow arm elbow slightly outward, about 15 to 30 degrees. This aligns your forearm in a straight line with the arrow’s path, reducing the chance of string slap and protecting your inner forearm. It also helps transfer energy efficiently through the shot.
Draw Using Back Muscles for Better Control
Power should come from your large back muscles, not your arms. Using back muscles improves control and consistency.
Initiate the Draw
Start with both arms raised, then draw the string smoothly using your back muscles, specifically the rhomboids and latissimus dorsi. Avoid pulling with your biceps or forearm. A coordinated motion keeps your form stable and reduces strain.
Use Correct Finger Placement
For recurve bows, use the three-finger draw with the index finger above the arrow and the middle and ring fingers below. The string rests on the first knuckle pads. For compound bows, most archers use a mechanical release aid attached to the wrist and string. This provides a crisp, consistent release and reduces finger fatigue.
Maintain Smooth Motion
Draw steadily without jerking or pausing mid-draw. Keep your head upright and eyes on the target. Avoid raising your shoulders. Keep them down and relaxed to prevent tension buildup.
Anchor at a Consistent Point for Accuracy
Anchoring means touching your drawing hand to the same facial point every time. This ensures repeatable draw length and alignment.
Find Your Anchor Point
Common anchor points include the following.
For recurve bows, the index finger touches the corner of the mouth and knuckles align with the jawline. For compound bows, the draw hand touches the jawbone, behind the earlobe, or under the chin. Mechanical release users often feel the strap or string against a consistent spot. Peep sights must align with the front sight housing when anchored.
Why Consistency Matters
Even a one-quarter-inch variation in anchor can cause significant misses at 20 or more yards. Pulling too low causes the arrow to fly high. Pulling too high causes the arrow to fly low. Practice dry firing without an arrow to build muscle memory. Film yourself or use a mirror to verify consistency.
Aim Using the Right Method for Your Bow
Aiming style depends on your bow type and experience level.
Try Instinctive Aiming
Used with traditional and recurve bows, instinctive aiming relies on subconscious alignment, similar to throwing a ball. Focus entirely on the target, not the arrow or sight. Your body naturally adjusts with repetition. This method works best for close-range shooting and beginners building feel.
Learn Gap Shooting
Gap shooting uses the space between the arrow tip and target to estimate distance. At 20 yards, aim 6 inches below center. At 30 yards, aim 12 inches below center. You memorize these gaps through practice. This method is useful when no sight is available, such as in traditional or survival archery.
Use Pin Sights on Compound Bows
Compound bows typically have a multi-pin sight with adjustable pins for various distances. Align the appropriate pin with the target. Some archers use a single movable pin that slides up and down.
Align the Peep Sight
A small hole on the string acts as a rear sight. Look through it to center the front sight housing and pin. This creates a tunnel-like view for precision. The peep sight must be aligned during bow setup.
Release and Follow Through Smoothly
The release determines arrow flight. A flawed release ruins an otherwise perfect shot.
Execute a Clean Finger Release
For finger shooters, let your fingers relax open. Do not pluck or snap the string. Allow the string to slip off naturally due to back tension. Keep the string resting lightly on the first knuckle. A good release feels like the string disappears.
Use a Smooth Trigger Squeeze
With a mechanical release, squeeze the trigger gradually. Do not jerk it. High-quality releases offer a crisp, predictable break. Your hand should move straight back into the shoulder.
Complete the Follow-Through
After release, keep your bow arm extended forward. Let your drawing hand continue back to your shoulder. Right-handed shooters should have the right thumb brush the right shoulder. A classic drill involves trying to knock a dime off your shoulder with your thumb. This ensures full extension and consistency. Do not drop the bow arm or pull the hand down immediately, as this disrupts arrow flight.
Control Breathing and Maintain Focus
Physical and mental discipline are key to consistent shooting.
Breathe Naturally
Inhale during setup and draw. Exhale slowly during aiming. Release between breaths, just before inhaling again. Never hold your breath, as this causes shaking and oxygen loss.
Stay Mentally Focused
Eliminate distractions and visualize the arrow hitting the target. Use a consistent pre-shot routine to build rhythm and confidence. Beginners often flinch or rush the shot due to fear. Combat this by starting very close to the target, 3 to 4 yards, and using balloon targets for low-pressure practice.
Fix Common Form Errors Quickly
Even experienced archers develop bad habits. Recognizing and correcting them improves accuracy fast.
Arrows Falling Off Shelf
This is caused by gripping the string too tightly, the nock not snapping securely, or the bow not being slightly tilted. Fix this by relaxing your fingers, ensuring secure nock fit, and tilting the bow 5 to 10 degrees so gravity holds the arrow in place.
String Slap on Forearm
This is caused by missing an armguard or the bow arm elbow not rotated outward. Fix this by wearing an armguard and rotating the elbow 15 to 30 degrees outward.
Inconsistent Groupings
This is caused by a shifting anchor point, flinching, or a poor release. Fix this by practicing dry fire, using video feedback, and focusing on consistent anchor and follow-through.
Arrows Flying High or Low
High impacts mean the anchor point is too low. Low impacts mean the anchor is too high. Adjust your hand position and verify form with a coach or mirror.
Train Smart and Progress Safely
Skill builds through structured, mindful practice, not just repetition.
Start with a Light Bow
Begin with a 20 to 25 pound draw weight to focus on form without strain. Master technique before increasing power.
Practice Dry Firing
Dry fire without an arrow to rehearse the draw, anchor, release, and follow-through. This builds muscle memory and endurance without wear on equipment.
Begin Close, Then Extend Distance
Start shooting at 3 to 4 yards into soft targets like foam, hay bales, or balloons. Focus on clean execution, not accuracy. Only increase distance once you achieve consistent groupings.
Add Skill-Building Drills
Wall holds involve drawing and holding at anchor for 10 to 20 seconds to build strength. Blank bale shooting means firing into a featureless target to refine form. The ten-ends routine involves shooting sets of 10 arrows with full focus on each step. Video analysis helps record shots to spot subtle flaws.
Follow Critical Safety Rules at All Times
Archery is safe when rules are respected. Breaking them risks injury.
Always Wear Protection
An armguard and finger tab or glove are non-negotiable. They prevent injury and build confidence.
Inspect Equipment Regularly
Before every session, check the string for frays, examine limbs for cracks, verify nocks are intact, and inspect arrows for bends or damage.
Use Appropriate Backstops
Always shoot into a safe backstop like straw bales, foam blocks, or a dedicated archery net. Never shoot at hard surfaces like concrete or rock, and never shoot into the ground, as arrows can ricochet.
Respect Range Etiquette
Only shoot when the range is clear. Retrieve arrows only when all bows are lowered. Follow commands like clear to shoot and cease fire. Store recurve and longbows unstrung when not in use, but not compound bows.
Frequently Asked Questions About Using a Bow and Arrow
What is the best bow for a beginner?
A recurve bow is best for most beginners. It is mechanically simple, teaches fundamental technique, and is more affordable than compound bows. Many beginners also find recurves easier to handle and maintain as they learn proper form.
How long does it take to learn archery basics?
Most beginners can learn basic form and shoot consistently within a few practice sessions, typically 1 to 2 weeks with regular practice. Achieving consistent accuracy takes several months of dedicated practice.
Is archery dangerous?
Archery is very safe when proper precautions are followed. Always wear an armguard and finger protection, never dry fire, use appropriate backstops, and inspect equipment before each session. Following these rules makes archery one of the safer outdoor activities.
What is the proper draw weight for a beginner adult?
Adult beginners should start with 20 to 30 pounds. Starting lighter allows you to focus on form and technique without struggling against the bow’s weight. You can gradually increase by 2 to 5 pounds as your strength improves.
Do I need special arrows for my bow?
Yes, arrows must match your bow’s draw weight and your draw length. Arrows that are too light can damage your bow, while arrows that are too heavy fly poorly. Visit an archery shop to get properly fitted arrows.
Can I teach myself archery?
Yes, many archers self-teach using online resources and practice. However, working with a certified instructor or joining a club accelerates learning and helps prevent developing bad habits that are difficult to correct later.
Key Takeaways for Learning to Use a Bow and Arrow
Mastering how to use a bow and arrow is about more than hitting a target. It requires developing proper movement, mindset, and mechanics. Start with safety and form, not distance or power. Choose a recurve bow if you are new to archery, and match the bow’s draw length and weight to your body. Always wear an armguard and finger protection, and never dry fire your bow. Practice the fundamentals: stable stance, relaxed grip, back-driven draw, consistent anchor, smooth release, and full follow-through. Begin close to the target and progress gradually. With patience and deliberate practice, you will build the muscle memory and confidence that define skilled archery. Whether for sport, tradition, or personal growth, every great shot begins with the fundamentals covered in this guide. Happy shooting.


